
BLOG ARCHIVE

Rooftop Reflections | Weekly Photo #30
Captured on a very wet and windy day in London during a photo walk with a couple of fellow togs, I took this photo of 20 Fenchurch Street while photographing the city from the Garden at 120 rooftop terrace.
A few weeks ago, I met up with a couple of fellow photographers and together we headed into London to photograph a very wet, windy city. We arranged the meet up a week or two beforehand but as the day drew closer, it became increasingly apparent that the weather wasn’t going to be great and we would be shooting in the rain for the entire day.

Fujifilm XT2 | XF16mm F2.8 | 16mm | 1/13th Second | f/2.8 | ISO200
“Life isn’t about waiting for the storm to pass. It’s about learning how to dance in the rain.”
We decided to focus on photographing in and around The Square Mile which hosts some of the tallest building in London and although the weather was pretty bad, we decided resist taking the easier option of rearranging the shoot and press ahead and see what we could capture regardless of the conditions. There was no chance of being gifted epic light or a dramatic sunset but I knew that the rain can bring another dimension to photographing London by adding puddles and wet surfaces that can result in capturing a different kind of light along with some fantastic reflections.
Learning the hard way from a previous rainy trip to London, I made sure I had my weather sealed Fujifilm XT2 camera with me and that combined with the XF16mm F2.8 prime WR lens, I had a fully weather-resistant system which allowed me to keep shooting as the rain continued to fall.
As we explored the city, we decided to pop up to the Garden at 120 which is a rooftop terrace 15 floors up, nestled amongst the city’s high-rise buildings providing some cool views of the city and with the weather still pretty miserable and without any shelter whatsoever, we had the entire place to ourselves. I reckon the Security Guards thought we were a bit crackers as the rain was beating down on us while we took photos but we persevered and it’s here that I captured this shot of 20 Fenchurch Street, AKA The “Walkie Talkie” building.
Apart from the obviously cool reflections provided by the wet floor in the foreground, I like how the lines on both sides of the frame lead the eye towards the main focal point with the wall on the right being the stronger element helping to balance the composition against the building on the left. Colour-wise, I tweaked the tones a little in Lightroom by dialling back the saturation and adding some contrast. Although a little muted, these grey/blue and orange colours are considered complimentary according to the colour science people as they are opposite each other on the colour wheel. I won’t go into colour science in detail here but you can check out this link to a post over at 500px if you want to read more about it.
I had a really good day with my fellow togs, Andrew and Julian and even though the weather was so poor, I managed to grab a few ok shots like this one throughout the day. It certainly helps to be reminded on occasion to resist the easy option and head out into the rain and just see what you might get. What’s the worst that can happen? You scout locations and get a bit wet?
Cheers
Trevor
This post is featured in my Weekly Photo series where I post a new photo every Monday. To have this delivered directly to your inbox, you can subscribe to the mailing list here.

Christmas in London | Weekly Photo #29
Being the last post before Christmas, I thought to keep this article “on-trend” and festive. I wanted to use a fresh, new photo of the Christmas Lights in London to round off the year so a few days ago, I headed into London before sunrise to see what I could capture.
Being the last post before Christmas, I decided to keep this article “on-trend” and festive. I wanted to use a fresh, new photo of the Christmas Lights in London to round off the year so a few days ago, I headed into London before sunrise to see what I could capture.

Fujifilm XT2 | XF10-24mm | 10mm | 3.5 Seconds | f/9 | ISO200
With only limited time, I wanted to head to somewhere I knew there was a high probability of getting a shot and although ordinarily, this might mean heading to the likes of Carnaby Street to capture this year’s display, at around 0730 in the morning this would mean the road would have been full of delivery trucks so I knew that area would be no good to me.
I decided to head to Covent Garden as they put up a very tall tree every year and I knew it would be quiet this time of day. Even though it was quiet, delivery trucks are about but with more space to shoot, they are a little easier to avoid. After wandering about for a while trying out different angles and with the blue hour fast approaching, I settled on this central composition, subtly framed either side to allow the large, bright Christmas Tree to stand tall and proud leaving no doubt as to what the main subject is. I love the cobbled road here at Covent Garden and having rained not long before I arrived, they were wet and shiny which helped me get these great reflections.
I had with me the Fujifilm XT2 camera and on it, the 10-24mm lens. This wide-angle lens was perfect to capture the tree and equally important the surrounding area. I want the story of this image to be about Christmas in London, not just a Christmas tree. To do this, I had to shoot wide and expose the photo to ensure the background was exposed correctly and anyone that knows Covent Garden will know this is a photo of London at Christmas.
Back home, I imported the photo into Lightroom and went about making small adjustments to the white balance, colour tones and corrected a little distortion to straighten up the verticals. I then dodged and burned a few key areas to emphasise lights and reflections before sharpening in Photoshop resulting in the final image you can see here.
That’s a wrap! I want to wish all of the readers of my blog a very, merry Christmas and happy and prosperous 2020.
Until next time,
Trevor
This post is featured in my Weekly Photo series where I post a new photo every Monday. To have this delivered directly to your inbox, you can subscribe to the mailing list here.

The Glass Canal | Weekly Photo #28
This week I present an ultra-long exposure of 8 minutes taken from the Ponte dell’Accademia bridge during an early morning sunrise in Venice.
“Venice is the exemplar of human wit and ingenuity. Despair of man and go to Venice: you will cease to despair. If human beings can build a city like this, their souls deserved to be saved.”
Like many photographers, I love to take photos of Venice. It has everything I like from charming streets and intimate canals to grand, cityscape vistas that will take your breath away. This picturesque city has an abundance of rustic splendour and oozes history throughout.

Fujifilm X-T10 | XF18-55mm | 18mm | 480 Seconds | f/8 | ISO200
During a previous trip to Venice in 2017, I decided to venture out before sunrise to capture the city as it sleeps. As an urban landscape photographer, whatever city you happen to be in, there is no better time to capture it than at sunrise. This is the time where you can have the place to yourself and capture the landscape in a way not normally experienced by most other people.
If there was one shot I just had to capture during my stay it was this composition below looking down the Grand Canal towards the Basilica di Santa Maria della Salute in the distance. The light wasn't as epic as I hoped but if I was going to capture a long exposure, this had to be it.
Upon the Ponte dell’Accademia Bridge, I set my camera onto the tripod, composed, focused and then mounted my filter. You can see the settings I used directly under the image above. I also have an easy 10-step process to taking long exposure photos which is available to download by subscribing to my newsletter. Having already taken a test shot without the filter, with the light levels as they were, the resulting exposure was an impressive 8 minutes. So, with the remote cable release connected, I went about taking the shot.
What I really like about this image is I had one chance to capture it while there was some light in the sky. The eight-minute exposure makes the water almost mirror-like with a touch of etherealism and the resulting image is a clean crisp shot ensuring the sweeping curve of the water leads the eye to the main focus being the architecture and Basilica.
Back in Lightroom, I had to deal with one of the downsides of such a long exposure and that was the many hot pixels across the image. These are areas of electrical discharge created by the sensor getting hot whiles taking the long exposure. Noticeable in the shadows, I had to endure the tedious process of cloning out the hundreds of small red dots from the darker parts of the image.
If you’re interested, I wrote a two-part travel blog about my trip to Venice which is filled with photos and information about the many places I visited.
Until next time.
Trevor
This post is featured in my Weekly Photo series where I post a new photo every Monday. To have this delivered directly to your inbox, you can subscribe to the mailing list here.

Peaceful City | Weekly Photo #27
Taken while on an early morning walk in the city, I was struck by how peaceful this scene looked and loved the silhouettes of the buildings over on the Isle of Dogs. In this post, I talk through my thoughts on the composition and editing process.
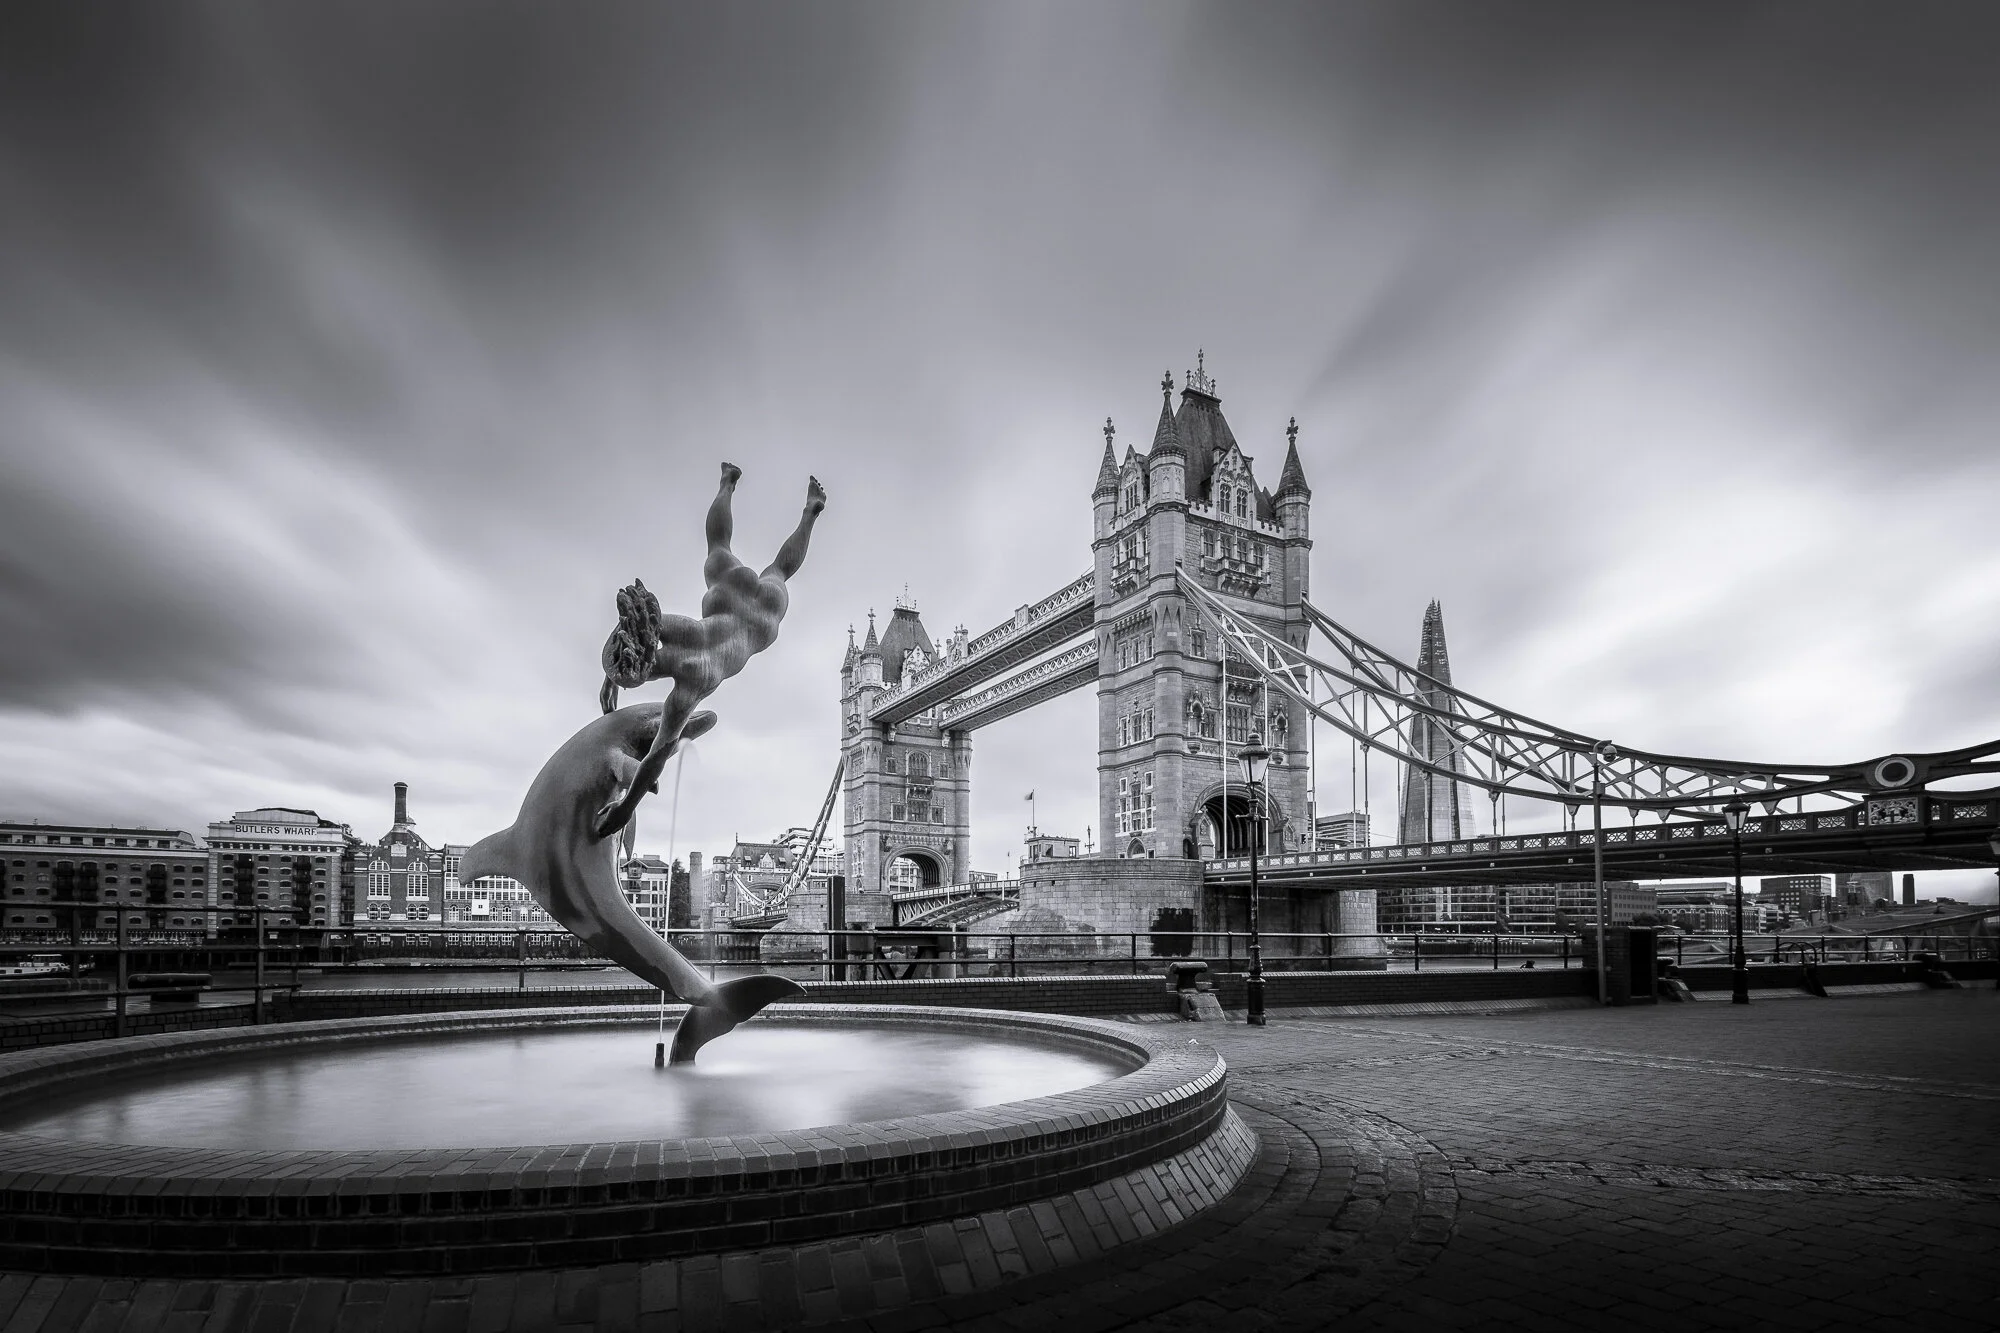
This is the view that presented itself to me, one morning in late December as I crossed London’s Tower Bridge. I was on a sunrise walk in the city during that funny time between Christmas and New Year where most people are at home and the city has a quiet, more subdued feel about it so I decided to try to capture some of that feeling tranquillity in my photos.

Fujifilm X-T10 | XF18-55mm | 39mm | 58 Seconds | f/13 | ISO200
What captured my attention when looking across East London was how calm and still, the city looked. There were some subtle pastel colours in the sky as the sun started to make an appearance and that coupled with a slight mist in the air was all I needed to set the camera down and try to capture the scene in front of me. While setting up, I decided I would try the image as a long-exposure to help soften the scene a little more by removing the ripples in the water and make the clouds a bit wispier. I ended up going with a 58-second exposure but with the light increasing fast, I had to close down the aperture to f/13, reducing the light enough to achieve such a long exposure.
I deliberately composed the shot so that the River Thames swept around the right-hand side of the image and flanked St. Katherine Docks that lined the river in the foreground but with the darker heavier buildings all on the left-hand side, I had to make sure I included the clouds on the top right of the frame to help add some much-needed balance. Although only subtle, I think the clouds do just enough to save the entire shot as, without them, it just wouldn’t work at all. In addition, I decided to emphasise the high-rise buildings in the background over on the Isle of Dogs so instead of going wide which may be the more obvious choice, I used a focal length of 39mm to help bring the buildings a little forward in the frame.
When I initially edited the image, I brought way too much colour back in and the image was bright orange and way too garish. After sitting on the image for some time, I decided to pull the colour right back to these subtle pastel tones all helping to communicate the peaceful feeling I experienced on that particular morning. If you edit your photos and sometimes wonder if you have over-edited an image, just stop and let the image sit there for a while. Be it days, weeks or for some, even months, if you are still happy after living with it all that time, then you know it’s a keeper!
Chat to you soon.
Trevor
This post is featured in my Weekly Photo series where I post a new photo every Monday. To have this delivered directly to your inbox, you can subscribe to the mailing list here.

South Bank | Weekly Photo #26
This week’s photo is a classic looking scene taken along London’s South Bank. In the article, I talk about how I considered the focal length carefully to ensure the resulting image had the best balance between the foreground, middle and background elements providing me with the best composition possible.
I love the “old-worldly London” feeling I get from this particular view along the South Bank. In particular, the peaceful, sweeping path lit by ornate street lamps and the dome of St Paul’s Cathedral nestled nicely in the background. The dome really does give the image that classic London look.

Fujifilm XT2 | XF55-200mm | 55mm | 2.6 Seconds | f/11 | ISO200
“To lose patience is to lose the battle.” - Mahatma Gandhi
Those that follow my work will know that although I have been including the occasional person in some of my street work lately, I still prefer a cityscape image free of people to help simplify and declutter the London skyline as much as possible and people tend to be “easier” to remove using techniques such as long exposure photography or merging multiple exposures later in Photoshop. That being said, it can at times be rather tricky to remove people, especially when you happen to be shooting one of the busiest spots along the river and unless you arrive in the early hours of the morning, you will seldom be on your own here which is why capturing this photo needed quite a bit of patience. I was stood in this particular spot waiting for a big enough gap in the foot traffic for about 30 minutes before I got the clean composition I was hoping for.
On this particular evening way back in 2018, I was out shooting with my recently purchased Fujifilm XF55-200mm lens which I was using to take a panoramic image from Waterloo Bridge. Using a tripod isn’t really allowed along this stretch of the river so being a little cheeky, I set my Fuji XT2 onto the tripod which was parked next to a tree in a bid to keep it well out of the way of passing foot traffic. Thankfully I wasn’t approached while stood there.
How I chose the correct focal length when taking this photo
In my opinion, this image works better if taken with a medium focal length of around 40-60mm so it was a perfect time to have the new lens with me. Taken wider (zoomed out) you can include more of the scene which isn’t always a good thing as it can result in a more cluttered image with no clear focal point. Additionally, the wider you go, the more the background gets thrown much further back and rendered less significant and in a scene like this, the mid and background elements are critical to the composition.
On the flip side, too much focal length (zoomed right in) will prevent the inclusion of key elements such as St Paul’s dome or the trees on the right that act as a compositional frame helping to keep the attention on the main focal points such as the aforementioned dome. As you can see from the settings I used that are listed underneath the image, on this occasion, I stuck with 55mm which, in my opinion, worked best for this shot.
It pays to consider your focal length carefully. Play around with different settings while out in the field and check your framing carefully as this may be the difference between a snapshot you discard and a keeper.
Coming up I have a couple of “On Location” posts where I use just a single lens from the Fuji prime line up for the entire shoot to help me work on my composition and put the lenses through their paces. I will be sharing these posts over the next few weeks so keep an eye out for those.
Talk to you soon.
Trevor
This post is featured in my Weekly Photo series where I post a new photo every Monday. To have this delivered directly to your inbox, you can subscribe to the mailing list here.

Skeletal Remains | Weekly Photo #25
During a walk along Brighton Beach with my family on a warm, summer’s evening, I decided to stop and take advantage of some glorious light by taking a photo of the West Pier remains.
I find the skeletal remains of the West Pier in Brighton fascinating to photograph? I enjoy taking these central, minimalist photos of what’s left of this once grand Victorian structure which played such a significant role in the history of Brighton’s beach-front down in England’s South East. It’s not the most original composition of this structure but there’s a reason why the pier has been photographed a million times from this spot.

Fujifilm XT2 | XF18-55mm | 18mm | 1/5th Second | f/9 | ISO200
In a previous Weekly Photo post, I shared a black and white, long-exposure image of this very pier which you can find here. In the post, I talked about capturing the same composition on a pretty uninspiring cloudy day and using a black and white film simulation to help me visualise the image as I took it.
I took this week’s photo during a warm summer’s evening as my family and I walked down on the beachfront eating fish and chips for dinner. I had the camera with me to capture a few sunset shots of the family. As we walked back to the car I spotted these post-sunset pastel colours that started to appear in the sky I decided to take advantage of the light on offer.
As my family continued towards the car, I stopped and set my tripod up directly in front of the West Pier as close to the water as I could but just far enough away to avoid getting wet feet. I mounted my Fuji XT2 and trust 18-55mm lens on the tripod and went about composing the image being careful to get the structure dead-centre. Without having filters with me, a long exposure image wasn’t an option but with the sea being a little choppy, I was drawn to capturing a some of the movement and energy I could feel as I stood there taking it all in. I kept my aperture at around f/9 which, at ISO200, gave me a 1/5th second exposure resulting in an image with just the right amount of movement and texture in the water whilst retaining those subtle pinks in the sky.
Back in Lightroom, I tried to emphasise the white, frothy water to highlight the movement and add some interest so I subtly brightened the frothy parts of the water using local adjustments. Other than that, I adjusted the HSL sliders to get the tones I wanted and added a bit of contrast to the pier to make the architecture stand out a bit more.
I still have a long exposure photo of the pier in mind which I’ve been trying to get for a while now which requires a low tide and the clouds moving in the right direction. I’m still chasing that one so I’m sure I will be back again soon enough.
Thanks for stopping by.
Trevor
This post is featured in my Weekly Photo series where I post a new photo every Monday. To have this delivered directly to your inbox, you can subscribe to the mailing list here.

Western Towers | Weekly Photo #24
A few weeks ago, I shared a photo that I took of the City of London taken from the very top of St. Paul’s Cathedral’s dome. After taking another trip to this London icon, I focused my attention on a forward-facing composition of the Western Towers which I have wanted to capture for quite some time.
A few weeks ago, I shared a photo that I took of the City of London taken from the very top of St. Paul’s Cathedral’s Dome which you can read about here. After taking another trip to this London icon, this time around, I focused my attention on a forward-facing composition of the Western Towers which I have wanted to capture for quite some time.

Fujifilm X-T30 | XF10-24mm | 10mm | 1/8 Second | f/8 | ISO160
Photographing St. Paul’s Cathedral
Being a warm evening in August, I once again took advantage of the Thursday late opening times and got to the cathedral for 7pm. As the doors opened, I had to dart to the spiral stairs and climb up to the Stone Gallery so I could get this central position first and bunker in ready for sunset.
There isn’t a huge amount of space to shoot between the pillars in the wall that surrounds the Stone Gallery and knowing I wanted to shoot as wide as possible, I just managed to squeeze my small Manfrotto PIXI tripod through the gap with my conveniently compact Fuji X-T30 camera. If ever there was a time I was thankful for moving to a smaller camera system, it was then.
I carefully composed the image to ensure the towers were symmetrical and using my remote cable release, began shooting. I wanted to find the right balance between the ambient and city lights to add just a little more interest throughout the image.
Like many cityscape images I take of London, I don’t think I am finished with this one yet. As winter kicks in, I plan to revisit the cathedral a few more times to capture this iconic location as the light changes throughout the year.
Until next time
Trevor
This post is featured in my Weekly Photo series where I post a new photo every Monday. To have this delivered directly to your inbox, you can subscribe to the mailing list here.

City of Gold | Weekly Photo #23
For this week’s photo, I visited the relatively new Garden at 120 in London and caught an epic sunset across West London. I also provide a couple of tips to capture a clean, sharp photo through a glass window.
I enjoy taking photos from this rooftop location along London’s Fenchurch Street. It’s called the Garden at 120 which opened at the beginning of 2019 and it is free to visit with no booking needed. As you can see here, it’s in a great position to capture an epic sunset across West London which I was fortunate to photograph a few months ago on a nice, warm summers evening in the city.

Fujifilm XT2 | XF18-55mm | 30mm | 1/120th Second | f/3.6 | ISO200
Like most rooftop locations in London, one thing you will have to contend with is shooting through the glass. Being relatively new, the glass isn’t too dirty yet but to get the best, cleanest photos possible there are a couple of things you can do to eliminate the dirt and reflections when photographing through glass.
I briefly touched on the subject of shooting through glass windows on a previous weekly photo post when I took an early morning shot of Canary Wharf from the Sky Garden which you can read here: Weekly Photo 13 | London In The Mist but simply put, if you do the following 2 things, it will help you get the best results:
Use a wide aperture. f/4 or below should do the trick but the lower the better. This will render the closest subjects to the camera out of focus and ensure the final image is clean of the grime from the window.
Use a lens hood. You can pick these up for under £10 on eBay and they fit around the end of your lens. When pressed up against the glass they cut out the light from around the camera which will remove reflections from the final shot.
I used both of the above techniques when I took the photo above and one of the more refreshing things about shooting up on this terrace is that they allow tripods. As long as you keep out of the way, they really don’t mind so even when the light drops, you can still capture some nice sharp photos of the city.
For post-processing, I started in Lightroom. I brought down the highlights and brought up the shadows. I added some split toning to emphasise the golds and blues in the shadows and then took it into Photoshop to sharpen and remove a few distractions on the horizon.
I’m really pleased how this came out, particularly as the dynamic range was really high but the trusty Fujifilm dealt with it and all the detail in the shadows was there to recover.
Speak to you soon.
Trevor
This post is featured in my Weekly Photo series where I post a new photo every Monday. To have this delivered directly to your inbox, you can subscribe to the mailing list here.

A Blue Hour In Ghent | Weekly Photo #22
This week’s photo is a blue hour image shot from Saint Michaels Bridge during the blue hour in Ghent, Belgium.
St. Michael’s Bridge is considered one of the most romantic spots in Ghent. It’s a beautiful setting by the river with cobbled streets and has some great views of the surrounding architecture and majestic churches.

Fujifilm XT2 | XF18-55mm | 18mm | 2.6 Seconds | f/11 | ISO200
I consider Ghent, one of Europe’s biggest secrets as it doesn’t seem to be as well-known as its smaller cousin, Bruges but in my opinion, this city in Belgium is definitely well worth a visit. I have already written my travel blog covering this trip where you can learn all about some of Ghent’s most popular places. You can find the article here: On-Location Photographing Ghent.
Photographing Ghent during the Blue Hour
Although this trip to Ghent was a family city-break, I still made a point of getting some sunrise cityscapes in by heading out early on my own to try to photograph the city while it looks its best with fewer people and good light. It gives me a few hours on my own to explore the deserted city, photograph away and have the best compositions to myself. I can then head back to the hotel and meet my family for breakfast so we can carry on with our day together.
Before I visited Ghent, I researched the city for photo ideas and had spotted a composition similar to this looking across at Saint Nicholas' Church so when I arrived in the city, this is the first place I went. Upon arrival, the way the streetlights lined the bridge caught my eye so I knew I would feature them but it was still pretty dark so I went about preparing for the shot while I waited for it to get a bit lighter. I wanted the cobbled street and streetlamps to lead the eye up, into the frame towards the church which would act as my main focal point.
Once composed, I adjusted my aperture to get enough depth of field which also helped me capture those cool starbursts created by the streetlamps and once the blue hour had kicked in I went about capturing the photo.
Happy I had the photo in the bag, I went on my way to capture a few more photos during this little bit of “me time” I had. I was lucky enough to take a few good photos during this early morning session so I plan to write my last post about my trip to Ghent covering the entire session and showcasing the photos I took, so look out for that article in the future.
Once all of the best light was gone, that was my cue to leave and meet my family for breakfast at the hotel.
Until next time.
This post is featured in my Weekly Photo series where I post a new photo every Monday. To have this delivered directly to your inbox, you can subscribe to the mailing list here.
Deserted City | Weekly Photo #21
This week’s photo is a black-and-white, long exposure photo made up of several photos taken at different times blended together to remove the many people that visit this popular viewpoint. In this post, I walk through the process I followed to create this photo.
This week’s photo was taken at the same time I took Weekly Photo #9 while at St Katharine Docks. In that post, I talked about my decision to venture out with my new Fujifilm X-T30 even though the weather was pretty miserable and taking a great long exposure black and white image. This time, I want to share with you a pretty easy photoshop technique to capture busy locations whilst removing all of the people in the photo.

Fujifilm X-T30 | XF10-24mm | 10mm | 8 Seconds | f/9 | ISO160
As it was a dull cloudy day I decided to create a high-contrast, black and white long exposure photo of this great view of Tower Bridge. The idea was to have the movement in the clouds provide some nice framing of the architecture which was only possible as they were moving towards me. If the clouds were moving in any other direction, the composition just wouldn’t work.
Although it was a cloudy day, the light levels were still quite good so even with the Formatt Hitech 10-stop ND filter attached to my XF10-24mm lens, the exposure time was only 8 seconds. Normally this wouldn’t be long enough to capture a good amount of motion blur in the clouds but on this particular day, they were moving pretty fast and even with an 8-second exposure, I captured plenty of movement in the clouds and this meant I didn’t have to close the aperture down too much to reduce the light hitting the sensor which would have also affected the overall quality of the image.
How to remove people from your photos
Although it was a pretty miserable day, this is still a popular location so unless you arrive very early in the morning, you will always have people wandering into your shot. Normally I would have a long enough exposure to blur most of the movement out but on this day, I had an 8-second exposure which meant I still had people showing up in the photo. So, to fix the issue, I decided to take multiple exposures that I could merge in post-production later.
Being careful to keep the camera in the same place, I took one exposure for the sky and over a period of time, a few different exposures of the foreground to ensure I had the entire scene void of people across all of the exposures. The important thing to remember here is that the people do eventually have to move so you don't capture people in the same position across the entire series. otherwise there will be no way to mask them out using this technique.
Here’s how I created the final image:
I edited the first image in Adobe Lightroom.
I then synchronised the edits across all copies of the image to keep the look consistent throughout.
I exported all photos as layers into Photoshop.
I highlighted all layers and selected Auto-align Layers from the Edit menu.
I added a layer mask to all layers and went about masking out the people in each layer to reveal a person behind without the person in.
I may well release a more detailed article with video or screenshots demonstrating how I put this image together. Please do leave a comment if that’s something you might want to see.
Until next time
Trevor
This post is featured in my Weekly Photo series where I post a new photo every Monday. To have this delivered directly to your inbox, you can subscribe to the mailing list here.

Venetian Nights | Weekly Photo #20
After just arriving in this great city and armed with my Fujifilm XT2 and a small tabletop tripod, I captured this photo of the Grand Canal while out on a stroll through Venice at night.
As charming as Venice is during the day, it takes on a whole new identity at night. There are fewer people on the island in the evening as most tourists are either day-trippers or stay elsewhere on the mainland. The resulting quieter streets coupled with the dark, poorly lit side canals means the city takes on a whole new aura of mystery and tranquillity and I for one love to walk the streets at this time and soak it all in.

Fujifilm XT2 | XF18-55mm | 29mm | 9 Seconds | f/10 | ISO200
Photographing the Grand Canal at Night
I took this photo during my latest trip to this beautiful city. In fact, it was the very first photo I took. After checking in at the hotel and dropping off our bags, my wife and I headed out into the night to explore the island. Armed with just my Fujifilm XT2 camera and a small tabletop Manfrotto PIXI tripod, I was traveling light that evening and it turns out, that’s all I needed to capture this photo.
We arrived at the Rialto Bridge and as we crossed, this composition stood out to me. I particularly liked the way the canal sweeps to the right around the buildings and gondolas. Although it was after dark, the lights were nice and bright and by using a smaller aperture of f/10, I was able to create those cool starbursts around the streetlights.
With the low light and small aperture, there was no way I could handhold this shot so I placed the camera on my Manfrotto PIXI tripod and with a nice sturdy wall to rest the tripod on, I went about capturing this 9-second exposure. Along with the composition, I’m drawn to the colours I was able to bring out of this image in post-production and knowing how good the guys at Fujifilm are with their colour science, I suspect that had a little bit to do with it.
Here are a few other articles featuring photos and stories about Venice:
Speak to you soon.
Trevor
This post is featured in my Weekly Photo series where I post a new photo every Monday. To have this delivered directly to your inbox, you can subscribe to the mailing list here.

The View from St Paul's | Weekly Photo #19
St Paul’s Cathedral opens late for a few days in August so I booked my tickets and headed up to the top of the dome to capture this view of the City of London at sunset. Jump into the post to read how I got on which also includes a top tip to allow you to revisit St Paul’s for a further 12 months free of charge!
This week’s photo of the City of London was taken from atop the dome of St Paul’s Cathedral as the sun was setting on a gloriously warm summer’s evening. During the winter months, this view can be captured at sunset but it can be rather cold and windy up there which can make it a rather unpleasant way to spend an evening so when I spotted that the cathedral would be opening late each Thursday during the month of August I immediately booked my ticket!

Fujifilm X-T30 | XF18-55mm | 18mm | 1/5th Second | f/5 | ISO160
TOP TIP: Although it costs around £17 online (£20 on the door) to visit the Cathedral, UK taxpayers can gift-aid the cost of the ticket and receive 12 months free access from the time of your first visit. It’s a fantastic deal if you want to visit again within the year.
Photographing the City of London from St Paul’s Cathedral
I also featured this location to shoot from in my recent blog post titled My Top 10 Photography Spots in London. Knowing I wouldn’t be allowed a tripod and space might be a bit tight, I decided to travel light and pack a small bag with the Fujifilm X-T30 and a couple of lenses, including the XF10-24mm I used for this particular shot.
As St Paul’s Cathedral only opens late four times during August, I assumed it might be a bit busy but I could not believe how busy it might get. I arrived for 7 pm and the queue was literally down the street! I was glad I packed light so I could move quickly and climb the 500+ stairs to get to the top without being weighed down too much by my gear. After getting to the top, I made myself as small as I could so other visitors could walk past me as I was shooting.
As the sun was setting and the light levels reduced, the shutter speed started to lengthen so luckily for me, the curve of the ledge allowed me to rest my camera and keep it perfectly still so I was able to continue shooting without the need to up my ISO or open up my aperture too much.
As the city lights switching on, the scene really came alive and I was able to capture this sunset/early blue hour shot with the city lights adding interest in the scene. The last of the sun’s light reflecting off the high-rise buildings and a hint of the blue hour light finishes the photo off nicely. This is easily one of my favourite photos taken so far in 2019.
Why You Should Print your photos
I am a big fan of printing photos as I do believe a tangible print you can hold and enjoy is far and away, the best way to show off your work. It was an easy decision to print this image which I did so along with a few other photos I have taken recently and I must say, although the photo of the print below doesn’t do it justice at all, it looks fantastic in person!

So, if you don’t usually print your photos, I thoroughly recommend you start. There are so many great online photo labs and costs are normally reasonable for paper printing. Please feel free to drop me any questions that might help you kick start your own photo printing journey.
Talk to you soon.
Trevor
This post is featured in my Weekly Photo series where I post a new photo every Monday. To have this delivered directly to your inbox, you can subscribe to the mailing list here.

2 Minutes in London | Weekly Photo #18
This week’s photo is a long exposure photo of the London Eye taken on a late summer’s evening in 2018. On top of the story behind the photo, I also share some of my other long exposure articles that will help anyone looking to improve their long exposure technique.
Long exposure photography in London has been a passion of mine for a number of years now. I love the way this technique allows me to capture the changing light, motion and even colour over relatively long periods of time all within a single frame. This can create stunning ethereal photos which allow the viewer to witness a scene in a way they wouldn’t usually see with their own eyes even if they were standing next to me while I captured the image.

Fujifilm XT2 | XF18-55mm | 24mm | 121 Seconds | f/10 | ISO200
Taking a long exposure of the London Eye
This photo was taken in September last year. I chose this location to capture a long exposure of the London Eye as I like the way it allows you to see down the river towards the buildings near St George Wharf in the distance which adds some great depth to the shot. If you time it right, you can avoid the boats that run up and down the river creating a nice simplified, clutter-free look. Although the sky was pretty clear, as the sun went down, some beautiful pastel colours appeared across the sky.
I took this photo with my Fujifilm XT2 and my trusty XF18-55mm. Using my Formatt Hitech 10-stop ND filter, I was able to change this photo from around a 1/8th of a second exposure to 121 seconds.
I have written many blog posts about taking long exposure images including why I do it, how I do it and so on. So, instead of repeating myself once again, I will list some of my most popular posts below for you to read at your leisure. So, if you have a few minutes, grab a coffee, settle in and have a read.
Slowing Time: Why The long Exposure?
How I take Long Exposure Pictures
My Top 5 Long Exposure Locations in London
Lastly, if you haven’t done so already, sign up to my newsletter and you will get a PDF eBook which lists my 10-step guide to take better long exposure photos. Click here to visit my Subscribe Page.
Thanks for dropping by.
Trevor
This post is featured in my Weekly Photo series where I post a new photo every Monday. To have this delivered directly to your inbox, you can subscribe to the mailing list here.

Illuminated River | Weekly Photo #17
This week’s photo is a London cityscape taken at night showcasing the new light installation at London Bridge which was recently installed as a part of the new Illuminated River project.
With the summer ending and the nights drawing in, I’m looking forward to getting out and taking more photos of London at night. This photo was taken a few weeks ago as I wandered the north bank of the River Thames in the hunt for new compositions of London’s iconic structures. As I wandered towards London Bridge, I remembered it had recently had its lights updated as a part of the Illuminated River project (more on that below). Architecturally, London Bridge is a little underwhelming and it’s not always easy to get an interesting photo of it but I have seen this composition before and with the Shard in the background and the bridge creating the obligatory lead-in line, I had my composition locked in.
On to the tripod went my Fujifilm XT2 and wide-angle 10-24mm lens. I then waited for the lights to change so I could capture all those vibrant colours along the side of the bridge. I used an aperture of f/10 to help keep the image sharp from front to back but also, it helped me create these great starbursts throughout the image. The bright white starburst that seems to be floating above the bridge, that would be the moon. Pretty cool, right?

Fujifilm XT2 | XF10-24mm | 15mm | 6 Seconds | f/10 | ISO200
The Illuminated River project
There is an interesting project happening along the River Thames called Illuminated River. This is a long term, multi-year project to roll out new, modern, low power light installations across 15 bridges in central London meaning not only will all 15 bridges get a fresh new look at night, but it will also be more environmentally friendly to run them. So far, 4 bridges are complete including London Bridge above. This cohesive art installation will stretch 2.5 miles along the river, making it the longest of its kind in the world and having looked over the proposed designs on their website here, I think it is going to be a fantastic addition to this great city.
Photographing London Cityscapes at Night
In recent years there seems to be a more conscious effort to implement new and upgrade existing lighting schemes across the city. I guess this is helped by the emerging brighter, low power technologies the city architects and designers can take advantage of but whatever the reason, the results mean we can now capture some fantastic night-time cityscapes across the city.
Until next time.
This post is featured in my Weekly Photo series where I post a new photo every Monday. To have this delivered directly to your inbox, you can subscribe to the mailing list here.
La Piazza Desolata | Weekly Photo #16
Have you ever wanted to experience a city like Venice and have it all to yourself? In this article, I talk about capturing this sunrise shot at St Mark’s Square and I also list 3 reasons why I think everyone should try to venture out before sunrise when visiting a new, normally busy location.
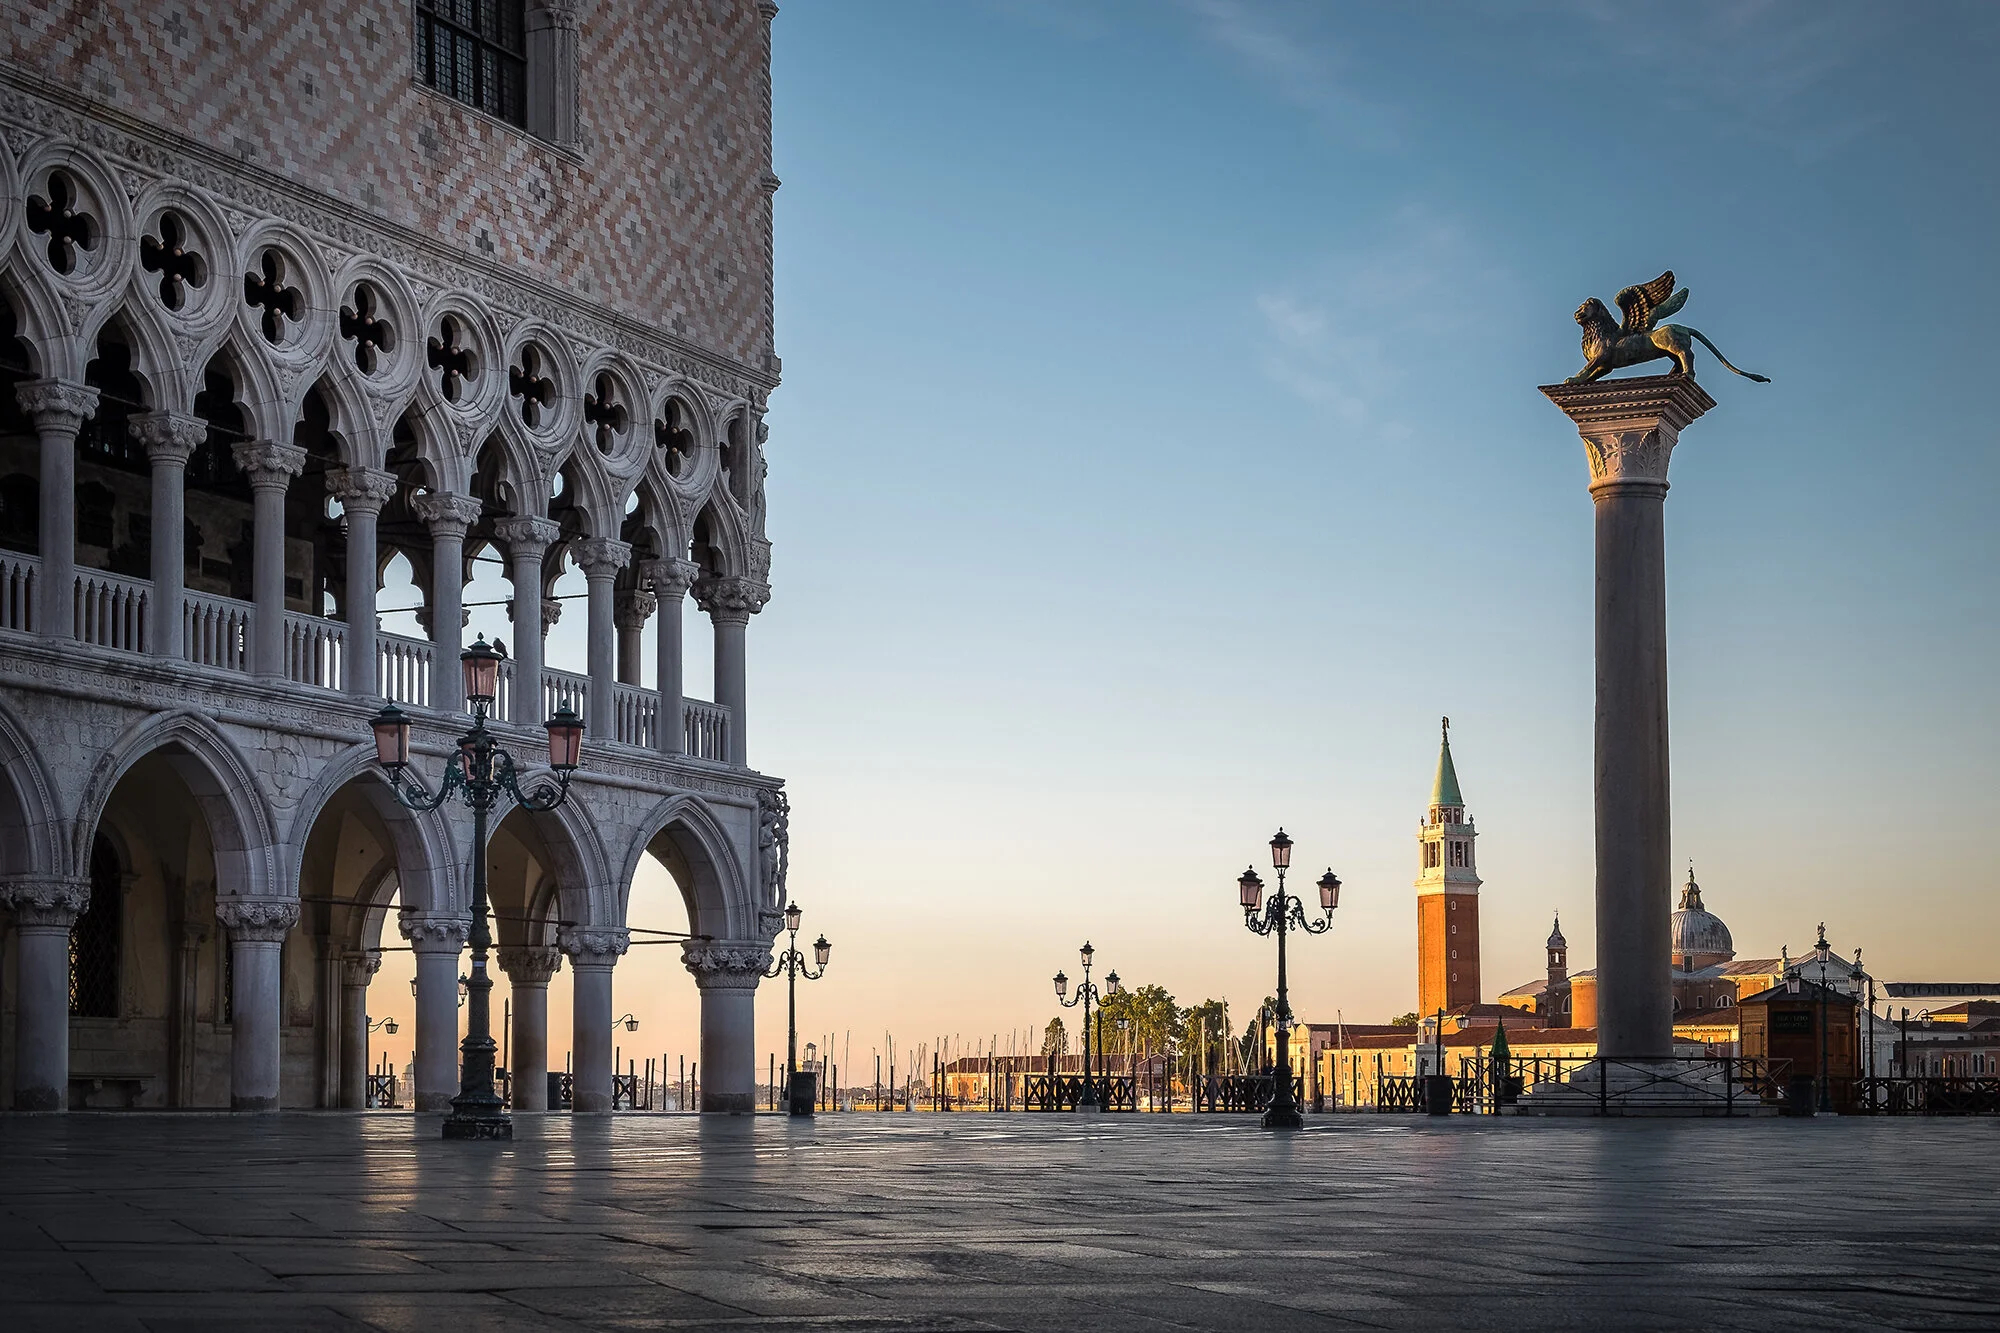
This is a very empty St Mark’s Square in Venice. I had just completed the 10-minute walk back from the Ponte dell’Accademia Bridge where I had captured the classic view of the Grand Canal at sunrise and I found myself in a very quiet St Mark’s Square. It feels both odd and exhilarating to be in a place on your own which is normally overrun by thousands of people and I wasn’t going to miss this opportunity to capture such a beautiful city in this unique way.
I share many more photos of my trip to Venice in my two-part blog post:

Fujifilm XT-10 | XF18-55mm | 34mm | 6 Seconds | f/8 | ISO200
After a short while wandering the piazza, photographing the ornate architecture and soaking up every ounce of the history as possible, I started to head back towards the Bacino San Marco. I noticed the sun lighting up the tower that belongs to the Church of San Giorgio Maggiore across the water, basking in gloriously warm sunlight and with the Lion of Venice up on the column appearing to stand and welcome the new day, it was an image I had to capture.
With such a large space in front of me, it was inevitable that one or two people would now be in the shot so I decided to use my Formatt-Hitech 10-stop ND filter to create a long exposure and as long as those one or two people kept moving, they would be rendered invisible in the scene. That’s exactly what happened and with the Fujifilm X-T10 (my camera of choice at the time), XF18-55mm lens mounted on the tripod and my settings locked in, I went about capturing the scene in front of me.
It took a few tries to ensure I didn’t capture any people, but I got there in the end and the resulting photo is one of my favourites from that entire trip.
Whenever I visit a new city, I make a point of venturing out at the break of dawn to enjoy the unique experience of having a normally busy location all to myself. Whether you take a camera or not, I have listed three reasons why everyone should give it a try.
3 reasons to photograph a city at sunrise
#1 You get the best light of the day.
Ok, this is a subjective one but to me, there is something quite magical about the light at sunrise. I love a good sunset like everybody else but with sunrises harder to capture because all of the getting up early nonsense, it seems just a little bit more special when out experiencing it. That coupled with the long shadows and warm sunlight, it can be such a beautiful time to be out with the camera.
#2 You get the whole place to yourself
As I mentioned above, if you like photographing iconic locations then you will no doubt have to point the camera upwards or include the crowds of people in your photos unless you visit early in the morning. Most tourist hotspots will start to get busy just after breakfast as the hotels usually have set times and tend not to serve much before 7 am. This means any time up until 8 am will be the best time to capture the morning light without lots of people in the shot.
#3 You get to do more.
Whenever I travel with my family, I will always schedule in a sunrise shoot so I can get my photography fix in before breakfast. Sunrise is a perfect time to focus on photography especially when travelling with friends and family. It enables you to get a few hours of dedicated photography before meeting back up to spend a full day doing other activities not necessarily related to photography.
I hope you found that useful and as ever, feel free to leave a comment about your own sunrise experiences in the comments section below.
Until next time.
Trevor
This post is featured in my Weekly Photo series where I post a new photo every Monday. To have this delivered directly to your inbox, you can subscribe to the mailing list here.

Sunset Over Westminster | Weekly Photo #15
In this week’s “Weekly Photo” article, I talk about the benefits of re-processing old photos and take the opportunity to re-edit an old favourite photo of a sunset in London.
When I first took this photo of Westminster from Waterloo Bridge, I absolutely loved it. So much in fact that I created a blog post demonstrating how I post-processed the shot from RAW to the final edit.

Fujifilm XT-10 | XF18-55mm | 23mm | 58 Seconds | f/11 | ISO200
I originally took this photo while on a walk along the River Thames in 2017 as I was trying to recreate an image I once took at night but this time during the golden hour. If I remember correctly, the golden hour came and went without much of a show but once the sun had dropped under the horizon, the sky was illuminated with these pink and magenta colours. It really was quite beautiful.
Back in 2017, I was still using my first (and still favourite) Fujifilm camera, the X-T10. I used a 10-stop Formatt-Hitech filter which gave me the 58-second exposure resulting in the smooth river and spinning motion in the London Eye. With very little wind, the clouds hardly moved during the exposure so there were no long, streaky clouds you can often find in long exposures which I think, in this particular image works rather well.
Why you should revisit your old photos.
Fast-forward nearly 2 1/2 years and I just happened to be browsing through some older images and came across this photo and I was a lot less impressed with how it turned out. So much so, I decided to have another go at editing the image. I’m so glad I did.
I like the way the image has more contrast and instead of the image being almost all magenta, I brought back some of the blue tones in the shadows and yellows/oranges in the sky nearer the sun. Finished with a bit of dodging and burning and a slightly tighter crop than before, I was done.
Going through this process got me thinking about the benefits of revisiting your older photos which I have listed below.
#1 You might find images you once overlooked.
When I first import and process my photos in Lightroom, I search for images that are sharp, well composed and properly exposed. I would normally have an idea as to the image I am looking to capture which means I may overlook other, perfectly good images. Going back and looking again without any agenda means I occasionally find really good images I once overlooked as it didn’t fit my needs first time round.
#2 Your styles and interests may have changed since you took the original photo.
Photographic styles and interests inevitably change over time and photos you once took that didn’t align to your photographic interests at the time or didn’t suit your previous processing style may now be just the kind of images you currently create.
#3 You can take advantage of new processing skills or the latest software tools available.
You may have photos in your library that for reasons of skillset or software limitations, you were never able to get the look you were after. As skills and software improve, you may now be able to process that image the way you wanted.
So, that’s it. I would love to hear if you have any more thoughts on revisiting older photos that I haven’t covered. If so, please leave a comment below.
Until next time.
Trevor
This post is featured in my Weekly Photo series where I post a new photo every Monday. To have this delivered directly to your inbox, you can subscribe to the mailing list here.

Dramatic London | Weekly Photo #14
This week’s photo was another cityscape from St. Katherine Docks in London and instead of a long exposure, I battle with some huge dynamic range to eventually produce this image with some dramatic sky over London.
When it comes to photographing London, it’s been quite a slow summer. Apart from being busy with a few weekends away, my motivation to photograph London has waned a little during these hotter months. I’ve heard a lot of other photographers say the same but this is the first time in years of photographing landscapes it has happened to me. It won’t be long before the days grow shorter and it gets colder so I’m sure I will be out more regularly soon enough. The break from shooting London has been good for me as I have taken the opportunity to capture other locations such as Brighton as you can read about in this recent post On Location Photographing Brighton. That being said, I did manage a few trips out over the summer months and a few weeks ago I popped back to St Katharine’s Dock and took this week’s photo.

Fujifilm XT2 | XF18-55mm | 25mm | 1/10th Second | f/8 | ISO200
Sometimes a photo just comes together with only a small amount of effort, the scene’s exposure is well balanced, the light is great and it just needs a small tweak in post processing but more often than not, the photo takes much more work and this image was no different.
As with my previous visit to this location, I had originally intended to capture a long exposure photo to help simplify the image a little but after trying out a few different exposure times, I wasn’t happy with how the sky was turning out. The shapes caused by the movement in the clouds wasn’t particularly pleasing to the eye and I was much more drawn to how the sky looked as is, without the movement.
The biggest challenge I had to deal with when capturing and processing this photo was the huge dynamic range between the darkest and lightest areas. I decided to bracket the shot while out in the field but in the end, I used just the +1 exposure as the other, darker images had too much noise and lacked definition in the shadows when I tried to recover them. Working on the brightest of the three images, I darkened (dodged) areas of the image to bring back that dark, moody look I remembered while out in the field and I was able to recover most of the highlights due to Fujifilm’s excellent raw files so only a small part of visible sun remains blown out. I don’t normally like any of my images to have blown out areas but the only exception to this rule is when photographing the sun or artificial lights at night as all cameras will struggle with these and trying to recover these will likely cause the affected areas to look grey and messy. Leaving them as is results in a much more natural looking image.
If I were being super critical, which I try to do with all of my images, I would say the water, architecture and clouds create a particularly busy composition. In such situations, I sometimes take a long exposure to smooth out the water or sky but as mentioned above, that doesn’t always suite the final image.
Thanks for stopping by this week.
Until next time.
This post is featured in my Weekly Photo series where I post a new photo every Monday. To have this delivered directly to your inbox, you can subscribe to the mailing list here.

London in the Mist | Weekly Photo #13
Along with this week’s photo taken from London’s Sky Garden, I share some tips to take better photo from behind the glass ensuring sharp, clean photos.
This is a photo of East London and specifically Canary Wharf taken at sunrise from the Sky Garden located 37 floors above London’s streets. During the winter months, you can book an early morning visit to this fantastic viewpoint from 7am making it a great spot to capture a sunrise over London.
Having already photographed the sunrise on this particular morning, I was greeted by some beautiful low-lying mist across the city creating a great sense of separation and depth. I really like the glimpse of the River Thames in the mid-ground, the strong shapes created by the buildings over at Canary Wharf and the subtle contrast from the cranes in the foreground.
See my previous article titled “Photographing London’s Rooftops” where I showcased other photos captured from this and other rooftop locations.

Fujifilm XT2 | XF55-200mm | 55mm | 1/2000th Second | f/3.5 | ISO200
It’s a little tricky to get a clean, sharp, reflection-free image when shooting up in the Sky Garden. With the dirty windows and no tripod rules you have to get a bit creative so here are a few tips to help you.
The no tripod rule:
Some locations that have a no tripod rule turn a blind eye to the mini tripods but having tried this in the Sky Garden, I was quickly corrected by the staff, so for this location big or small, you can’t use a tripod. Improvising, I laid my camera bag on the floor right up against the window and used it to rest my camera on. It was a little tricky but it did the trick and my images were nice and sharp.
Shooting through dirty windows:
This one is simple. get the aperture as wide as you can. Use f/2-4 if you can get that wide. Shooting these distances won’t give you any depth of field issues but even though most lenses are not their sharpest wide open, that’s the trade-off to render all of the marks on the window out of focus and invisible in the final image. Also, with a wider aperture, you will have a faster shutter speed which helps combat the no tripod rule above.
Avoiding the reflections on the glass:
When taking photos through glass windows you will no doubt have some trouble with reflections. The cheap and easy way to avoid this is to place the end of the lens right up against the window. Although this might be effective, it restricts you to the angle you can shoot so you might not be able to capture the ideal composition. The alternative is to invest in a lens hood. I use the Ultimate Lens Hood which fits around the end of the lens and creates a reflection-free area when pressed up against the window. I find it still a little tricky to use but at least I can capture the compositions I want.
I hope you find these tips useful in the future.
Until next week.
This post is featured in my Weekly Photo series where I post a new photo every Monday. To have this delivered directly to your inbox, you can subscribe to the mailing list here.
3 Minutes in Brighton | Weekly Photo #12
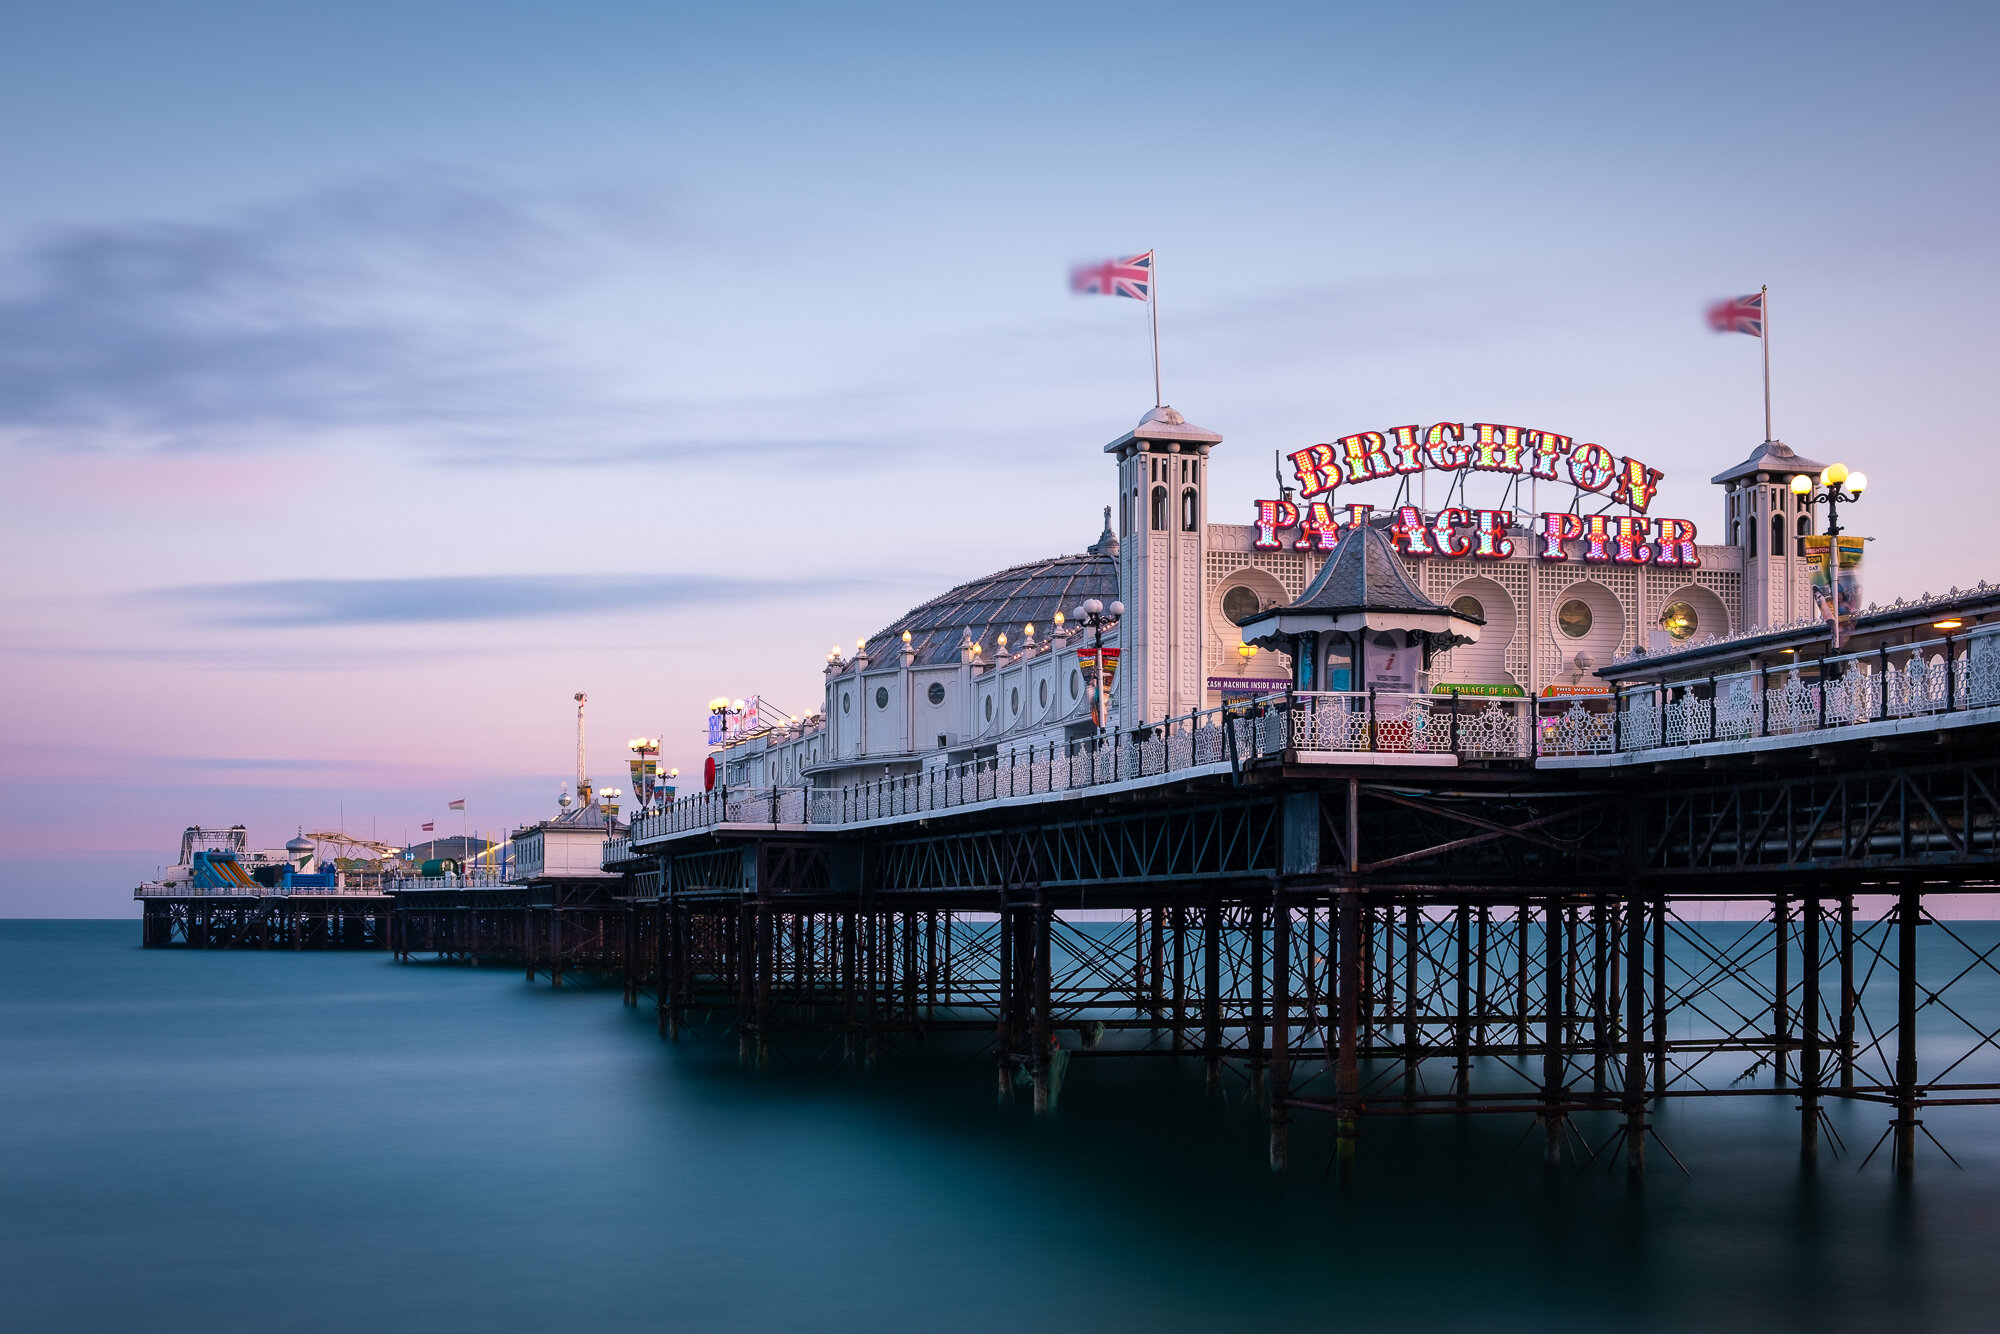
After a few hours wandering around Brighton taking photos of the seafront, I captured this 3 minute long exposure of the Palace Pier whilst I sat on the beach, relaxing and taking in the last light of the day.
This photo encompasses so much about why I take long exposure photos. The calm created by the velvety clouds and sea with the pastel like blend of light as it changes throughout the long exposure and the main subject standing out without distractions competing for attention.

Fujifilm XT2 | XF18-55mm | 28mm | 181 seconds | f/9 | ISO200
In my pursuit to capture more photos down on the south coast, I once again travelled to Brighton on a warm July’s evening to try and capture a few images I had planned. I wrote about it a bit more in my latest “On Location” post titled On Location | Photographing Brighton Beach where it became apparent that the particular style of image was not going to be possible on this trip so after a couple of hours of photographing the seafront, I wandered to this spot by the Palace Pier to relax, capture the scene in front of me and enjoy the sunset.
As the sun was setting, I set my Fuji XT2 camera on the tripod which was only extended quarter height as I was sitting down on the beach, I mounted my Formatt-Hitech 10-stop filter onto the front of the lens and with the cable release in hand I went about capturing the image. (Read more about how I take long exposure photo here).
Sometimes I wonder if the images we take reflect the mood and environment we took them in and judging by the resulting photo, I think there is certainly a lot of truth in that as for the 30 or so minutes I was sitting on the beach, there was a relaxed, peaceful vibe. With the smooth look created by the 3-minute exposure and the pastel colours in the sky, I think this shows through in the image too.
A beautiful end to a beautiful evening.
Until next time.
This post is featured in my Weekly Photo series where I post a new photo every Monday. To have this delivered directly to your inbox, you can subscribe to the mailing list here.

Solitary Gondola | Weekly Photo #11
I set out to capture this classic Venetian cityscape while the light was good and with a clear focal point in the shot. It is not often that a particular photo I am after comes together, but on this occasion, I was happy with the result. Jump into the post to read how it went.
“This was Venice, the flattering and suspect beauty – this city, half fairy tale and half tourist trap, in whose insalubrious air the arts once rankly and voluptuously blossomed, where composers have been inspired to lulling tones of somniferous eroticism.”

Fujifilm XT2 | XF18-55mm | 18mm | 1/40th Second | f/9 | ISO200
This photo was taken on my second visit to Venice and having already captured a sunrise image from this spot (links below), It’s such a classic and instantly recognisable viewpoint which I wanted to capture another photo but this time, towards the end of the day and including a point of interest. I arrived on the busy Ponte dell’Accademia Bridge around 5:30pm, still some time before sunset and as expected the Grand Canal still had quite a few boats on the water.
I take a lot of cityscape images and as you may have read in other blog posts I have written, I like to declutter the compositions removing distractions and simplifying the scenes as much as I possibly can. In the case, the boats on the water were creating the clutter in the image resulting in no clear focal point in the composition. So, I did what I had too, and waited patiently for a gap in the traffic.
It was probably 20 or so minutes later when the traffic reduced so I just needed that focal point I was after. Keeping an eye on both sides of the bridge I noticed a single gondola sailing underneath my feet and as it entered my frame, most of the other boats had left it, allowing me to capture this iconic cityscape with the focal point I was after. I didn’t have an opportunity to wait for the second gondola to leave down a side canal as in no time at all, boats started to enter the frame once more. I felt confident that I had captured the best version of the image I could that evening. It’s a great feeling when you feel you have a keeper on the memory card and can’t wait to get it back to the computer to process.
The settings I used were fairly standard, and I was able to use a low ISO, f-stop of f/9 at 1/40th second exposure as I had my tripod to avoid any nasty camera shake. I processed the shot in Adobe Lightroom to emphasis the nice blues in the water and sky and lighten up some of the architecture that frames the shot.
This became my favourite photo of the trip which I printed and looks fantastic on paper. I say it all the time, “print your photos!!”.
I have written a number of other posts covering my trips to this city and a few notable posts are listed below:
On Location Photographing Venice - Part One
On Location Photographing Venice - Part Two
On Location Photographing Venice in Black and White
If you ever have the chance to visit Venice, I highly recommend it as I for one can’t wait to be back, surrounded by the deep history and beautiful architecture once more.
Until next week.
This post is featured in my Weekly Photo series where I post a new photo every Monday. To have this delivered directly to your inbox, you can subscribe to the mailing list here.