
BLOG ARCHIVE

Good Morning London | Weekly Photo #37
This week, I share a cityscape photo of East London during a beautiful sunrise taken from the 35th floor up at London’s Sky Garden. The post also includes some useful tips to help take great, clean photos of London’s rooftops through glass windows.
This is the view looking east, across London taken from up at the Sky Garden on a cold but beautiful January morning. From this vantage point, you get a stunning view of some of London’s iconic landmarks such as Tower Bridge and the Tower of London that once, themselves dominated London’s skyline.

Fujifilm XT2 | XF10-24mm | 17mm | 1/60th Second | f/4.5 | ISO800
Photographing London’s Rooftops
This was my first attempt at capturing London’s rooftops from the Sky Garden so I wasn’t entirely sure what to expect when I got up there. It was still dark when I arrived so I had a few minutes to wander around and pick out some possible compositions but it didn’t take too long to find this cracking composition of the city. I like the way the river flows into the frame taking you on a journey past Tower Bridge and all the way across to the Isle of Dogs where you will see some subtle silhouettes of the cluster of skyscrapers just poking through the horizon.
With the composition chosen, I had to get a bit creative with supporting my camera as it was still pretty dark and tripods aren’t allowed up in the Sky Garden. Thankfully I had my rather flat backpack with me which made for a somewhat stable platform to rest my camera and with the lens hood attached and pushed up against the glass helping to cut out any reflections, I positioned my camera ready to take the shot.
To capture the photo I wanted, I had to get the timing of the shot just right as I needed to wait long enough for the sun to light up the sky but not too long so that the city lights started to dim, leaving the foreground across the city muted and uninteresting. I wanted the photo to pop a bit more so with my aperture opened up and a shutter speed of 1/60th second, I started firing off shots as the sun rose towards the horizon in front of me.
The main challenge in post-production was to avoid pulling back the shadows in the foreground too much. If I had done so, the darker areas would look a bit too HDR-like and I would end up with a noisy, messy image. I had to tweak and adjust bit by bit to get the look I want whilst avoiding pushing the editing too far. I’m quite pleased with how it turned out.
Here are a few tips to help anyone preparing to shoot from a high vantage point, through a glass window which I have taken from a previous post which also features more photos taken on this very morning: Photographing London’s Rooftops
#1: How to work around the no tripod rule:
Some locations that have a “no tripod” rule turn a blind eye to the mini tripods but having tried this in the Sky Garden, I was quickly corrected by the staff, so for this location big or small, you can’t use a tripod. Improvising, I laid my camera bag on the floor right up against the window and used it to rest my camera on. It was a little tricky but it did the trick and my images were nice and sharp.
#2: How to shoot through dirty windows:
This one is simple. get the aperture as wide as you can. Use f/2-4 if you can get that wide. Shooting these distances won’t give you any depth of field issues but even though most lenses are not their sharpest wide open, that’s the trade-off to render all of the marks on the window out of focus and invisible in the final image. Also, with a wider aperture, you will have a faster shutter speed which helps combat the no tripod rule above.
#3: How to avoid the reflections on the glass:
When taking photos through glass windows you will no doubt have some trouble with reflections. The cheap and easy way to avoid this is to place the end of the lens right up against the window. Although this might be effective, it restricts you to the angle you can shoot so you might not be able to capture the ideal composition. The alternative is to invest in a lens hood. I used the Ultimate Lens Hood for the photo above which fits around the end of the lens and creates a reflection-free area when pressed up against the window. I still find lens hoods like this a little tricky to use but at least I can capture the compositions I want without those pesky reflections.
I hope some of you will find these tips useful.
Talk to you next time.
Trevor
This post is featured in my Weekly Photo series where I post a new photo every Monday. To have this delivered directly to your inbox, you can subscribe to the mailing list here.

On Location Photographing London With The Fuji XF35mm F2
Join me as I venture into London with my Fujifilm X-T30 and XF35mm F2 lens and capture a few cityscape images along the River Thames during a beautiful sunrise shoot.
Up until about a year ago, I suffered from a condition I can only describe as “Lens FOMO”. The notable symptom is the fear of missing out (FOMO) on the perfect photo because I don’t have the right lens with me. To combat this, I would always carry a full bag of gear so I was ready and prepared to capture any subject in nearly all conditions. This strategy is all well and good, but a full bag is a heavy bag and that weight can get tiresome and the long term effects on my back surely can’t be good, right? Something had to change.
Fast forward to today and things are quite different. I realised some time ago that I needed to relax more. Worrying about missing the shot was taking the fun out of the shoot and being frustrated if I wasn’t heading home with some kind of successful photo was missing the point in a really big way. What many photographers, including myself, realise at some point along their journey is that the hunt can be as satisfying as the catch. When I first took up photography, I was in it just for the photo. In my rather ignorant opinion, that was the be-all and end-all. It goes without saying that catching the killer photo is still the target but these days, the exploration, escapism and creativity are all just as important which is why, when I head out on a shoot, I no longer feel the need to take all of my gear with me and will often just head out with a single camera and one or two small prime lens. With this minimalistic setup, I feel liberated and agile to explore different angles and compositions and best of all, have great fun doing so.
You can read more about the gear I use and how I pack my bag depending on the shoot over in this post: What’s in my camera bag (2020 Edition).
Photographing London with The Fujifilm X-T30 and XF35mm F2
Recently, armed with only my Fujifilm X-T30 and the super light XF35mm F2 lens, I headed out before sunrise for a walk along the river in London to take a few photos. The compact X-T30 combined with any of Fuji’s small prime lenses is such an awesome combination. You get all the latest and greatest tech inside the X-T30 such as Fuji’s latest X-Trans sensor and super-quick autofocusing with a small, fast, high-quality prime lens. With the tactile knobs and dials to play with, for me at least, it is a joy to shoot with.
I also posted a similar article while out in London with another of Fujifilm’s compact prime lenses which you can read all about here: Photographing London With The Fuji XF16mm F2.8
I had no plan to shoot anything in particular nor any idea as to what the weather had in store. I just wanted to be out with the camera and see what I could capture. Starting off near London Bridge, I ventured over to More London and captured a few of the classic compositions before heading along the river towards Bankside and the Millennium Bridge. With such a small set-up, I started to look for new, creative compositions and had a lot of fun opening up the aperture and playing with a shallow depth of field.
Below are a few of the photos I captured during the shoot.

Fujifilm X-T30 | XF35mmF2 | 35mm | 1/20th Second | f/2 | ISO800

Fujifilm X-T30 | XF35mmF2 | 35mm | 1/13th Second | f/2 | ISO160

Fujifilm X-T30 | XF35mmF2 | 35mm | 1/20th Second | f/2 | ISO160

Fujifilm X-T30 | XF35mmF2 | 35mm | 1/280th Second | f/4.5 | ISO160

Fujifilm X-T30 | XF35mmF2 | 35mm | 1/45th Second | f/2 | ISO160

Fujifilm X-T30 | XF35mmF2 | 35mm | 1/125th Second | f/2.8 | ISO160

Fujifilm X-T30 | XF35mmF2 | 35mm | 1/750th Second | f/2 | ISO160

Fujifilm X-T30 | XF35mmF2 | 35mm | 1/450th Second | f/2 | ISO160

Fujifilm X-T30 | XF35mmF2 | 35mm | 1/70th Second | f/5 | ISO160

Fujifilm X-T30 | XF35mmF2 | 35mm | 1/1,100th Second | f/5.6 | ISO160

Fujifilm X-T30 | XF35mmF2 | 35mm | 1/3,200th Second | f/5.6 | ISO160
Although the single camera, single lens strategy is not just limited to prime lenses, I wanted to just touch upon why I have a couple of them in my bag. Unlike a zoom lens which allows you to get closer or further away from the subject while keeping your feet rooted to the spot, prime lenses have a fixed focal length which means you have to zoom with your feet (as in walk closer or further away from your subject). Zooming with your feet doesn’t work in all situations and may sound restrictive to some, but it’s that limitation coupled with typically wider apertures and increased image quality that attracts so many to them. Primes tend to simplify the process, stripping away the compositional decisions around the focal length. What you see is what you get. This for some is far more liberating than having a zoom lens.
Overall, it was a great morning to be out photographing the city. I had some nice light and had some fun with the wide aperture and shallow depth of field. I still occasionally head out with a full bag of gear, particularly if I have a shot in mind such as a long-exposure, cityscape image for which I need extra equipment but I do so much less frequently these days. With only a single camera and lens, I feel free to wander the streets and find angles and unique compositions that I just wouldn’t think to look for when weighed down by a big heavy bag on my back.
Speak to you soon.
Trevor

150 Seconds in London | Weekly Photo #36
This long exposure photo of The Girl and the Dolphin Fountain in front of Tower Bridge very nearly didn’t happen as it took some time and a lot of patience on my side for there to be a large enough gap between people to capture this 150-second long exposure photo.
This is my own take on a classic composition of Tower Bridge with the Girl and the Dolphin fountain in London taken back in 2018. It’s a popular location for photographers and tourists alike as it provides a great view of some of London’s iconic landmarks. This particular long exposure photo is a personal favourite of mine which I have printed large and hanging up on my wall at home.

Fujifilm XT2 | XF10-24mm | 16mm | 150 Seconds | f/11 | ISO200
Before I speak about the photo itself, I wanted to talk about how this shot reminds me of the patience needed while out and about taking photos like this in London. This is such a busy spot and it was such a nice evening so there were quite a few people about, trying to grab a peek at Tower Bridge. Normally when taking long exposures, if the exposure is long enough, someone walking into my shot won’t register in the final image but if they stop, even for a short while, I will get a blurry, messy figure in the scene.
Being someone who likes my cityscape images clear of people and with so many people stopping to look at the view, as much as I tried, I could not get a clean image. Every time I thought the coast was clear, I fired off a new shot only for another person to walk into the scene and stand there long enough to be visible in the final image. I won’t lie, it was incredibly frustrating and if I was that way inclined, I may have asked some of the people to move out of the way while I took the shot but firstly, I don’t have the front to do this and secondly, what right do I have to do that anyway? Being there photographing this location gives me no greater rite of passage and everyone is entitled to stand where they like and take in this epic view even if it means me missing the shot altogether. So, I just stood there, waiting patiently for a gap in the foot traffic with no outward signs of frustration and while I still had good light, I was eventually rewarded with a 150-second window without someone stopping for too long enabling me to capture the image.
This photo was taken on my Fujifilm XT2 and wide-angle XF10-24mm lens. Using a wider focal length of 16mm meant that I could capture the entire scene without it looking squashed in and leaving the architecture enough room to breathe. I used my Formatt-Hitech 10-stop filter to give me the 150-second exposure allowing me to capture the movement in the clouds perfectly resulting in a kind of frame around Tower Bridge which I think works really well here.
I also have another black and white, long exposure of a slightly different composition which I published in week 21 of this Weekly Photo series. You can see that image here: Deserted City | Weekly Photo 21.
I was (and still am) really pleased with this photo. the light and movement of the clouds were just perfect and although it’s not too often I get the right conditions for taking a long exposure photo at sunset, I’m glad I was able to stay patient and wait it out as it paid off in a big way!
Until next time.
Trevor
This post is featured in my Weekly Photo series where I post a new photo every Monday. To have this delivered directly to your inbox, you can subscribe to the mailing list here.

Defenders of London | Weekly Photo #35
I recently took a trip over to the Thames Barrier in East London during a pretty miserable, grey day and as the light was fading, I managed to capture this black and white, long exposure photo of these distinctive structures.
Some will recognise this distinctive structure but for those that don’t, this is the Thames Barrier situated just east of London, not far from the Isle of Dogs. It was erected in 1982 to protect the city against high tides and storm surges.

Fujifilm XT2 | XF18-55mm | 28mm | 209 Seconds | f/10 | ISO200
As you will probably know, I do like a long exposure photo. Something about the ethereal, minimalistic look they provide means that for me at least, it’s the perfect technique to use when capturing a busy, sometimes overly cluttered London Cityscape. The process allows some of the tension in the scene to be defused enough to ensure the main subject can stand proud and distraction-free in the frame.
You can check out more reasons to give long exposure photography a try in an article I wrote a while back called Slowing Down Time | Why the Long Exposure?.
I took this photo a couple of weeks ago while on a shoot with Andy Conway. Andy is an excellent photographer and up and coming YouTuber based in the South of England. After meeting at Canary Wharf, we decided to leave the hustle and bustle behind and head east to capture the Thames Barrier. The weather was pretty miserable, the sky was lifeless and the light was flat so there was really only one thing for it. A black and white, long exposure image was on the cards for this shoot. After spending a minute or two scouting the location, we settled on this side-on composition of these imposing structures that appear to be standing in-line, at the ready to defend the city against their tidal enemy. With the camera mounted and a 10-stop filter attached to the lens, I went about capturing this 209-second exposure.
After converting to black and white, I process the image with a high key, minimalistic look which helped to emphasise the strong architectural lines of these powerful, intimidating structures. I used local adjustments in Lightroom to dodge and burn parts of the image to get the tones and brightness how I wanted and finished up with a bit of split toning to cool down the overall image and give it the clean, slightly metallic look I was after.
One last thing before we wrap up. For some, giving long exposure photography a try can be a bit daunting, but in truth, it really is quite straight forward if you understand what’s involved so, I wrote a 10-step guide that you can follow if you want to give this technique a try. Use the link at the bottom of this post to subscribe to my newsletter and a PDF copy will be sent straight to your inbox.
Cheers,
Trevor
This post is featured in my Weekly Photo series where I post a new photo every Monday. To have this delivered directly to your inbox, you can subscribe to the mailing list here.

10 Top Tips For Taking Great City Photos
My top 10 tips for taking great cityscape photos is for those that are looking to take their cityscape photography to the next level and take better photos of their local town or city.
With so many people living in and around cities, it’s no wonder that cityscapes are a popular subject for many photographers but taking great cityscape photos doesn’t always come easy so, if you’re a beginner looking to give cityscapes a go or an experienced photographer in need of a bit of inspiration, here are my 10 top tips to help any photographer be successful in capturing their own amazing urban cityscape photos.
Before we start, I thought I’d just mention that although all of the example images were taken in my home town of London, these tips to can be used when visiting any city and in fact, some of them are transferable to other genres of photography such as natural landscapes and even street photography.
#1: Look for lead-in lines in your cityscapes
First off, let’s start with a classic compositional tool. I introduce to you the much talked about, famous amongst photographers, ever-reliable lead-in line!! OK, tongue and cheek aside, the lead-in line is a classic for a reason as they help lead the viewer’s eye around the frame, taking them on a journey which should eventually end at the main subject. Take the photo below, the lead-in line is created by the wall in the foreground which takes the eye from the bottom left to the right-hand side and up towards the main focal point which in this case are the high-rise buildings over in the city.

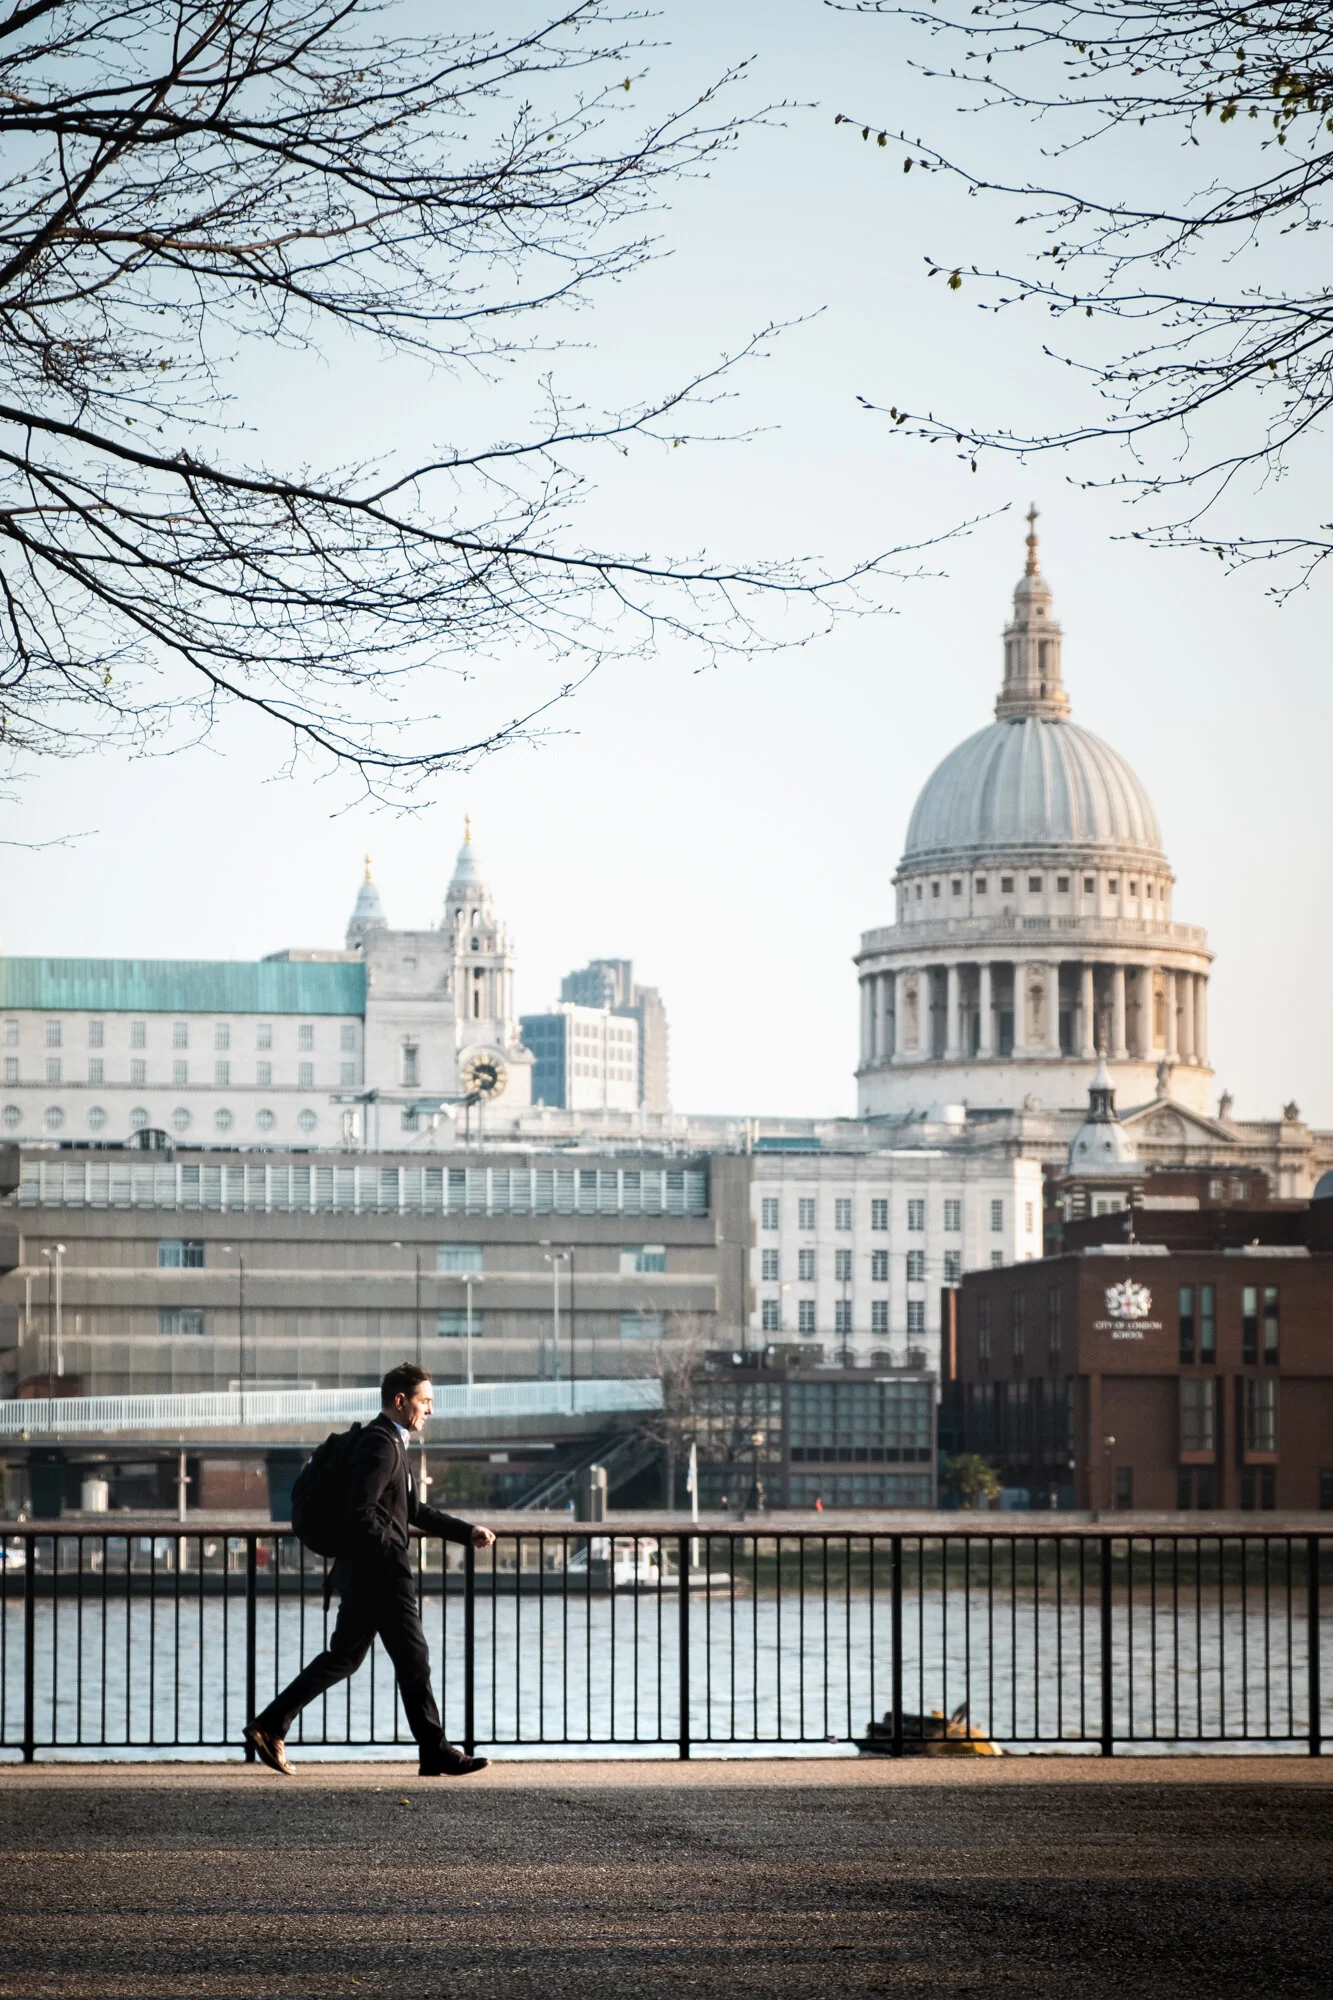
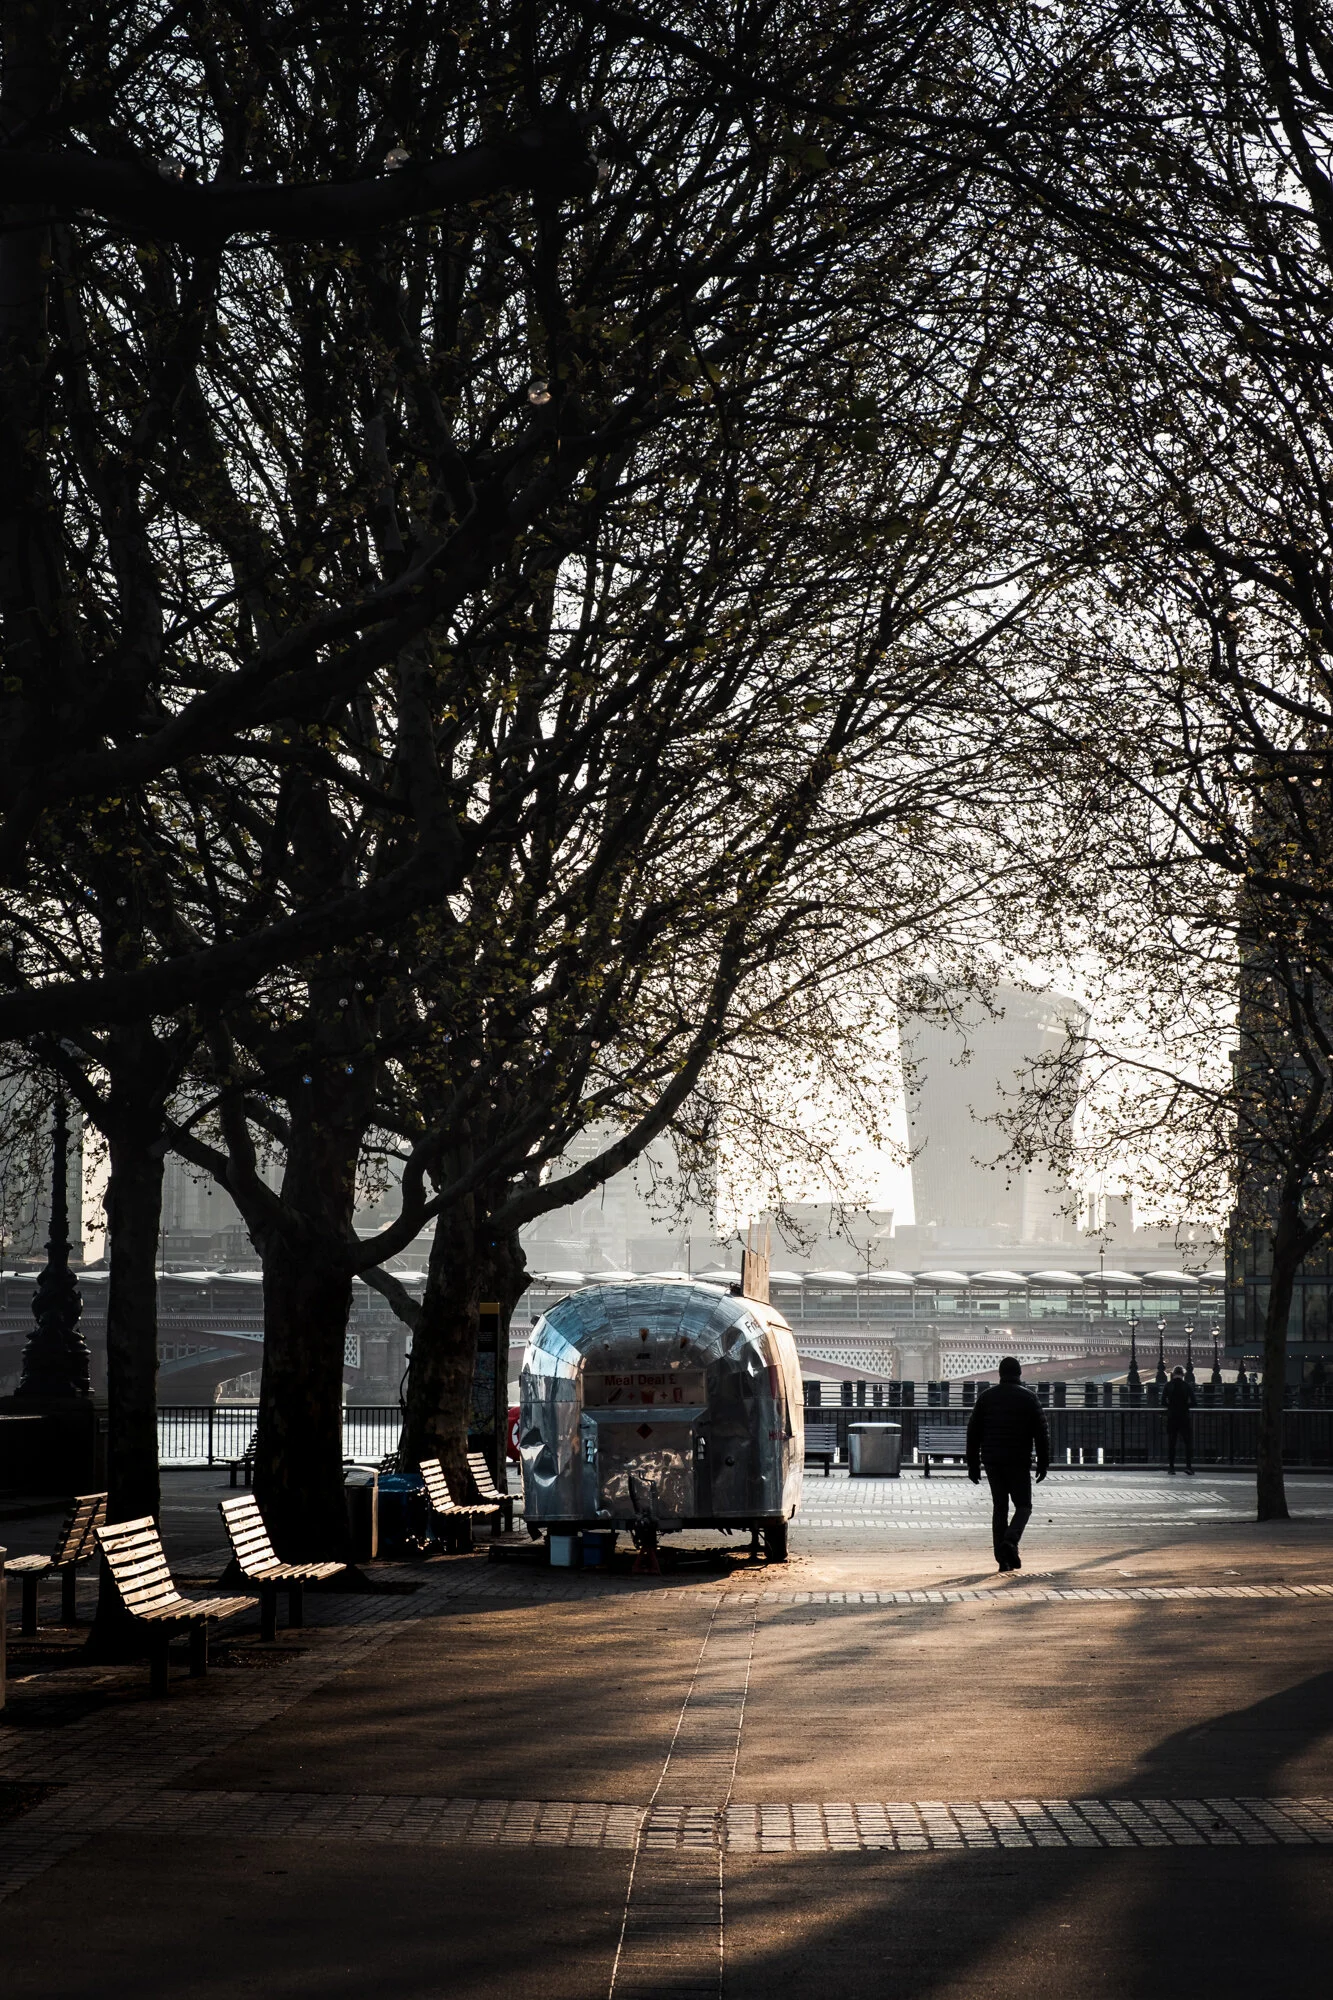
#2: Use people in the photo to add interest
Although I don’t consider myself to be a street photographer, I will on occasion include people in the frame to add another element of interest into my cityscape photos. You can use people as compositional subjects like in the shot of St Paul’s below where this man is placed in the opposite corner to the cathedral’s dome which helps to balance the scene. Alternatively, including a smaller, silhouetted figure like in the second image can add a little mystery to your photo so, think about how you can incorporate people into your cityscapes in the future.
#3: Try a long exposure to create a unique cityscape photo
Those that follow my work know I take long exposure photos of London’s skyline and one of the reasons I do so is that it provides a unique view of the cityscape which cannot be seen with the naked eye. If you are looking for that something a little different or want to simplify the scene somewhat, then try a long exposure image.
Top tip: Although long exposure photography can be a little daunting at first, I have created a useful 10 step guide to creating successful long exposure photos which you can download when you sign up to my newsletter here.
#4: Get creative and use a shallow depth of field
Opening up that aperture and getting creative with shallow depth of field is a great way to get a unique look in your cityscape photos. You don’t necessarily need a professional lens with a super-wide aperture such as f/1.4 or f/1.8 as it all depends on the distance your focus point is from your lens. Take the photo below for instance. This was shot with an aperture of f/5 with is achievable for nearly all lenses but because the focus point is close to the lens, the background is rendered out of focus.

#5: Have fun and frame your subject
Frames are a great compositional tool as they help to draw the viewers eye straight onto the main subject. You can have so much fun finding different ways to frame the subject so next time you are out capturing cityscapes, try looking for doorways, arches or even gaps in the railings to shoot through.


#6: Climb up high and photograph the rooftops
There is an ever-increasing number of high vantages points that provide stunning views of the city and although this trend is not just unique to London, I do know that in London planning rules require public viewing galleries to be incorporated into new high-rise buildings which means the number will only go up over the coming years. This is great news for photographers on the hunt for great cityscape photos as from this high up you get an entirely different perspective and the resulting images can be quite awe-inspiring when the conditions are right.
Top tip: There are a few tricks you can use to capture clean, sharp photos when photographing your cityscapes through the glass of a high-rise building which you can find in one of my previous posts here: London in the Mist | Weekly Photo 13

#7: Get really wide to capture a dynamic photo of the city
By using a wide-angle lens, you can have a bit of fun and capture some unique perspectives such as the one below of Canary Wharf over on the Isle of Dogs. Having a wide-angle lens enabled me to include the steelwork and chains into the scene which add interest, lead-in lines and a handy frame around the main subject.

#8: Capture the cityscape during blue hour
Photographing the city at blue hour can help create some unique cityscape photos as this is the only time of day when the ambient light is low enough for the city lights to be switched on but still bright enough for there to still be detail in the sky. This view of London’s Square Mile financial district was taken from the top of St Paul’s Cathedral and is a great example of how the city can look during the blue hour.
Top tip: Capturing the blue hour can be tricky if you are not prepared and ready, so, research the time of day the sun sets and blue hour starts in advance to ensure you are ready to capture your photo in plenty of time.

#9: Go for a cityscape at sunset
Sunsets are beautiful and here’s a newsflash, people like looking at beautiful things so when you have a great cityscape coupled with an awesome sunset then you have all the ingredients needed to capture something quite special. Although the sun rises and sets every day, a good, dramatic sunset doesn’t happen too often and when they do, they come and go quickly so do your research. Check what time sunset takes place, check the weather and cloud cover so when you head out, you give yourself the best opportunity to capture Mother Nature’s greatest show.

#10: Shoot the city lights at night!
I guess I could have used this image in the first tip above as it has a fantastic lead-in line (bonus tip: look for bridges as compositional subjects) but this tip is about going out after dark and capturing the city at night. London, like many other cities, takes on a whole new identity at night. 10 years ago, London’s skyline would consist of just dull orange lights but these days, with the modern high-rise buildings and projects such as the Illuminated River Project, London has made a great effort to spice things up and add a splash of colour to the city at night.
Top Tip: Close down the aperture to create cool starburst effects like those shown in the photo below.
A quick note about safety. It should go without saying but please do not take your safety for granted. Not all areas of every city are safe to wander alone so, whatever you do, take care of yourself and where possible, take a friend with you, especially at night.
Now, get out and shoot!
The most important tip of all is to actually get out and start taking photos. So, armed with these 10 top tips for successful cityscape photography, I urge you to go and give them a try in your nearest town or city and take your own great cityscape photos.
If you have any tips you want to share or if you have any other thoughts on this post, please post your comments below and feel free to share this article so that others might see and take advantage of these tips for when they are out photographing their local city.

City Blues | Weekly Photo #34
Getting up and out before sunrise can be a challenge for landscape photographers so what motivates me to do so? In this article, I talk about how having personal creative projects provide me with the purpose and motivation to be out early enough to capture blue hour cityscape photos of London like this one.
I took this photo a few days ago on “Blue Monday”. I don’t normally rush photos out so quickly. I like to live with them a little longer before I publish as I will sometimes bring it back into the digital darkroom to make some further adjustments but this week is different. I chose to release this photo as I felt it suits the subject of this post quite well.
Blue Monday is according to some, the most depressing day of the year. Christmas is behind us, the nights are long and credit card bills for money spent over the festive period are in. Do I think Blue Monday is a thing? If being honest, I’m pretty sceptical. I don’t think people are struggling on this particular day per se but rather, I think there are people battling “The Blues” every single day of the year. I do, however, appreciate that at the very least, it helps raise more awareness of such an important subject.
The benefits of personal creative projects
A while back, I wrote an article called “Mental Health and Why Photography Matters” where I talked about how having a creative outlet can have a positive effect on your mental wellbeing as it provides you with the motivation and purpose to push forward and create something meaningful and fulfilling to you.

Fujifilm X-T30 | XF16mmF2.8 | 16mm | 2.6 Seconds | f/10 | ISO160
Currently, much of my motivation to get up and out to take photos comes from this Weekly Photo project. I don’t necessarily consider this a project in the strictest of terms but it is what currently drives me to take photos and write articles. For a lot of landscape photographers, producing 52 share-worthy photos over the course of a year is a difficult undertaking and I’m certainly no exception.
To quote Ansel Adams:
Twelve significant photographs in any one year is a good crop.
As much as I would like it to be so, unfortunately not every photo I share each week can be considered “portfolio-worthy” but that’s not really the primary goal of the project. The goal of this project is to provide the motivation I need to get out into the world, regardless of the conditions, enjoy my craft and forget about life’s issues even if for just a short while. No doubt I‘ll continue to have highs and lows along this creative journey, but I have a purpose to get out, continue to be creative and above all else, use photography as my weapon to fight the good fight against whatever blues I may be facing at that time.
Let’s talk about the photo. As previously mentioned, I took this photo last Monday as I was walking towards London Bridge where I managed to capture a pretty spectacular sunrise (one for a future post). I had with me my Fujifilm X-T30, my 16mm prime lens and a small table-top tripod. As I walked along the river, I looked back over my shoulder just as the sunlight started to peek through the clouds so stopped and captured this photo of HMS Belfast. With the blue hour fading away and the sunlight starting to appear, the result was these beautiful blues, purples and magentas across the image. It really did look like this at the time.
Getting up and out before sunrise can be challenging at times, but with a personal creative project providing me with motivation and purpose, I have the drive to get on location in time to witness this special time of day.
Until next time.
Trevor
This post is featured in my Weekly Photo series where I post a new photo every Monday. To have this delivered directly to your inbox, you can subscribe to the mailing list here.

London Layers | Weekly Photo #33
This week I got the long lens out and captured this photo of the city from the Golden Jubilee Bridge during a sunrise shoot in London.
Over the years, I have taken quite a few photos of this view of the city. I think I’m drawn to it because of the way the scene encompasses a few of London’s great architectural icons, some of which, built centuries apart from each other. I like to capture the essence of London in my cityscapes and with St Paul’s Cathedral and the red London buses crossing the bridge, it leaves the viewer with little doubt as to where the photo was taken.

Fujifilm X-T30 | XF55-200mm | 74mm | 1/300 Second | f/5 | ISO160
Enjoying a cheeky early morning photography session in London before work, I started over on Westminster Bridge while it was still dark where I managed to capture a few shots of the London Eye which was all lit up in a collection of bright, vibrant colours and with a few photos in the bag (which may be featured in a later post) I ventured over to this spot on the Golden Jubilee/Hungerford Bridge to capture this view of the city.
To capture this entire scene and at the same time ensure the main subjects remain prominent, it needs to be captured with a telephoto lens. I don’t mean a huge, expensive 600mm beast of a lens, but one with just enough reach to add the compression needed and pull that background closer to the camera. If taken with a wide lens, the entire scene would be pushed back, rendering the subjects less significant allowing them to get lost in the cityscape. This I wanted to avoid.
With my Fujifilm 55-200mm lens attached to the camera and at a focal length of 74mm, I managed to capture this image just as the sun hit the side of the recently finished 22 Bishopsgate over in the city. Apart from those cool rays of light reflecting off the building, why this photo works for me is that by using the telephoto lens, I was able to create a layered composition of the city. Working backwards from Waterloo Bridge in the foreground (given more prominence by the red buses), the dome of St Paul’s in the mid-ground and the tall skyscrapers in the city making up the background. These layers create a sense of depth and separation which I feel works well in photos of the city with a rather straight-on composition looking down the river like this as it gives the eye somewhere to explore and with any luck, keeping the viewer engaged.
Speak to you next week.
Trevor
This post is featured in my Weekly Photo series where I post a new photo every Monday. To have this delivered directly to your inbox, you can subscribe to the mailing list here.

Dijver Canal | Weekly Photo #32
Taken just after sunrise one summer’s morning, this week’s photo is one of the Dijver Canal in Bruges, Belgium.
As most of the readers of my blog know, I take the vast majority of my images in and around London. If you take a look at my Weekly Photo page, you can see that’s the case but to break things up a bit, every so often I will throw in a photo from other UK locations or from my travels further afield. This week I bring to you a photo of a very popular location in Bruges, a charming and historic city located in the north-west area of Belgium.
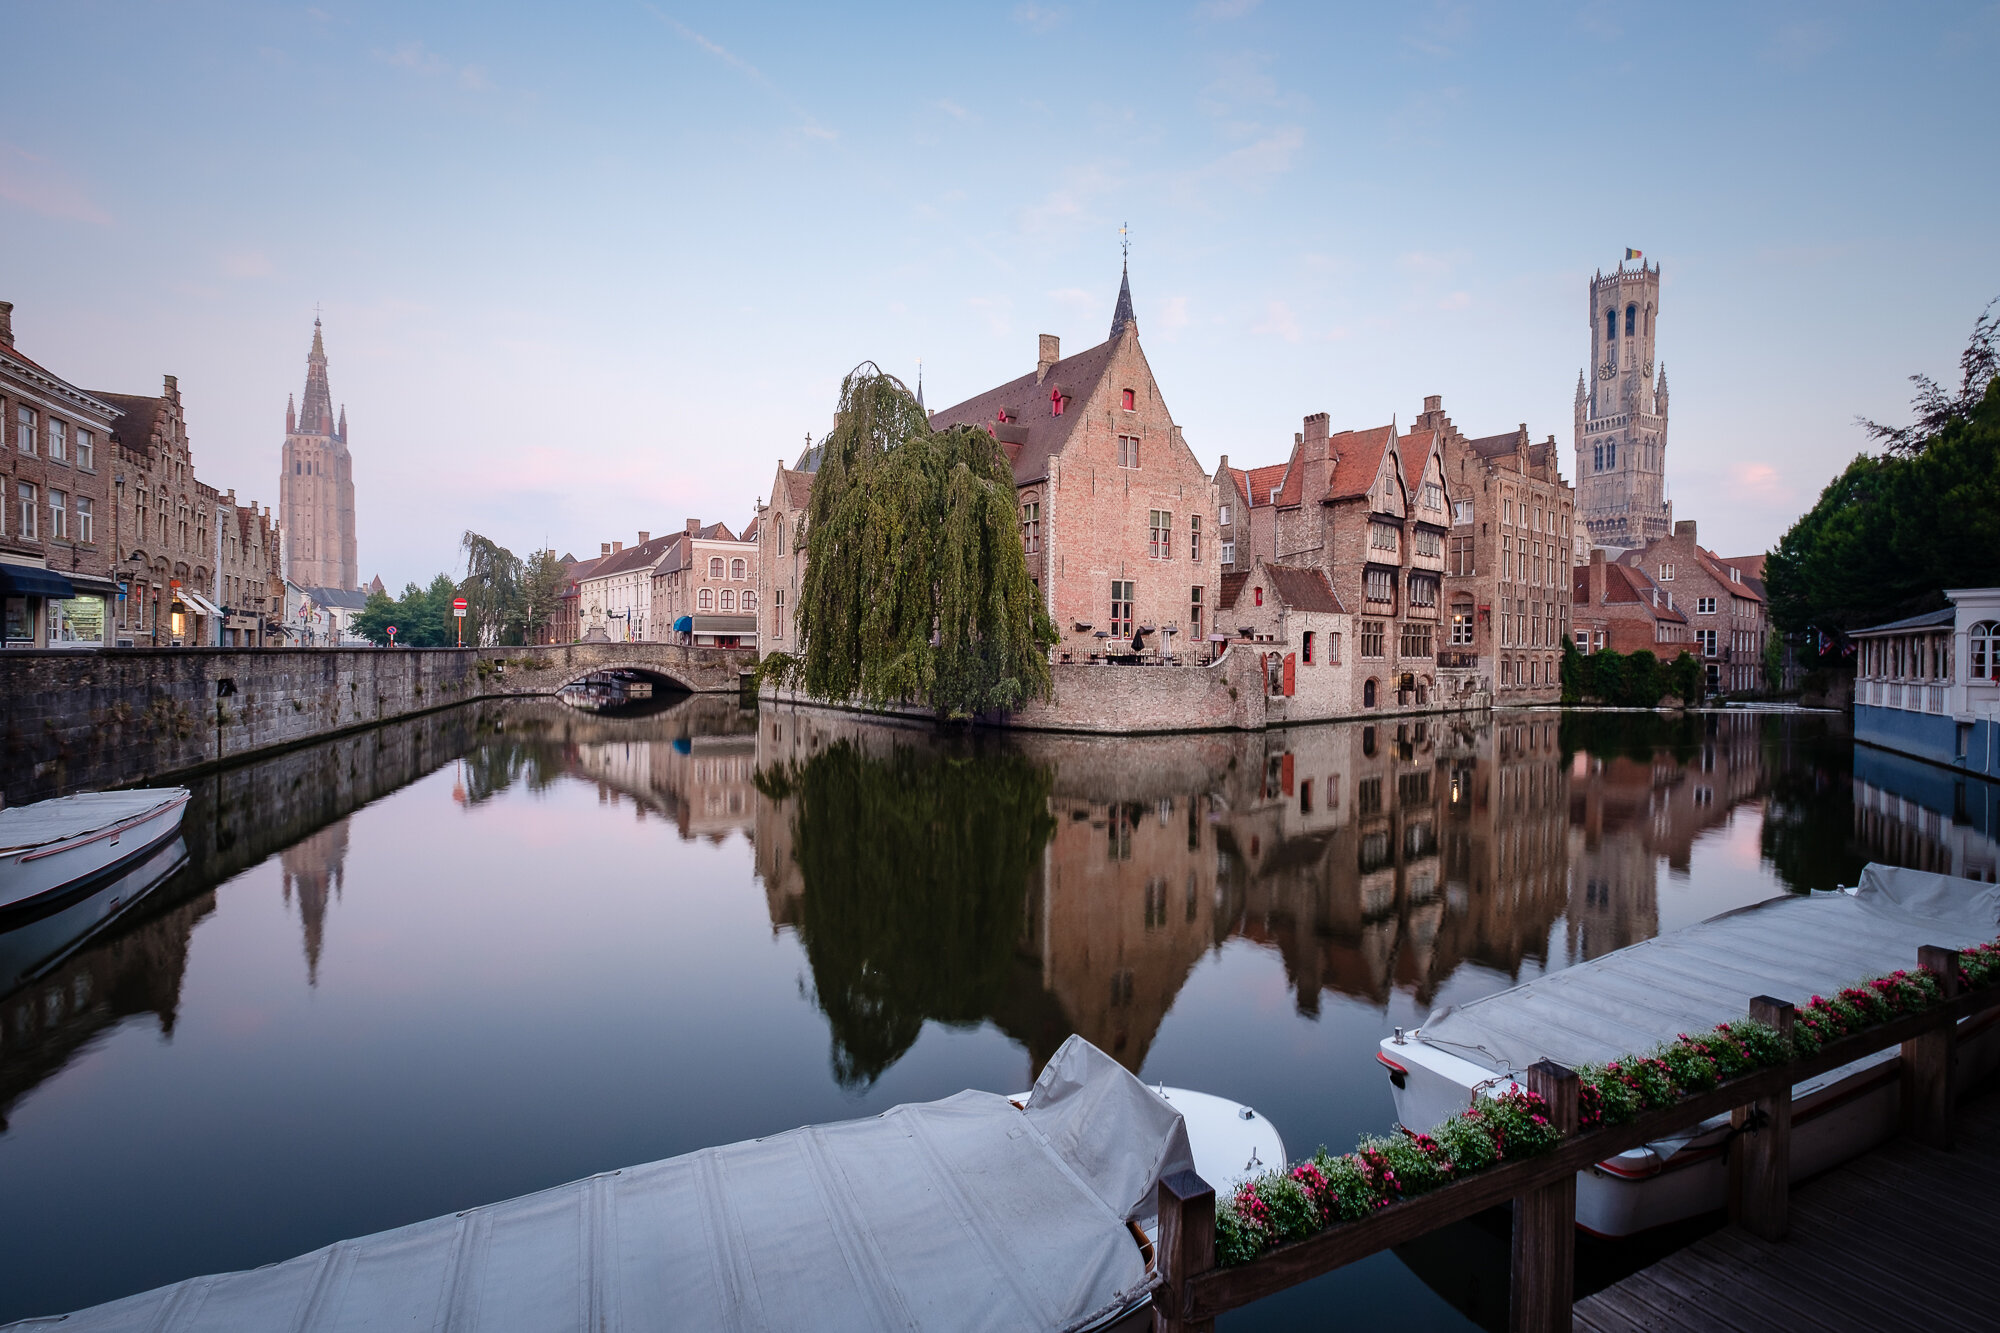
Fujifilm XT2 | XF10-24mm | 10mm | 1 Second | f/11 | ISO200
If you have ever looked at photos of Bruges, you will have no doubt come across a similar view of the Dijver Canal as it zig-zags past the very pretty Relais Bourgondisch Cruyce Hotel. It’s probably the most popular viewpoint in the city and for those that have visited, they will know just how busy this part of Bruges can get. This photo was taken in late July, during the day and with so many people around, getting close to the river wall was a bit of a challenge as everyone wants to get a photo of this famous view.
On the day I took this photo, I got up and out of the hotel at around 6 am which is something I try to do whenever I visit a new city for a couple of reasons. Firstly, for the light. If I am going to go to the trouble of visiting these places, I want to photograph them in the best possible light. I was at this location during the day when the sun was high and the light was just too harsh. So, by getting up early, I get to capture the scene when the light is diffused and much more photogenic.
The second reason I get out early is to avoid the huge crowds that surround this area during the day. To capture a photo that provides a more tranquil, relaxed feeling, I try to present the scene free of the hustle and bustle of the many tourists. The other advantage is that I can set up my tripod in the best place to get the best composition.
So, once I found the location, I mounted my Fujifilm XT2 camera with the 10-24mm lens on to the tripod. I chose this wide composition as I like the way the boats in the foreground and the wall to the left frame the canal which appears to open out from the bottom left corner, leading your eye into the frame to rest on the picturesque buildings on the far side of the canal. Taken at the widest 10mm, I also used an aperture of f/11 to ensure the scene was in focus from front to back providing me with an exposure time of 1 second which was just enough to smooth a few ripples in the water.
If you want to see many more photos I took during my visit to Bruges, check out the following article I wrote here: On Location Photographing Bruges
Before I sign off, I just wanted to quickly mention that this is the first of my Weekly Photo posts that will be delivered directly to the inbox to anyone already subscribed to my mailing list. Those not subscribed can do so here, that way you will never miss another post.
Until next week.
Trevor
This post is featured in my Weekly Photo series where I post a new photo every Monday. To have this delivered directly to your inbox, you can subscribe to the mailing list here.

What's In My Camera Bag? (2020 Edition)
“What camera did you use to take that shot?” “What filter did you use for that long exposure?” These are just a couple of the questions I regularly receive when people see my photos, so, for those interested, here is my own What’s in my camera bag? 2020 edition.
“What camera did you use to take that shot?” “What filter did you use for that long exposure?” These are just a couple of the questions I regularly receive when people see my photos, so, for those interested, here is my own What’s in my camera bag? 2020 edition.
Before I start, it is worth noting that I firmly believe it’s the photographer that has the vision, chooses the subject and creates the image. There are many photographers that successfully shoot with a single body and lens, a compact camera or even just their camera phone and still produce quite stunning work so don’t get fixated on the photography gear, always fixate on the craft and seeking to create your own artistic style.
“The single most important component of a camera is the twelve inches behind it.” - Ansel Adams.
That being said, if you are shooting with intent and have particular style of image you want to capture, then the right equipment can remove all of the friction in the process and allow the photographer to focus on the creative instead of working overly hard to get the shot and maybe even taking some of the fun out of the process.
Lastly, this is not going to be an overly technical post. It won’t be about the features and specifications, just what gear I am currently using and why.
Cameras

Fujifilm XT2
Those that have followed me for some time know I am a Fujifilm shooter and this XT2 is my primary camera. Unless I am travelling super light (more on that below) I take this capable camera. It may no longer be the latest model but it is still super-fast, very capable and not going anywhere yet!

Fujifilm X-T30 (NEW for 2020)
When I moved over from Nikon to Fujifilm in 2016, I bought the X-T10 and I instantly fell in love with it. I loved the tactile dials and buttons, it literally changed my photographic life. Since the X-T10 was getting a little long in the tooth, last year I reluctnatly upgraded to the X-T30 which to all intents and purposes is the same camera but with upgraded internals. I wrote a blog post about the switch which you can find here.
Camera Lenses

Fujifilm XF 18-55mm f2.8-4 R LM OIS
This was the first Fujifilm lens I brought as it came with the X-T10 and is regarded as it’s kit lens. This may be true but normally kit lenses are considered entry level and not able to match the quality of more expensive lenses. The XF18-55mm breaks that mould as it has excellent image quality and a fantastic standard zoom. This versatile lens ca be found on my camera more often than any other.

Fujifilm XF 55-200mm lens f/3.5-4.8 lens OIS
For the weight and size, this is a fantastically compact zoom lens with great image quality to go with it. When I first purchased this lens, I was concerned as I had previously brought similar lenses for similar money when I shot Nikon and image quality was quite poor. This lens is different, it’s IQ is great and the optical image stabilisation is a godsend, especially at those longer focal lengths.

Fujifilm XF 35mm F2 WR
This 35mm F2 is one of Fujifilm’s “f2” range and it truly is a great lens. It may not be as fast as the f1.4 35mm Fujifilm also make but this compact little lens packs a punch and coupled with my X-T30 means I have a very lightweight system to wander around with and when used with my XT2 I have a full weather resistant system.

Fujifilm XF 16mm F2.8 WR (NEW for 2020)
This is the newest lens in my lineup. I really enjoy using my 35mm prime (above) but wanted something wider to go along with it in my lightweight kit. Since buying this lens I have put it through its paces and really like the results. Some of which you can see on this post here.

Fujifilm XF 10-24mm lens F4 OIS
A great and versatile wide-angle lens. Great for architecture and cityscapes, this lens will often come on a shoot with me. Not the fastest lens at f4 but I rarely shoot landscapes that wide and the OIS certainly helps when shooting handheld in low light situations.
Tripods

MeFoto Roadtrip
I don’t own any big, bulky tripods. This is as heavy as it gets for me which is all I need to capture my long exposure and low light photography. This will be in my bag if I know my photo shoot will include some extensive tripod use. The ball-head is strong enough to hold the weight of my heaviest combination which is the XT2 and 55-200mm lens.

Manfrotto Compact Light
I brought this tripod just before I took my first trip to Venice. I knew that tripods would be difficult in such a crowded place so a lightweight tripod seemed an ideal compromise between weight and frequency of use. Since then I now carry it as a part of my lightweight kit (see the differing kits below).
2020 Update: I will be looking to replace this tripod during 2020 as although I like the tripod, the ball head is starting to fail and needs replacing.
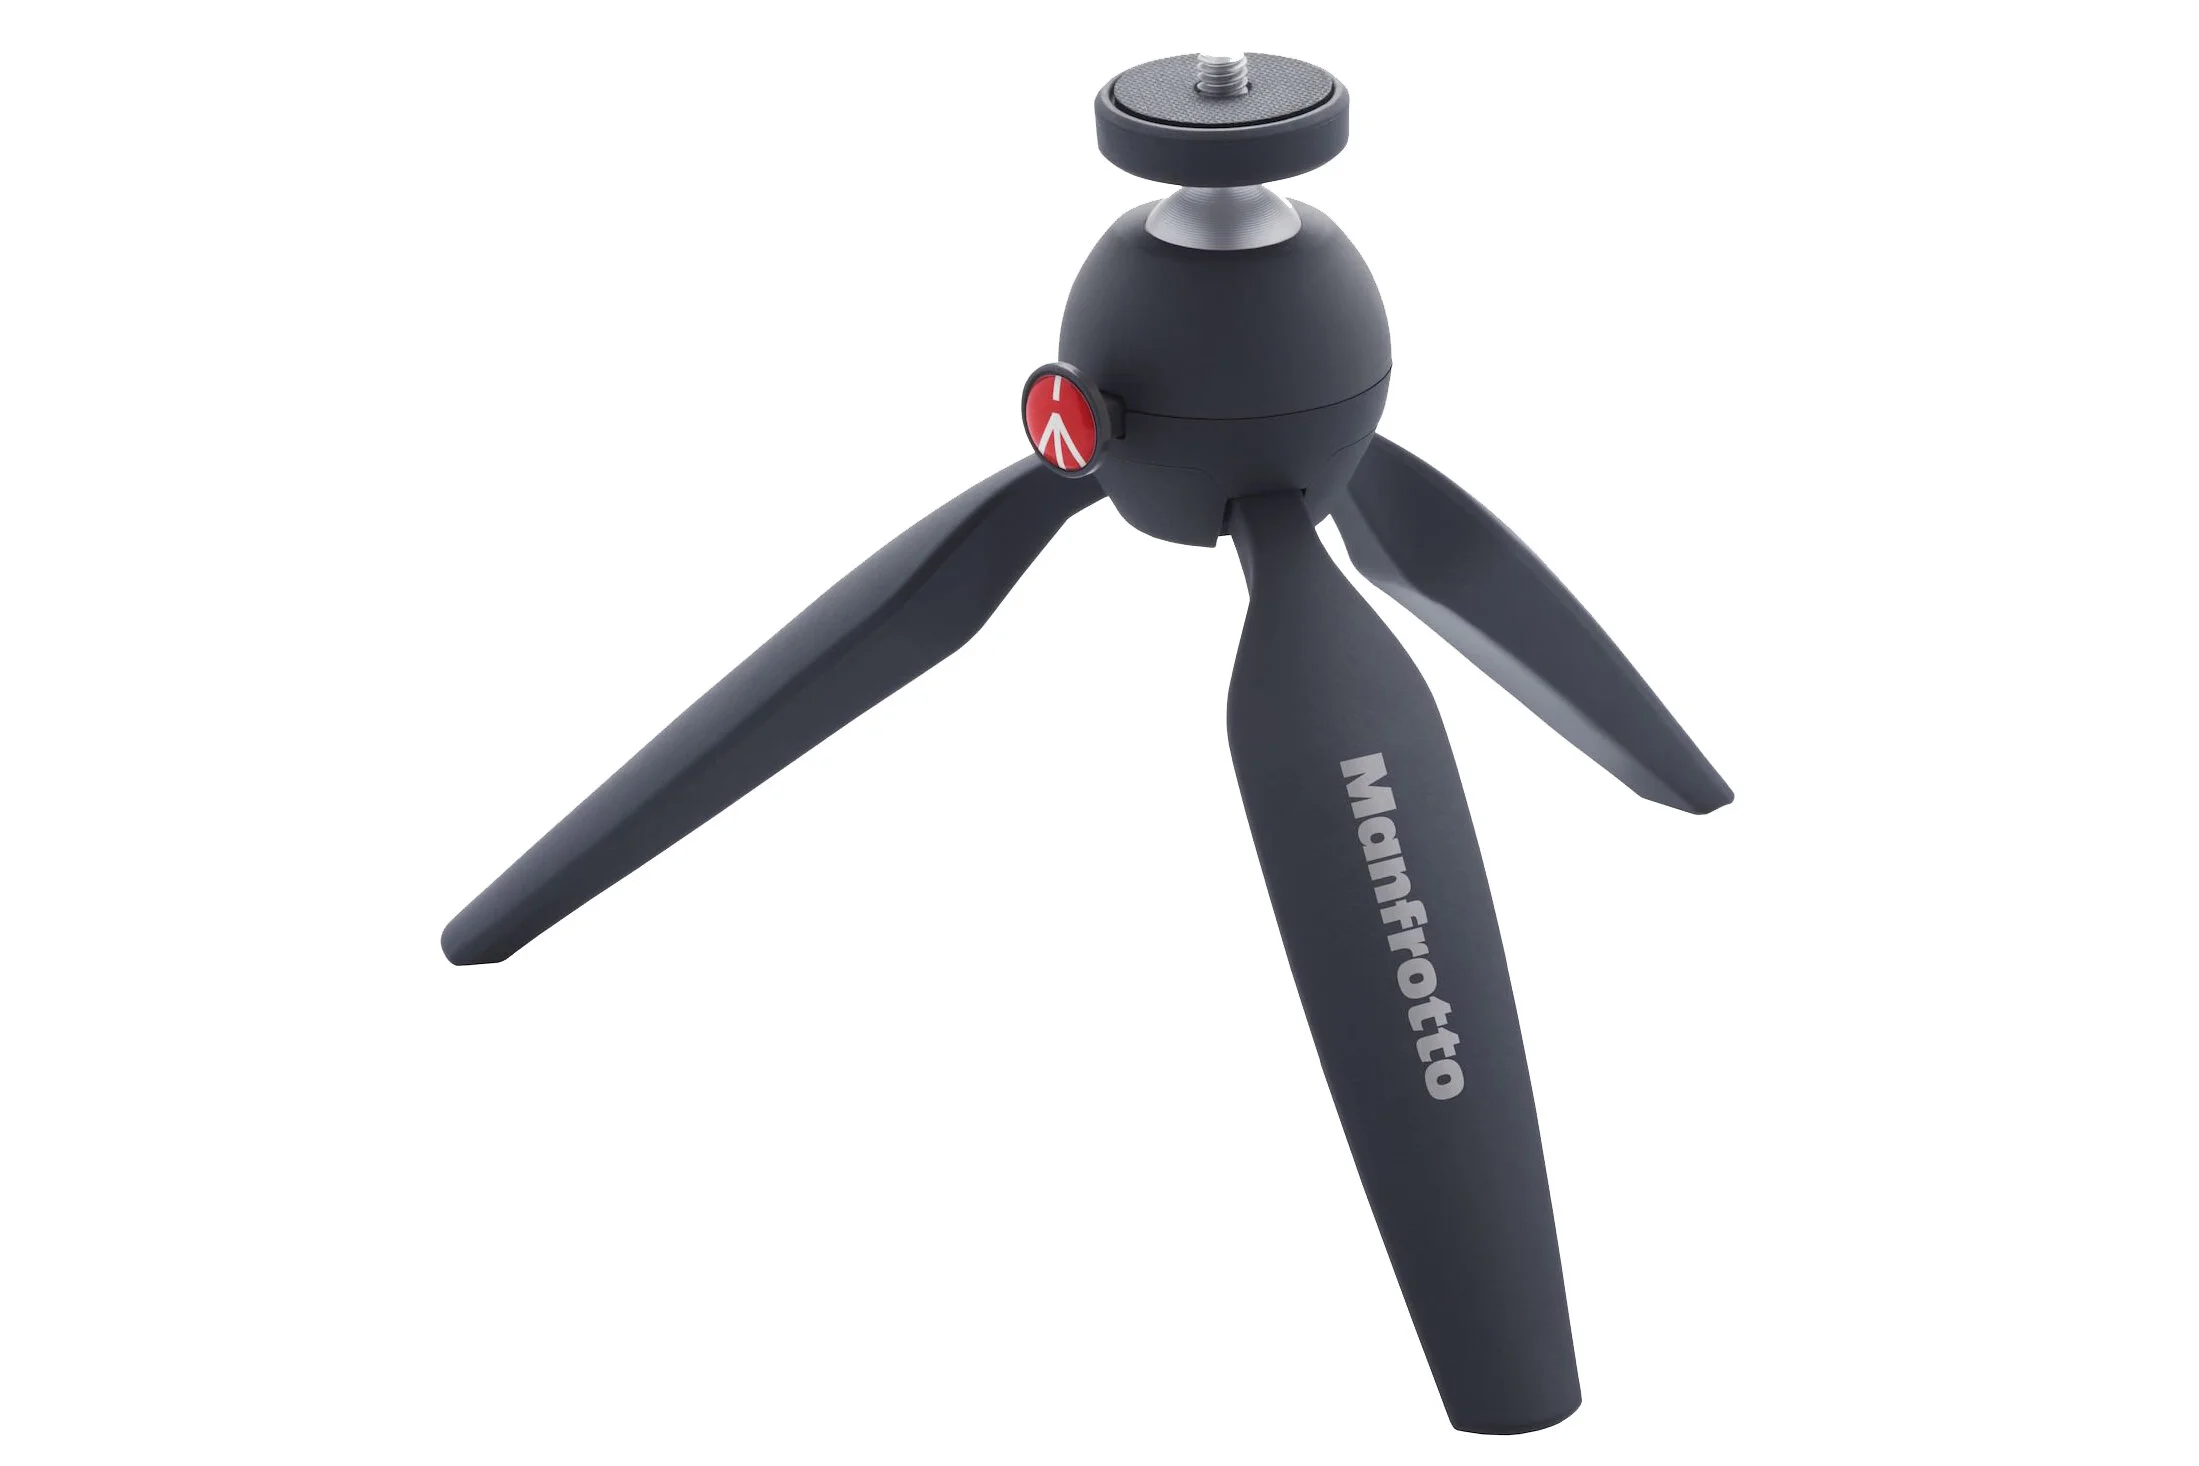
Manfrotto Pixi
This little table top tripod is excellent. It is super strong and super light and perfect to carry around for those just in case moments you need a little stability while out shooting.
Filters

Formatt-Hitech 85mm Filters
A great set for landscape and long exposure photography. The 85mm filters are perfect for the Fuji mirrorless system and more than big enough for all of the lenses with one small exception. The 10-24mm, which at its widest has a little vignetting at 10mm when the filters are attached. Currently, I have a 10 stop ND filter and a set of three ND graduated filters for those landscape photos where the dynamic range is too high.
Camera Bags
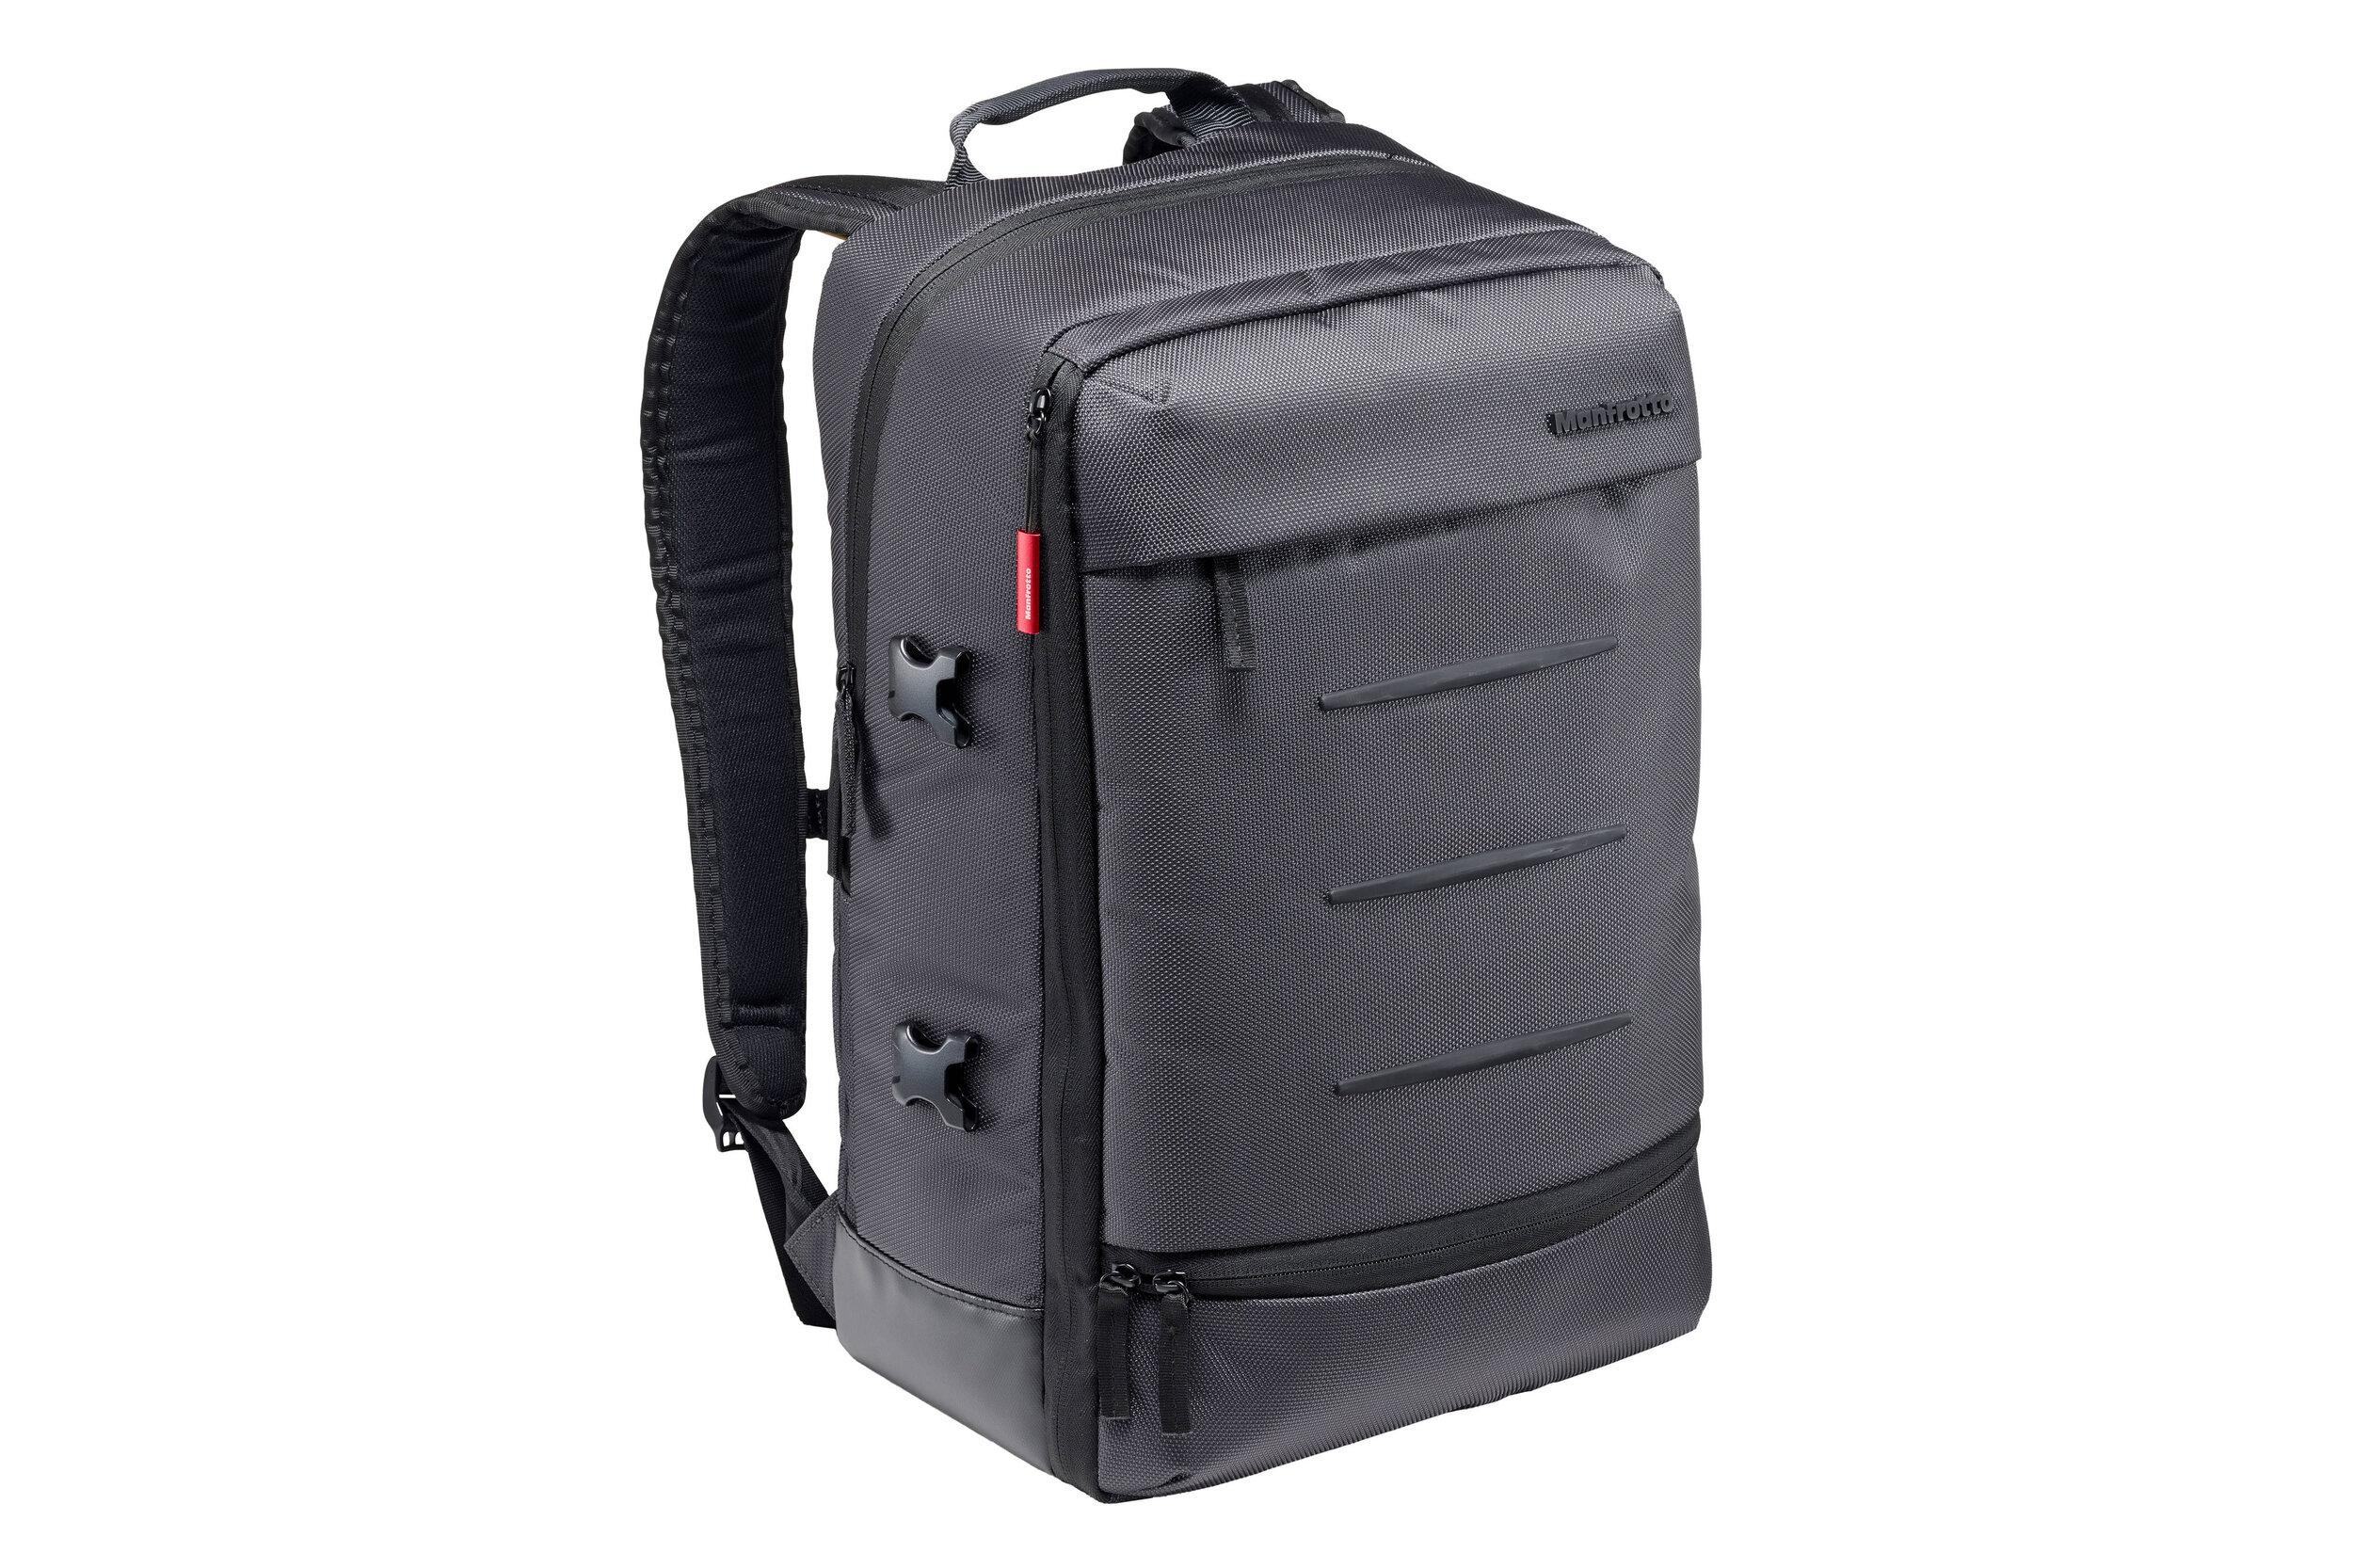
Manfrotto Mover-30 Manhattan Backpack (NEW for 2020)
I brought this bag in 2019 as I was after a bag which was large and comfortable enough to carry my lightweight, city gear but look a little more subtle so it didn’t draw as much attention and I could blend in a bit more as I walked about the city. At the time of writing, I’ve had this bag about a month and so far, enjoyed using it.
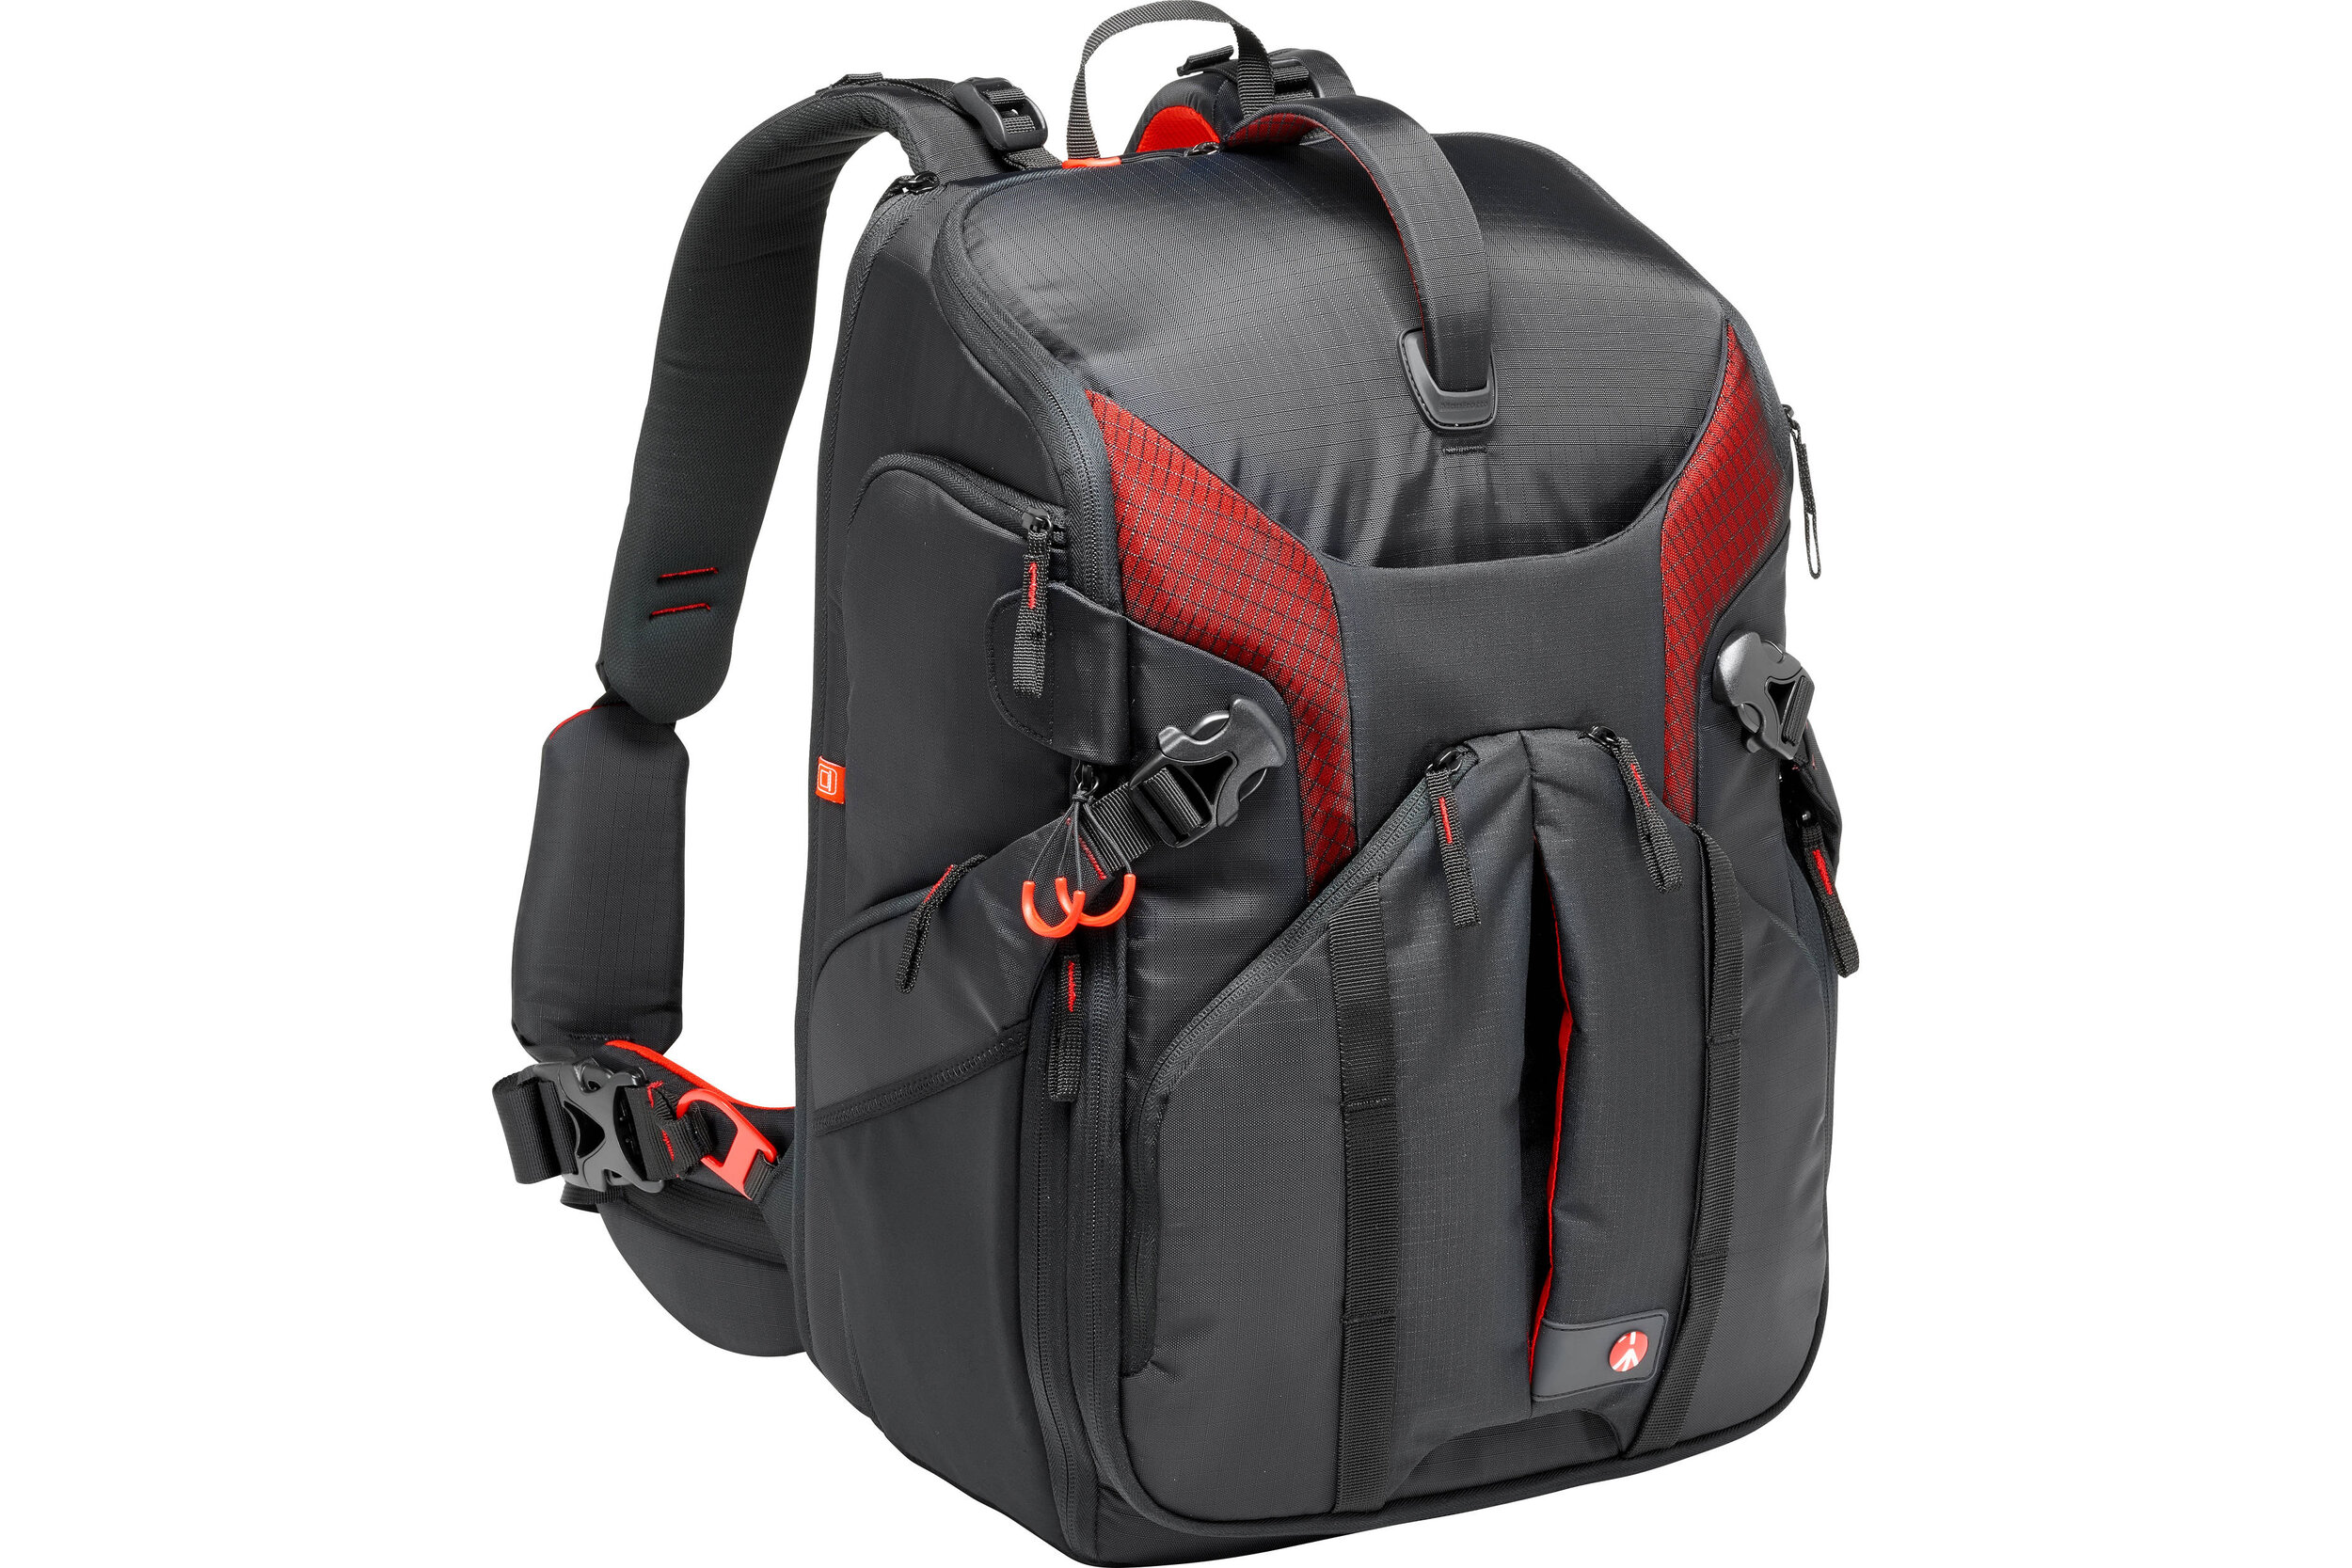
Manfrotto Pro Light Backpack
Having a mirrorless system means the size and weight of my kit is kept a little lower and that means I don’t need a huge bag to carry it all. I chose this bag as it both carries all of the kit I would take on a shoot with its multiple configuration options and it also allows me to carry my biggest tripod centrally to keep the bag balanced and takes the pressure off my back.

Manfrotto Street Backpack
I use this bag when I need to travel light or I need to carry other bits as well as some camera equipment. This easily fits a camera and a couple of lenses leaving enough room in the top compartment for clothes and laptop etc.
Accessories

3 Legged Thing L-Bracket
Perfect to quickly switching between landscape and portrait while using the tripod.

3 Legged Thing Toolz
Quite a critical tool as the 3 Legged Thing L-Bracket covers the battery compartment on my XT2 so when the battery needs changing, out comes this tool to quickly remove the L-bracket.

Ultimate Lens Hood
Perfect to help cut out those reflections when shooting through glass. I used the ULH when I was on this sunrise shoot in London.
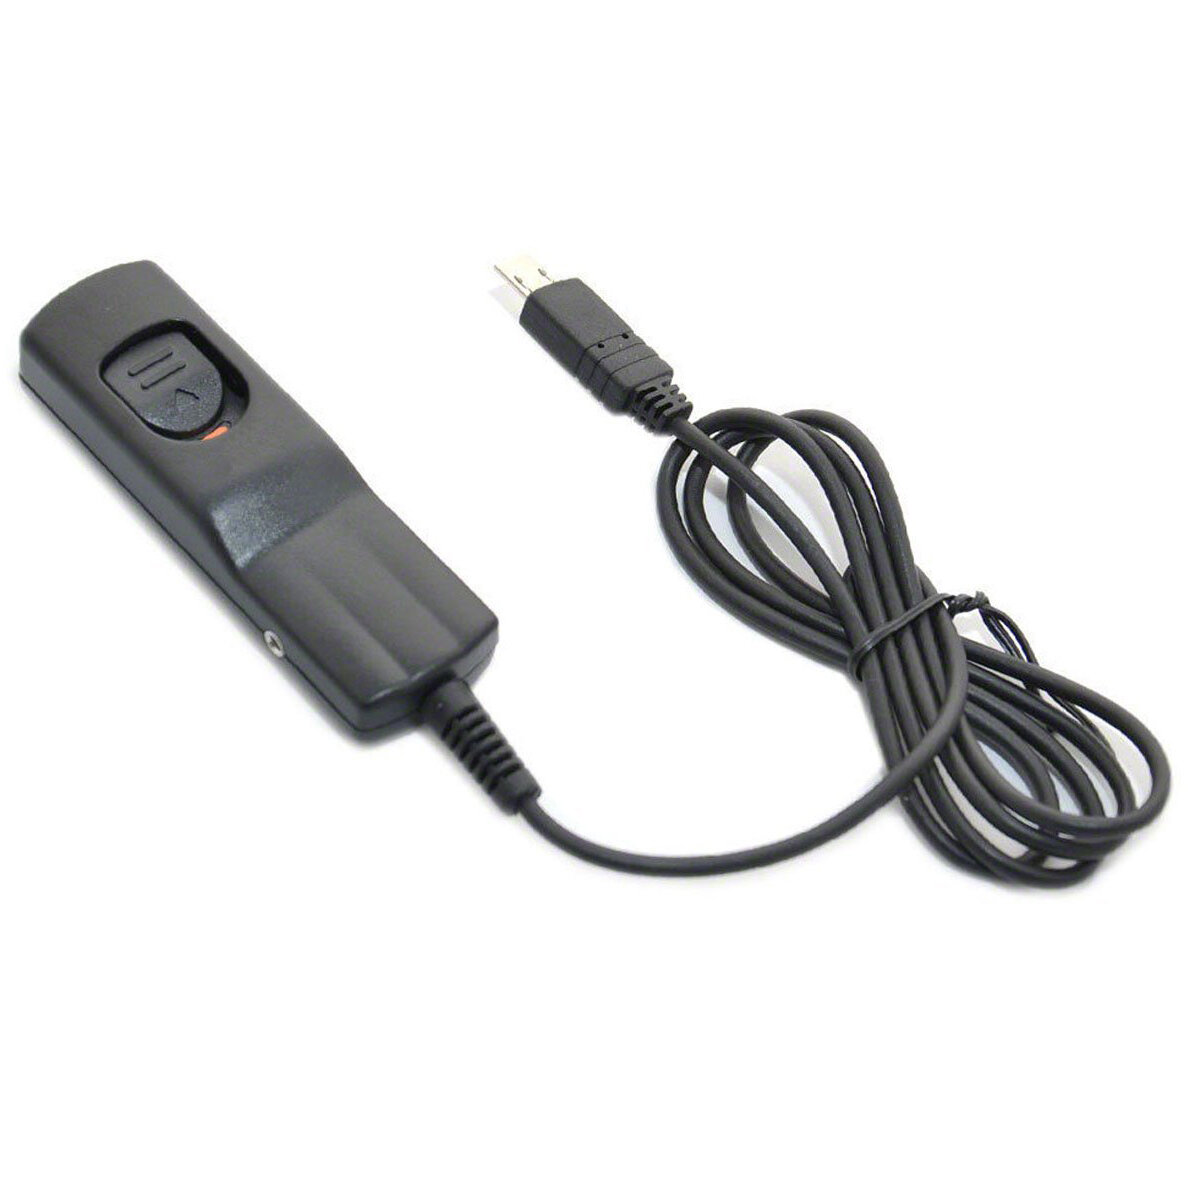
Remote cable Shutter Release
Critical to ensure no camera shake happens when pressing the shutter or keeping the shutter open during long exposure shoots.

Peak Design Slide
This is a great camera strap, it’s comfortable and the quick release anchors mean it can be removed with minimal fuss.

Sandisk Memory Cards
I use Sandisks memory cards because so far, during all of the years I have been photographing, I have not had one failure. I do retire cards when they start showing any sign of wear which I am sure helps avoid failures.

Fujifilm NP-W126s Battery
On a long shoot, I will go through many batteries. One downside of mirrorless is still the battery life. It is improving but still nowhere near what it was when I shot with a DSLR.

BC-W126s Charger
The charger comes with me on longer photography trips when I know my batteries might not last the entire time.

Puridea S2 10,000mAh
This neat little battery pack can charge my phone 4 times or using my other USB charger, can charge 6 or 7 camera batteries. An incredibly useful gadget.
So, how do I pack all of this gear in my bag?
Although I have a healthy collection of camera gear, I certainly wouldn’t bring it all with me to each shoot. Below are 3 of the most common ways I pack my bag, depending on the type of photography I intend to do.

FULL LANDSCAPE/ CITYSCAPE
When I am on a long shoot, capturing long exposure images, high level cityscapes or grabbing the odd time-lapse, this is the kit I will usually pack. There is not a lot of room left in the bag and it’s my heaviest configuration but at least I am prepared for anything.

LIGHTWEIGHT CITY/TRAVEL
Much more suitable for a long day walking around the city or while traveling where there will be a mix of intimate and sweeping landscapes to photograph. The shoulder strap for walking about and the very lightweight Manfrotto tripod to take photos in low light. Depending where I go and what I intend to shoot will depend on the combination of lenses I take.

ULTRA LIGHT-WEIGHT WALKABOUT/STREET
I tend to have this kit with me when I’m shooting handheld around the streets of London or when my primary focus for the day isn’t photography but I may sneak in an hour or two. Although I may pack the kit in my Manfrotto Street backpack to travel with, I will tend to leave the backpack in the car and take just the camera and strap out with me and keep the spare prime lens and tiny tripod in a pocket so I can travel as light as possible.

So, there you have it, all of the gear I take with me as of January 2020. I mentioned above that I plan to upgrade my Manfrotto Compact Light tripod this year but other than that, I don’t foresee any major upgrades in the camera and lens department…well, unless Fujifilm does something special with the XT4 that is. Never say never and all that!!
As my equipment evolves, I will try to refresh this post each year.
Until next time.
Trevor

City Chrome | Weekly Photo #31
5 Years ago, I would have likely overlooked this image as it would not have suited my style of the time but times change and tastes evolve and this photo of the City of London is a good example of that.
“Change is the only constant in life” (Heraclitus) and never a truer word was spoken when it comes to photography. Landscape photographers have to work with many variables such as the subjects they shoot such as this ever-changing cityscape and the conditions they shoot in such as the weather and time of day but one of the subtler changes that most photographers will experience is how their style changes over time and I’m no exception. The changes can be slight and change slowly over time, or, the change can be rather abrupt such as when the photographer shoots an image and although not their usual style, likes it and proceeds to shoot more like it. I’m pretty sure I have experienced both.

Fujifilm X-T30 | XF18-55mm | 30mm | 1/125th Second | f/5.6 | ISO160
I sometimes look back at older photos and think “Wow, that’s not a good photo” or “what was I thinking?”. The processing may be less refined, the colours too vibrant or shadows opened up way too much (yes, I went through the overdone HDR phase too). The truth is that they are not all bad photos (some of them certainly are) but it’s just that the kind of photos I like to take and the resulting style has shifted since that particular photo was taken.
Talking about this photo here. 5 Years ago, I may have binned the image based on it being a little mono and lacking in vibrancy. It doesn’t have the same wow factor I would look for back then. But I have noticed over the last 2 years or so, my tastes are changing. I’m starting to process my images with a little less saturation, not so garish with slightly deeper shadows and the style of shot shown here of the London skyline is now starting to push the right buttons for me. In life, I have always been one to be comfortable with change and in photography, it’s no different. You should have faith that your style is evolving for the better and If you notice your creative tastes are moving in a different direction, my advice would be to follow it and just see where it takes you.
So, about this photo. It was taken around 30 minutes before sunset from my current favourite rooftop location atop the Dome of St Paul’s Cathedral which provides some of the best views of the city. I’m a big fan of this composition which only works because the Walkie-Talkie building (aka 20 Fenchurch Street, aka The Sky Garden) is included to help add weight to the right-hand side balancing the scene against the cluster on the left. It also provides a subtle frame for Canary Wharf in the distance which I think is a nice touch.
This kind of shoot is ideal for my smaller Fujifilm X-T30 and 18-55 lens combination. When upon the Golden Gallery which sits at the very tip of St Paul’s dome, space is incredibly limited and having s smaller kit with a smaller bag helps you keep out of the way while others pass. If you are caught holding up the line, you will be told to move on so best to stay out of the way as much as possible.
Processed to emphasise the reflective glass buildings, I left the white balance “as shot” to keep those cooler tones and added a little contrast and clarity to give the buildings and those reflections a little more punch. Other than a few more subtle tweaks to the tone curve and HSL sliders, that really was about it.
I hope you like the end result as much as I do.
Until next week.
Trevor
This post is featured in my Weekly Photo series where I post a new photo every Monday. To have this delivered directly to your inbox, you can subscribe to the mailing list here.

2019 | A Photographic Year in Review
My photographic review of 2019 including a look back at some of my favourite photos and events that took place throughout the year and finishing up with some thoughts about 2020.
Well, that’s it. Another year passes and as I sit here preparing to write this post, having just celebrated Christmas with my family and friends, I now embark on the quest to quietly reflect on 2019 and contemplate where I want to take my photography and what I want to achieve in 2020.
2019 was, as usual, a busy year for me both in my personal and photographic life. I kicked off 2019 with a focus on getting myself in shape which apart from the obvious health benefits of shifting a few pounds, can really help when heading out and lugging around a big, heavy camera bag for hours on end. There was, however, one downside. As we all know, there are only so many hours in the day so I had to take the decision to prioritise work, family and health over photography. This didn’t mean my photography stopped, not at all, but the number of opportunities to get out with my camera would inevitably be impacted.
It wasn’t all bad, I still made over 40 photography related trips into London during 2019 and still managed to shift a few pounds! Not too shabby.
Below are a few of the photographic highlights of mine that took place during the past year.
Printing my own photos
Previous to 2019, I would occasionally print photos via a professional photo lab but with the desire to print my work more and knowing the benefits it may bring to my photography, in March 2019, at the Photography Show in Birmingham, I brought my first professional printer so I could try my hand at printing my own photos at home.
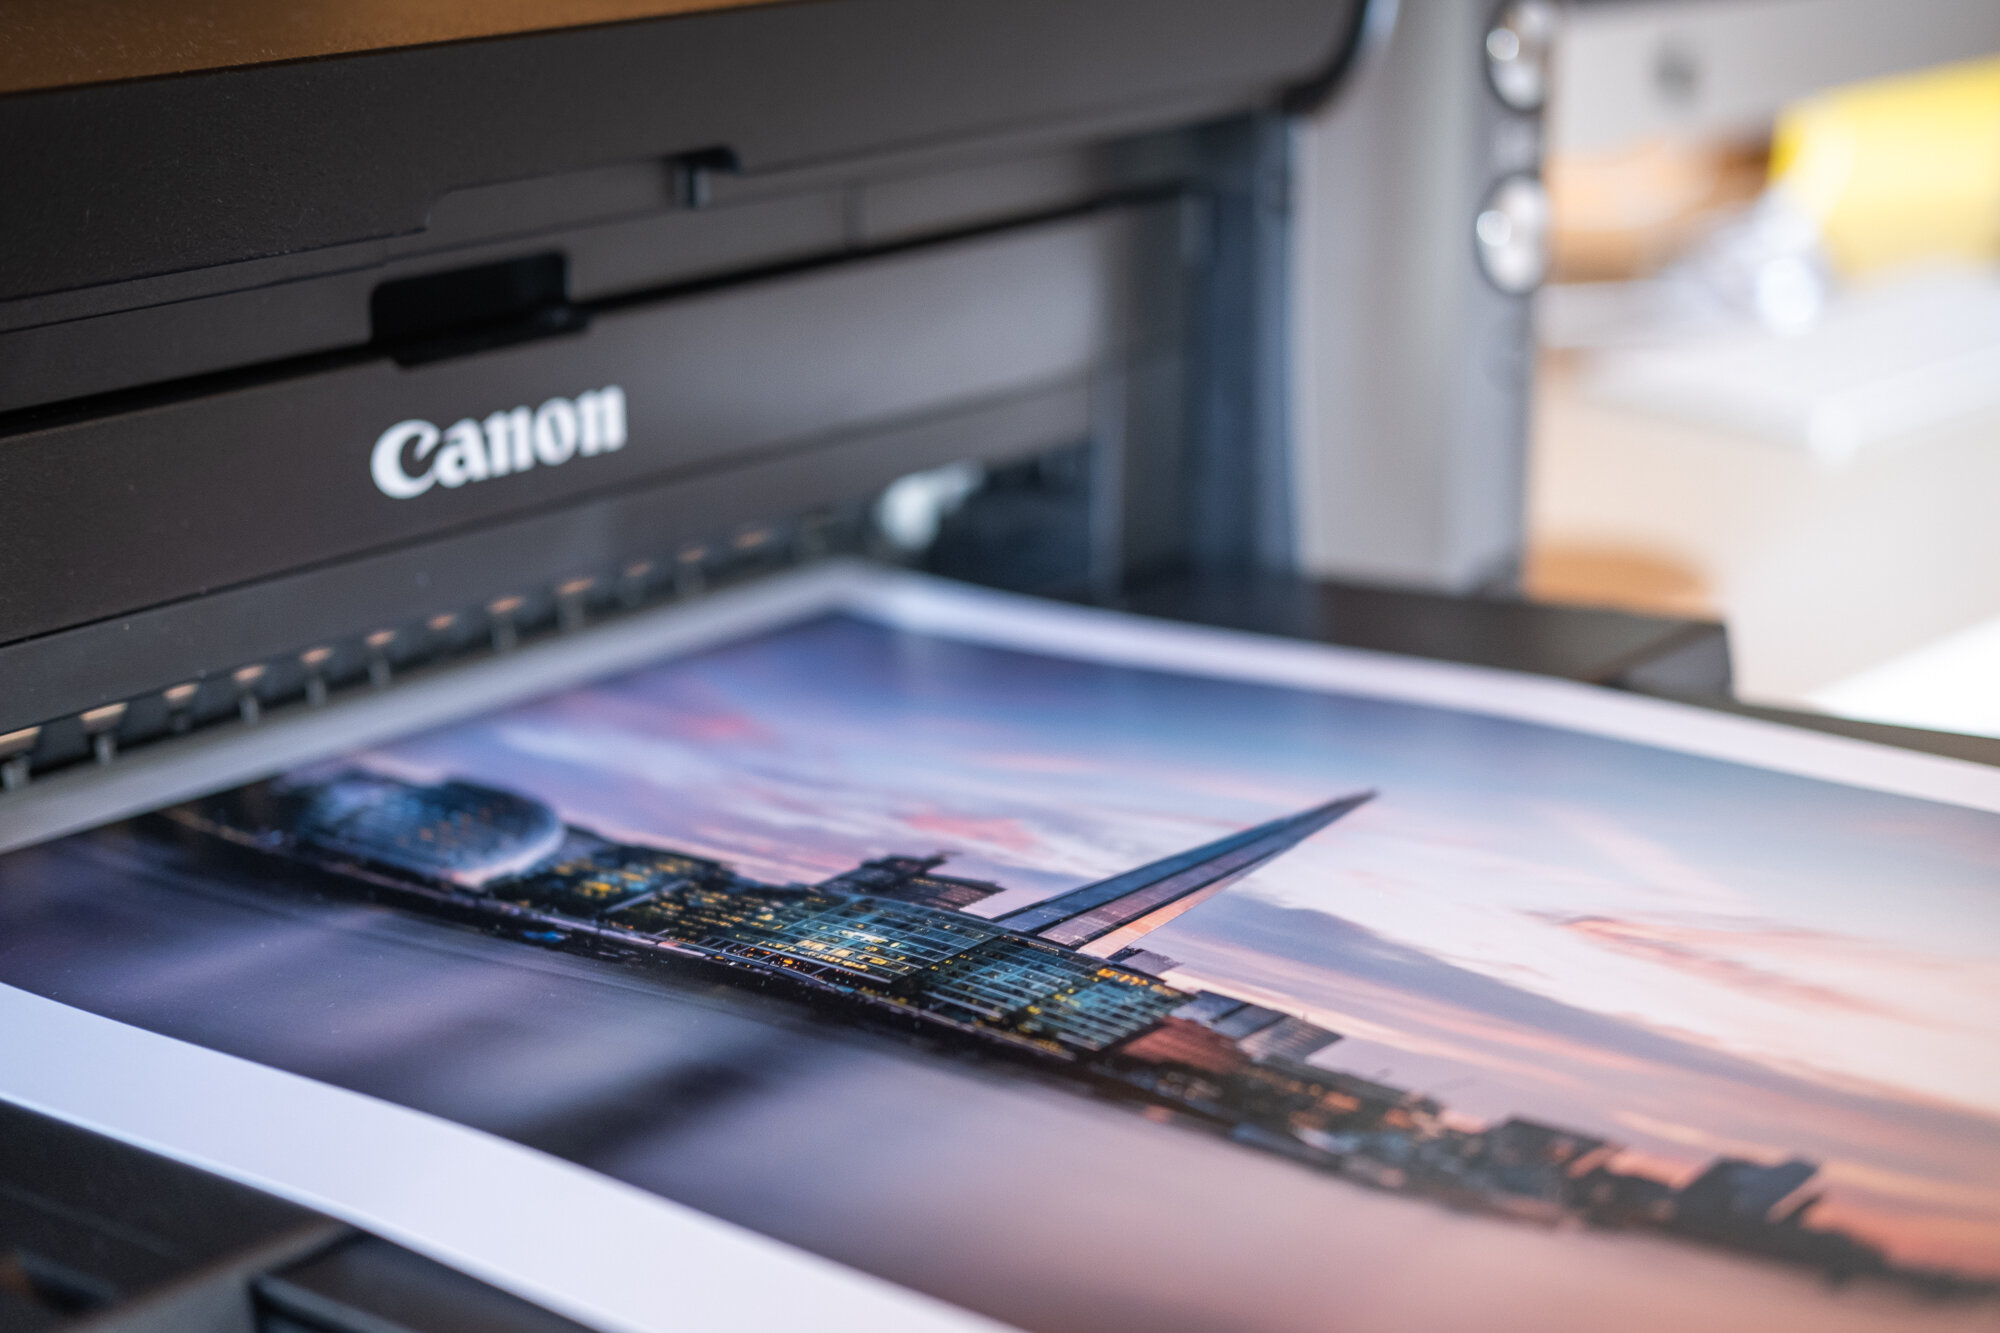
It was a bit of learning curve but once I got to grips with proofing and printer profiles I cannot emphasise enough how important printing images has become for me. Not only am I able to appreciate my images in a larger, more tactile form but it provided me with the ability to better critique my work.
Whether you use a professional print lab or decide to do what I did and print at home, I cannot recommend enough that you print out some of your best work!
In 2019, I wrote an article about my simplified home printing process which you can read more about here.
Mental Health and Why Photography Matters
The hidden role photography can play in our lives is something I have only just started to explore in 2019 and it has really opened my eyes to the subject. After diving a bit deeper into the positive effects having a creative outlet can have on people that fight various degrees of inner darkness, I decided that this is something I want to continue to pursue and help raise awareness where I can. You can read more in my first post on this topic here.
On-Location Photographing Ghent
One of the photographic highlights for me in 2019 was visiting the charming city of Ghent. I spent an enjoyable few days exploring the city and managed to grab a cracking sunrise along the river. Two of the photos I took during that sunrise shoot can be found further down, towards the end of this post.
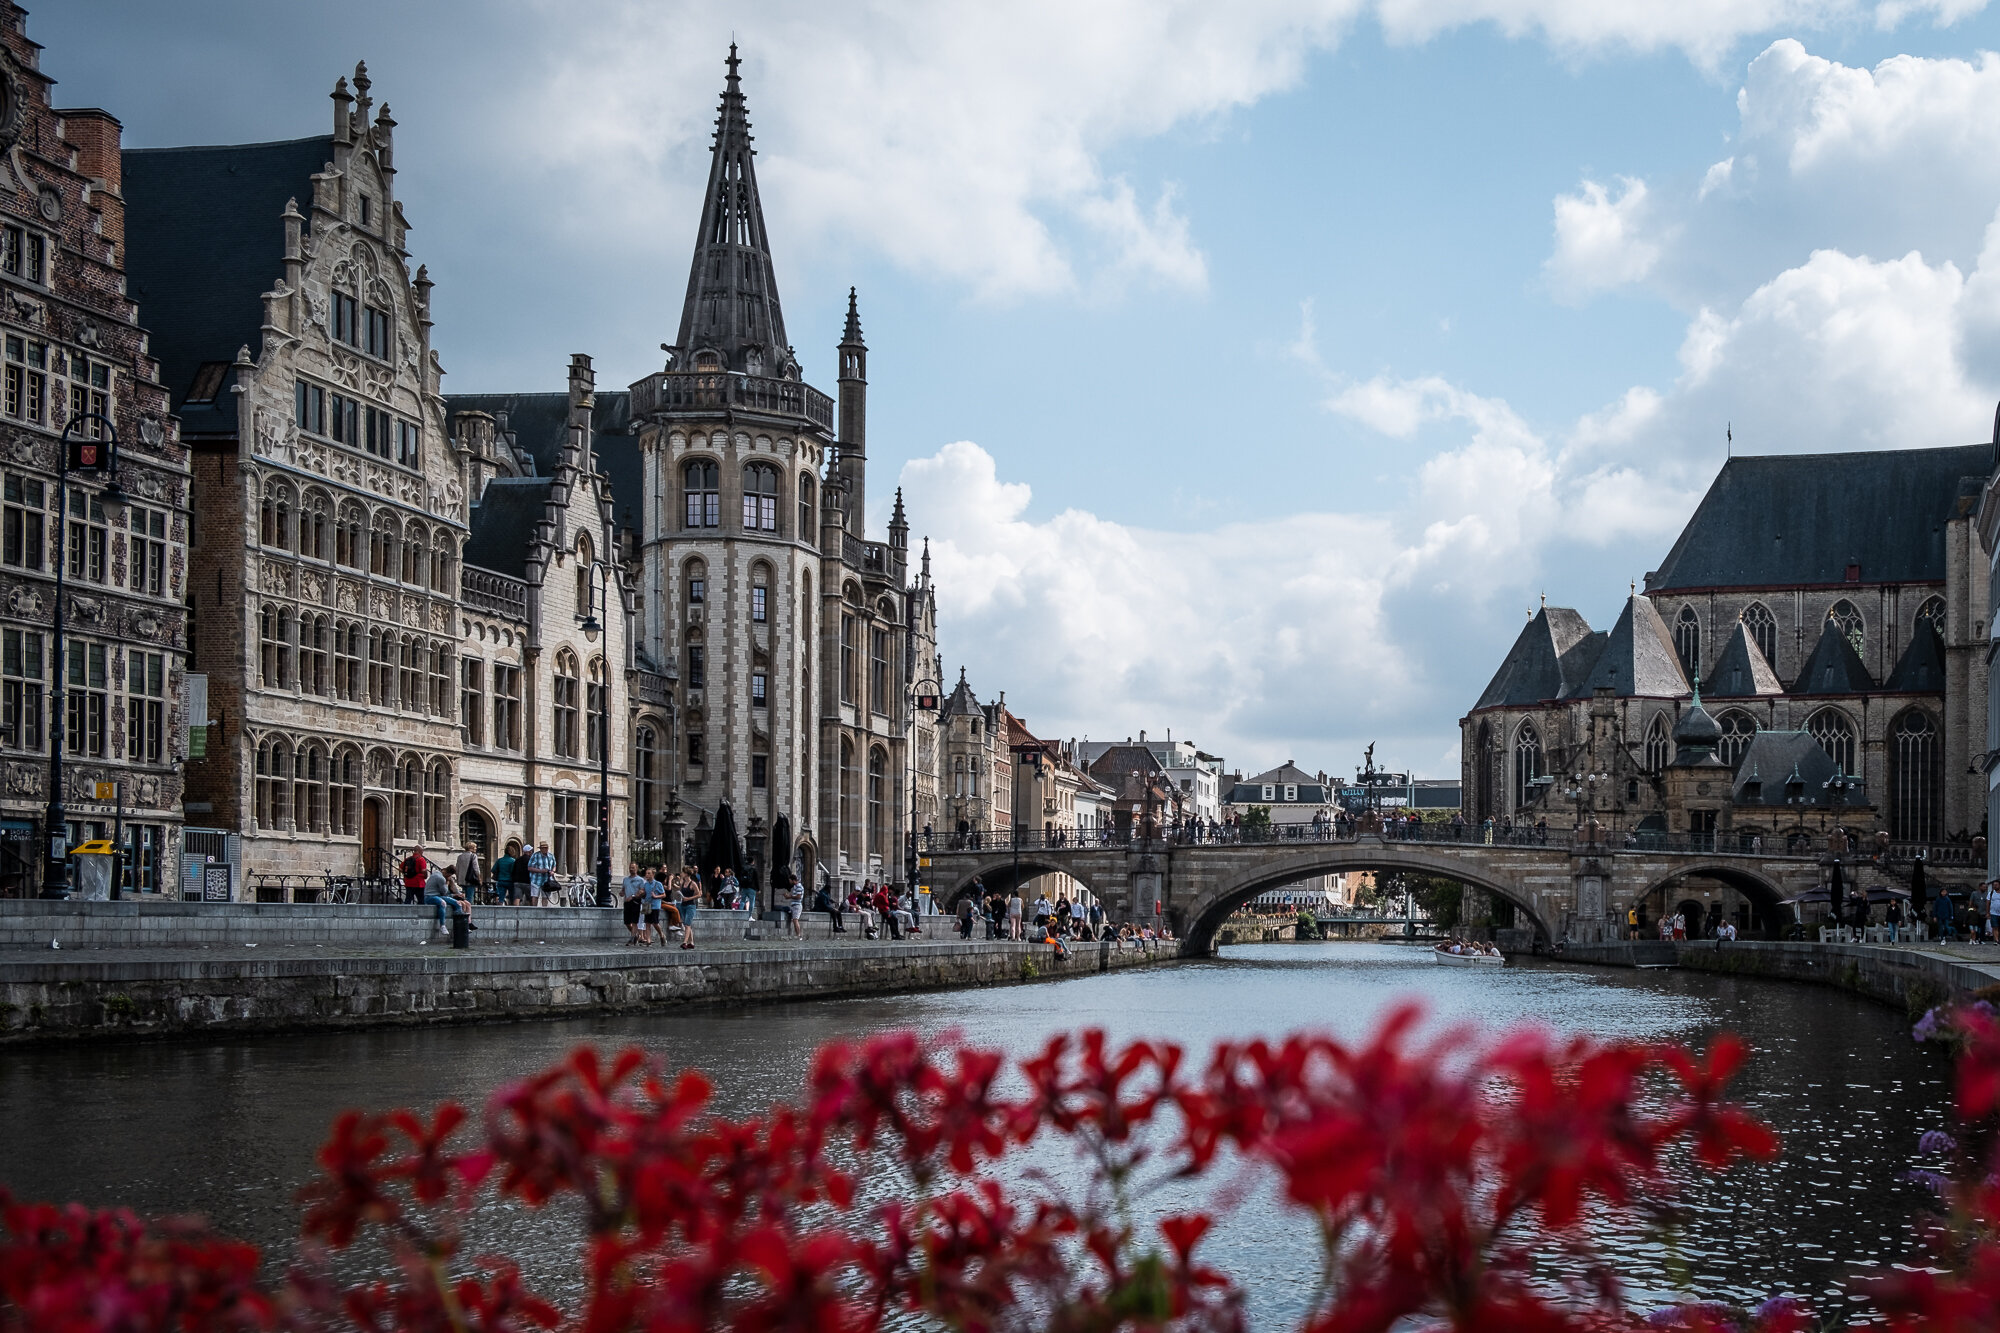
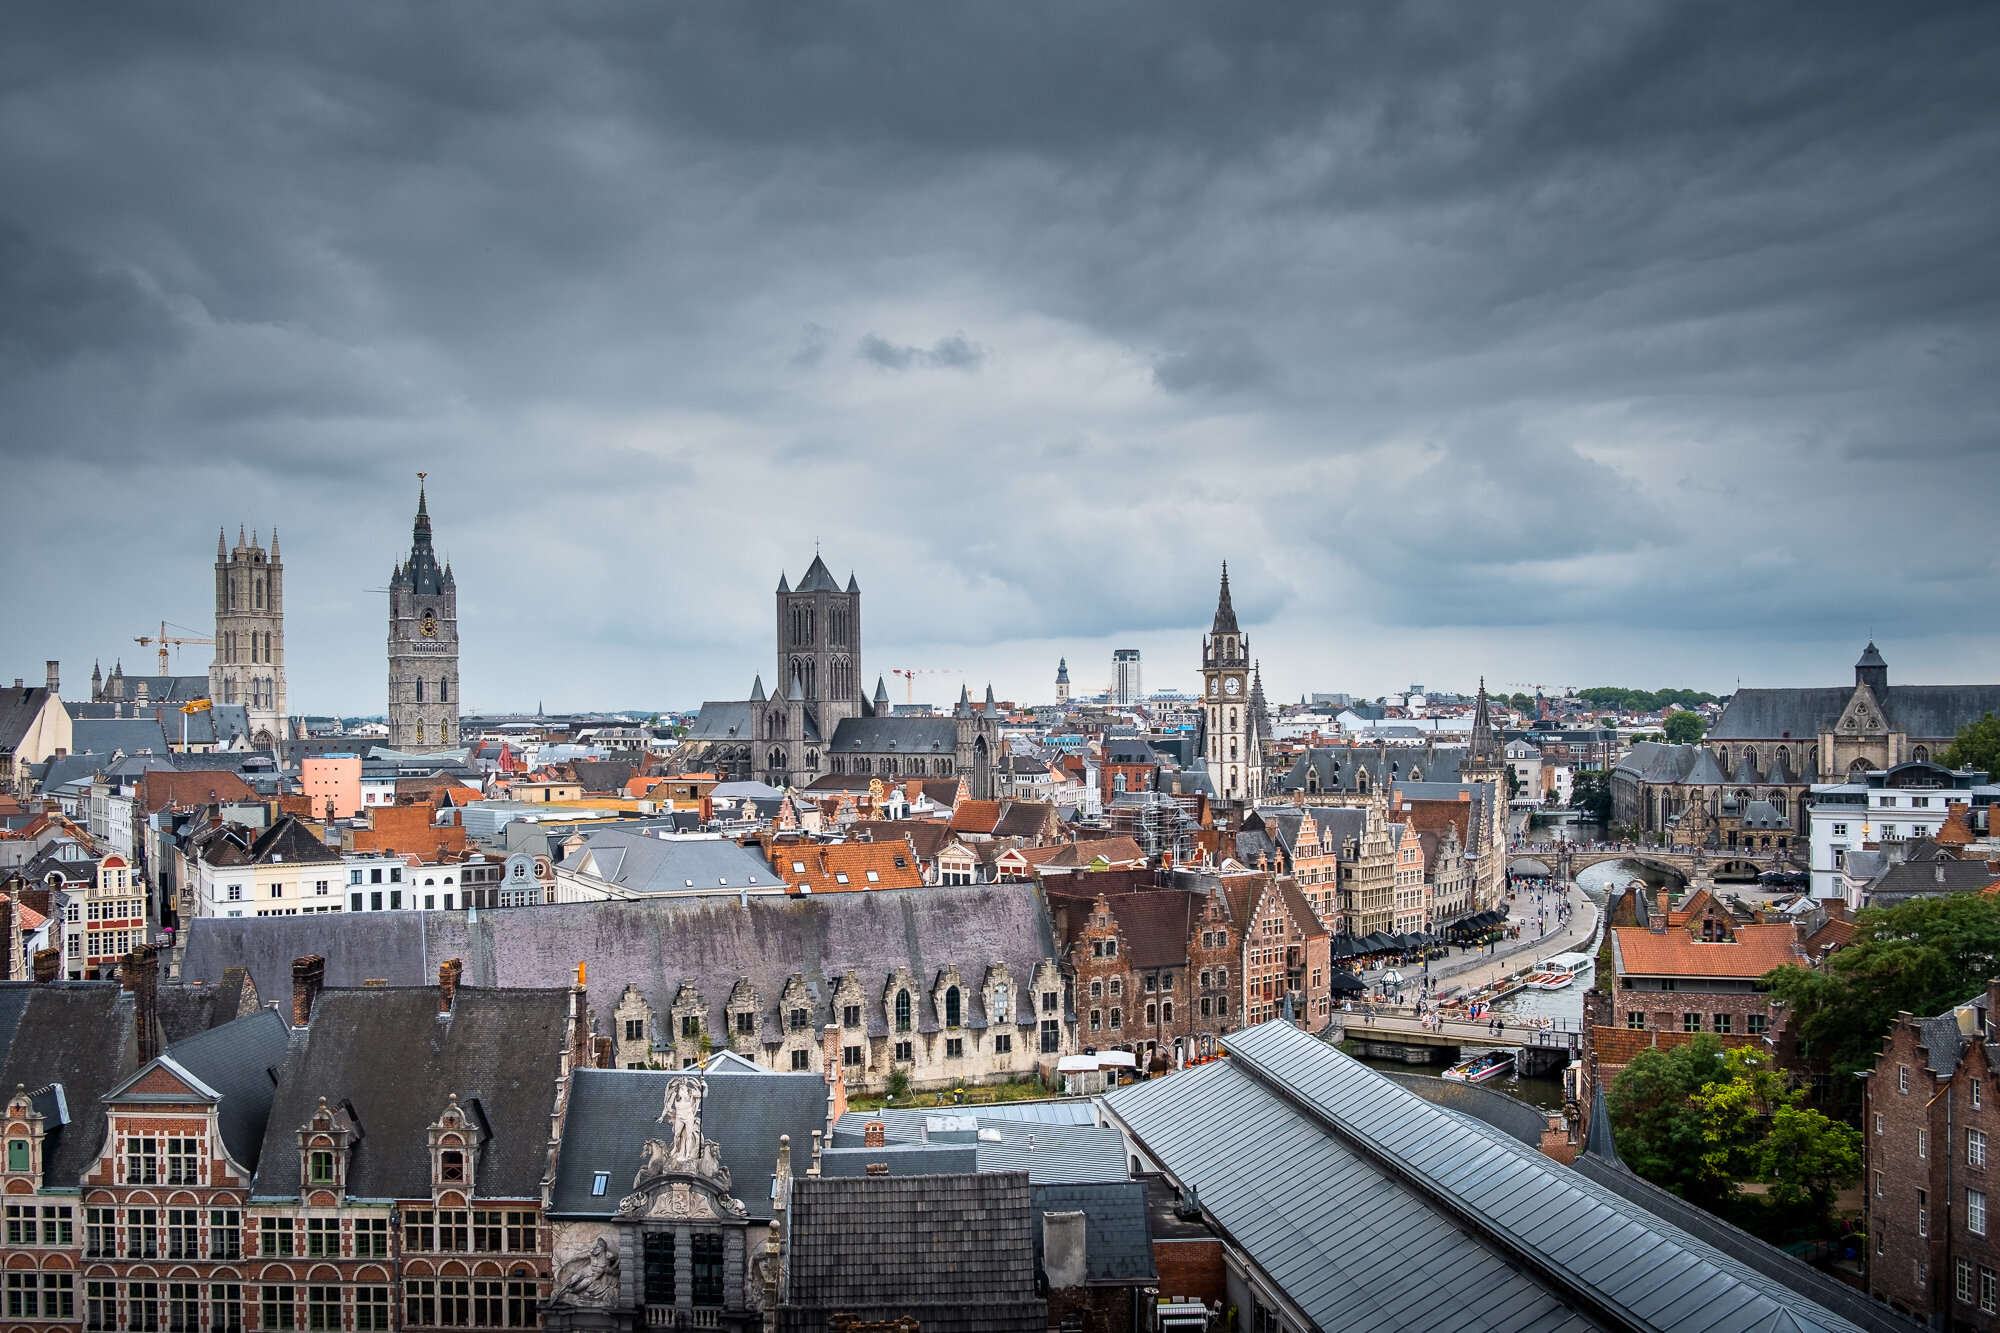
Over the last couple of years, I have visited various cities in Europe including Paris, Venice and Bruges and 2020 will be no different with a trip to Amsterdam already booked in for May! If you wanted a recap on this trip to Ghent, pop over to my On Location travel post I wrote a few months ago: On Location | Photographing Ghent.
Weekly Photo Project
This was arguably the most significant photographic decision I made in 2019. I decided to start a new project which would combine my photography with an increasing desire to explore the storytelling side of the craft. I decided that I would post a new photo each week in the form of a blog post that would be accompanied by some kind of short story which I called Weekly Photo (I know, clever, right?) I’m reluctant to call this a project (such as a 365 or 52) as its not something I plan to complete. It has no end date. It is just a change of approach as to how I would be presenting my work going forward.

I embarked on this Weekly Photo journey because I was getting a bit fed up with feeding the social media machine, hunting for a new image each day was quite frankly, boring and I wanted to release photos on my own terms. Don’t get me wrong, I fully understand the important role social media plays for photographers but with this new approach, my website would now be the priority and social media became the supporting act.
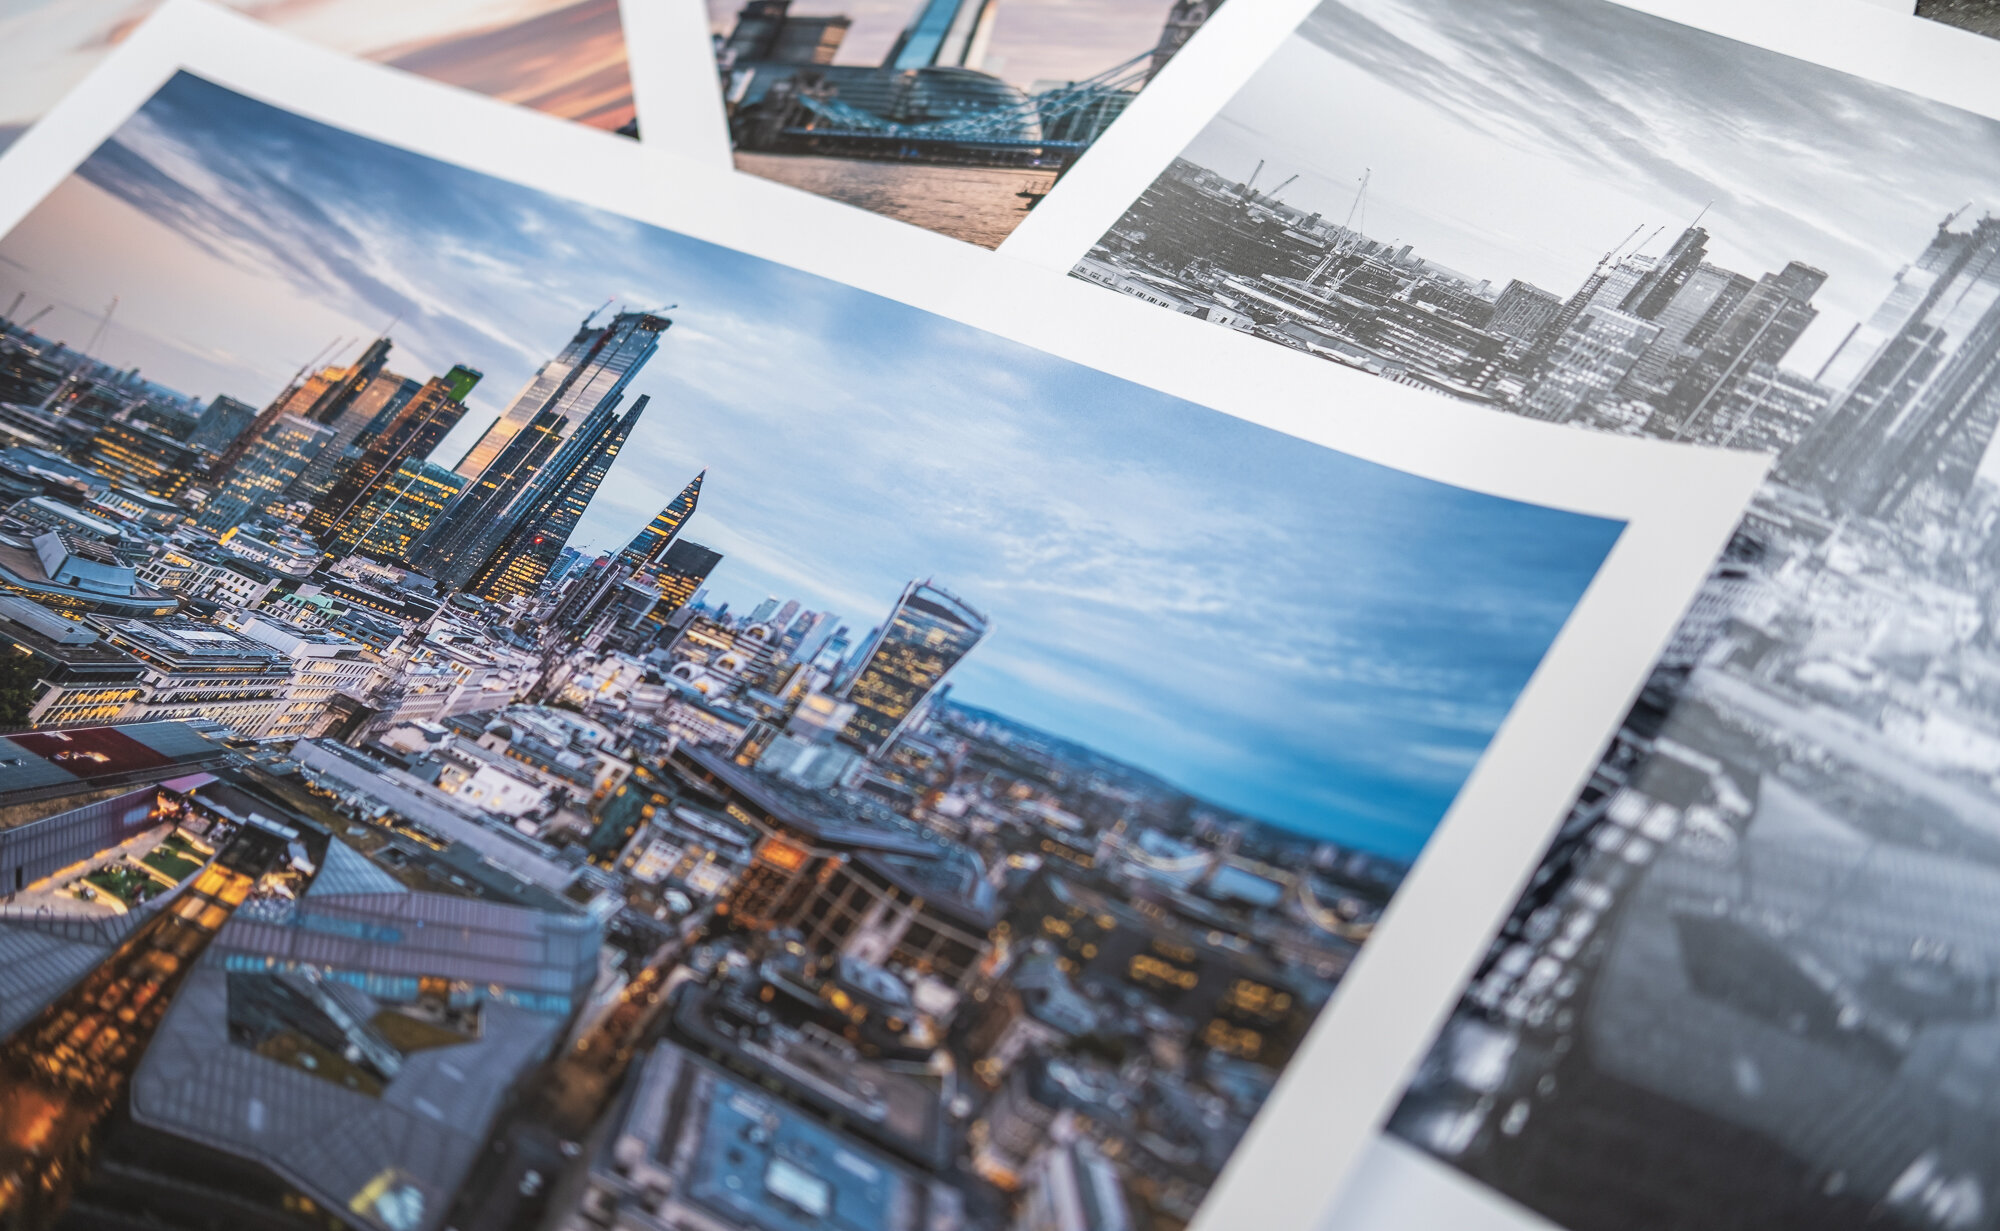
There were, however, some unforeseen benefits that after only 30 posts (to date) I have already discovered. The most significant is how the need to curate and select the images to publish makes me think more carefully about what I like or dislike about my photos. Essentially, I now self-critique my photos more than I have ever done which helps me work out what does or doesn’t work and over time will help me become a better photographer.
Another, somewhat related plus side of this process and one that links to the first point above is that as I process and publish my weekly photos, I also print them. Printing my photos is a whole different ball game when it comes to inspecting my work as the physical print will show off any issues such as missed dust spots or distracting elements that I may have missed when viewing the photo on the screen.
Looking forward to 2020
So, what plans do I have for 2020? Well first off is to continue to build upon my Weekly Photos and refine my storytelling ability whilst sharpening my photographic skill set. Taking it even further, I plan to finally give my print store a serious go and offer limited edition, signed prints of a selection of my Weekly Photos and who knows, I may even create a calendar later in the year. I’ve had half-hearted attempts to offer prints in the past but never really promoted my store and this is something I have to learn to do more of if I really want a print store to work. I know it won’t allow me to give up my day job but it may help fund some of the expenditure photography requires and to have more of my work on other people’s walls would mean a lot to me. Anyone that parts with their hard-earned cash to buy my work is paying me the biggest compliment I can receive as a photographer.
Travel wise, I don’t have a great deal planned yet except a trip to Amsterdam in May where I will no doubt capture some travel shots and a sunrise shoot around the canals.
Now, I want to share a few of my favourite images from 2019, starting with some cityscapes of London, my sunrise shoot in Ghent and finishing up with my favourite city by the sea, Brighton.

Fujifilm XT2 | XF18-55mm | 20mm | 131 seconds | f/10 | ISO200
The photo above was featured in the third Weekly Photo post found here: THE SHARD AT SUNSET | WEEKLY PHOTO #3

Fujifilm XT2 | XF10-24mm | 17mm | 1/60th second | f/4.5 | ISO800

Fujifilm X-T30 | XF18-55mm | 18mm | 1/5th Second | f/5 | ISO160
The photo above was featured in the nineteenth Weekly Photo post found here: THE VIEW FROM ST PAUL'S | WEEKLY PHOTO #19

Fujifilm X-T30 | XF10-24mm | 10mm | 1/8 Second | f/8 | ISO160
The photo above was featured in the twenty-fourth Weekly Photo post found here: WESTERN TOWERS | WEEKLY PHOTO #24

Fujifilm X-T30 | XF10-24mm | 17mm | 28 seconds | f/9 | ISO160
The photo above was featured in the ninth Weekly Photo post found here: ST KATHARINE DOCKS | WEEKLY PHOTO #9

Fujifilm XT2 | XF18-55mm | 18mm | 2.6 Seconds | f/11 | ISO200
The photo above was featured in the twenty-second Weekly Photo post found here: A BLUE HOUR IN GHENT | WEEKLY PHOTO #22

Fujifilm XT2 | XF10-24mm | 10mm | 1/6th second | f/7.1 | ISO200

Fujifilm XT2 | XF18-55mm | 18mm | 1/5th Second | f/9 | ISO200
The photo above was featured in the twenty-fifth Weekly Photo post found here: SKELETAL REMAINS | WEEKLY PHOTO #25

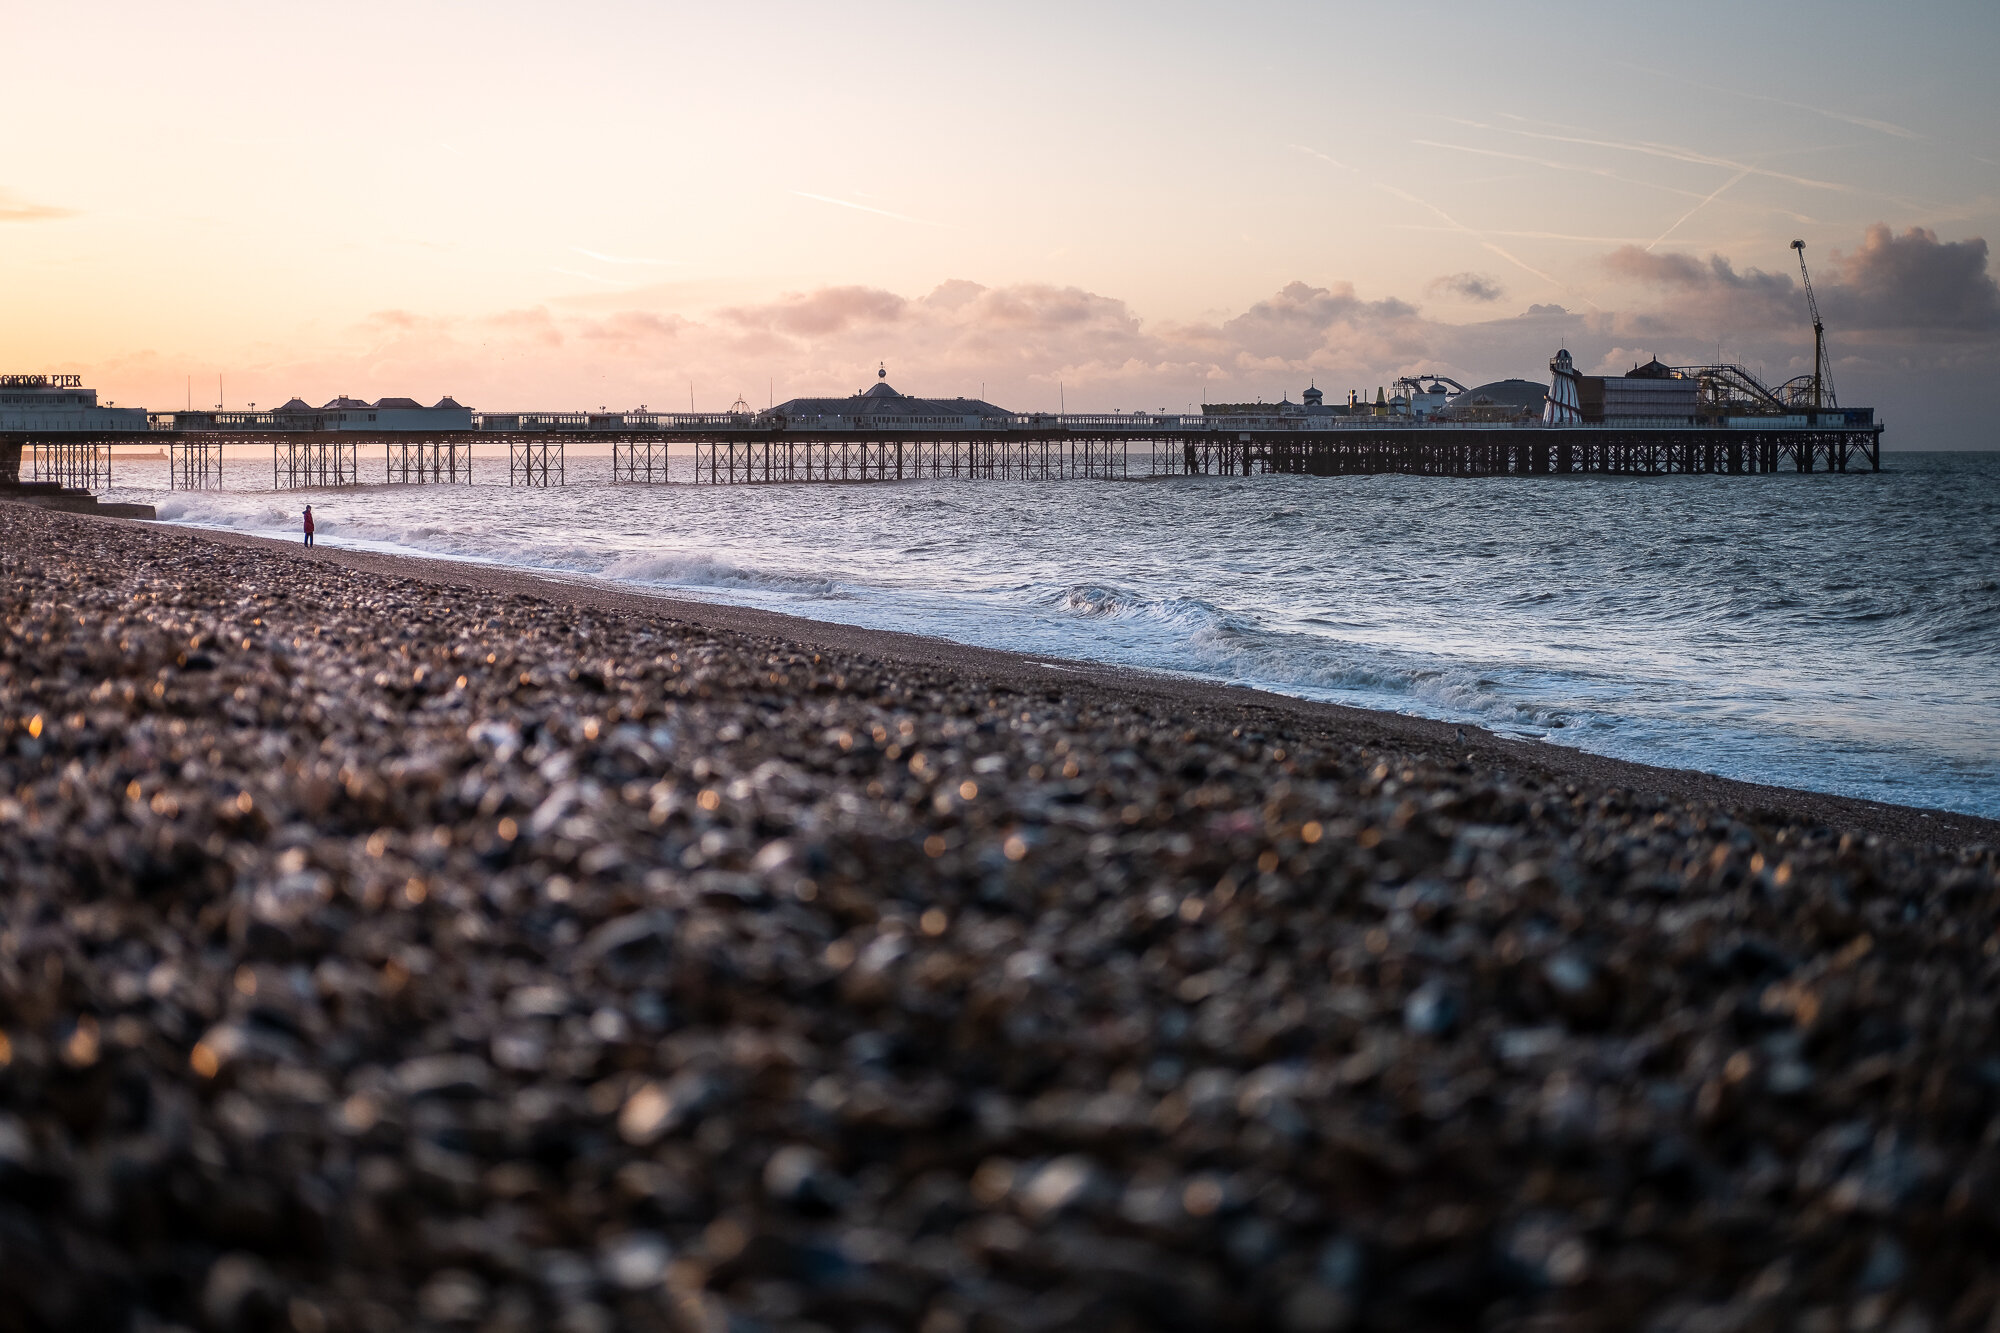
Fujifilm XT2 | XF18-55mm | 28mm | 181 seconds | f/9 | ISO200
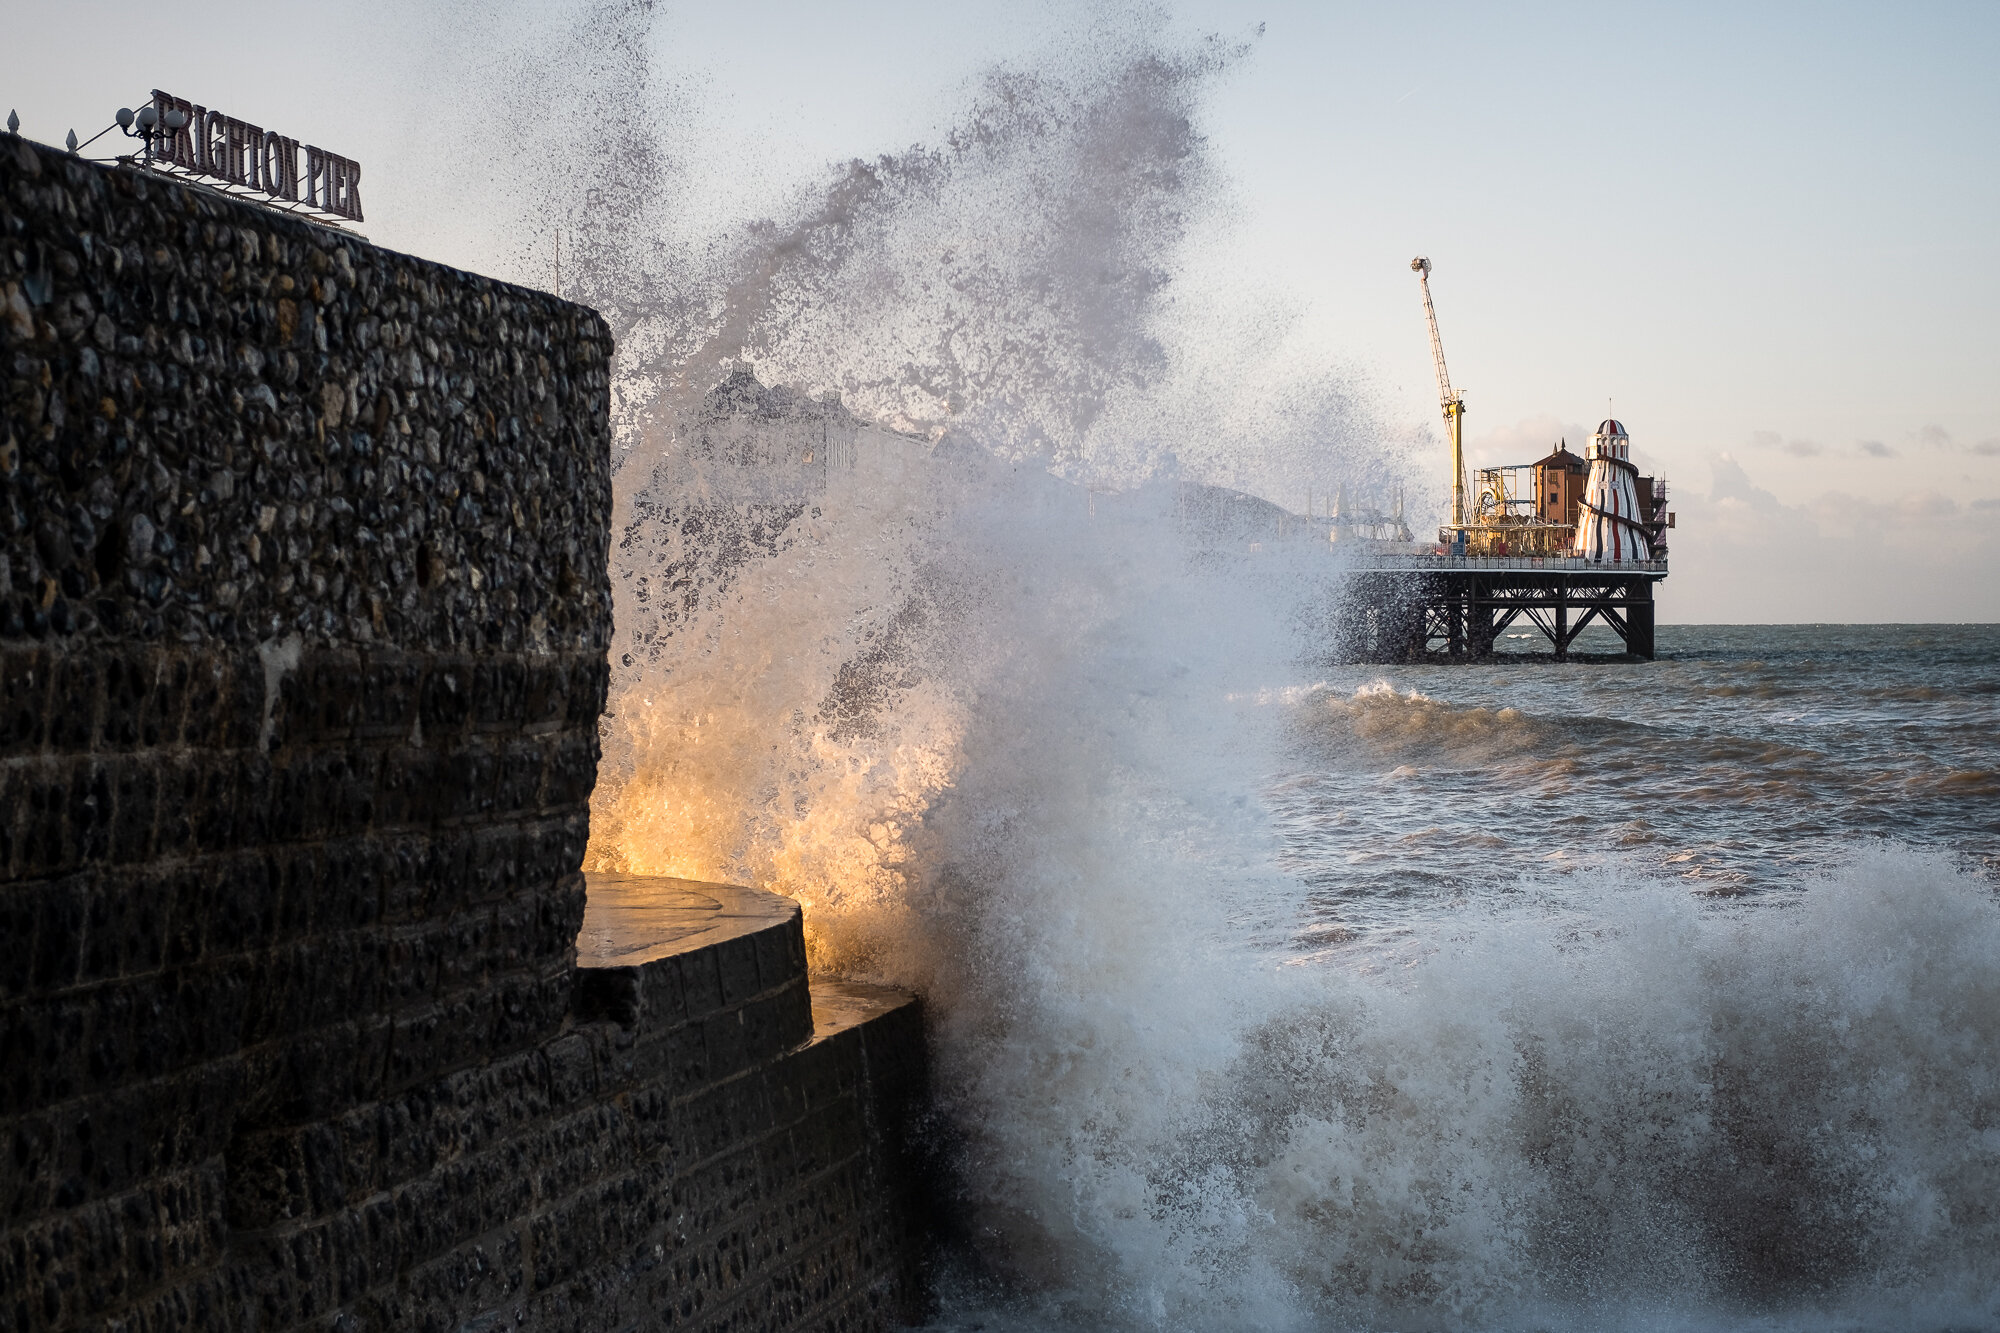
The photo above was featured in the twelfth Weekly Photo post found here: 3 MINUTES IN BRIGHTON | WEEKLY PHOTO #12
Thanks to all that supported me in 2019 and I urge you to stick around throughout 2020 by bookmarking my site or by signing up to my newsletter so I can continue to share my work with you in the future. I wish you a happy and prosperous New Year.
I’ll talk to you again next month, next year, next decade!
Trevor

Rooftop Reflections | Weekly Photo #30
Captured on a very wet and windy day in London during a photo walk with a couple of fellow togs, I took this photo of 20 Fenchurch Street while photographing the city from the Garden at 120 rooftop terrace.
A few weeks ago, I met up with a couple of fellow photographers and together we headed into London to photograph a very wet, windy city. We arranged the meet up a week or two beforehand but as the day drew closer, it became increasingly apparent that the weather wasn’t going to be great and we would be shooting in the rain for the entire day.

Fujifilm XT2 | XF16mm F2.8 | 16mm | 1/13th Second | f/2.8 | ISO200
“Life isn’t about waiting for the storm to pass. It’s about learning how to dance in the rain.”
We decided to focus on photographing in and around The Square Mile which hosts some of the tallest building in London and although the weather was pretty bad, we decided resist taking the easier option of rearranging the shoot and press ahead and see what we could capture regardless of the conditions. There was no chance of being gifted epic light or a dramatic sunset but I knew that the rain can bring another dimension to photographing London by adding puddles and wet surfaces that can result in capturing a different kind of light along with some fantastic reflections.
Learning the hard way from a previous rainy trip to London, I made sure I had my weather sealed Fujifilm XT2 camera with me and that combined with the XF16mm F2.8 prime WR lens, I had a fully weather-resistant system which allowed me to keep shooting as the rain continued to fall.
As we explored the city, we decided to pop up to the Garden at 120 which is a rooftop terrace 15 floors up, nestled amongst the city’s high-rise buildings providing some cool views of the city and with the weather still pretty miserable and without any shelter whatsoever, we had the entire place to ourselves. I reckon the Security Guards thought we were a bit crackers as the rain was beating down on us while we took photos but we persevered and it’s here that I captured this shot of 20 Fenchurch Street, AKA The “Walkie Talkie” building.
Apart from the obviously cool reflections provided by the wet floor in the foreground, I like how the lines on both sides of the frame lead the eye towards the main focal point with the wall on the right being the stronger element helping to balance the composition against the building on the left. Colour-wise, I tweaked the tones a little in Lightroom by dialling back the saturation and adding some contrast. Although a little muted, these grey/blue and orange colours are considered complimentary according to the colour science people as they are opposite each other on the colour wheel. I won’t go into colour science in detail here but you can check out this link to a post over at 500px if you want to read more about it.
I had a really good day with my fellow togs, Andrew and Julian and even though the weather was so poor, I managed to grab a few ok shots like this one throughout the day. It certainly helps to be reminded on occasion to resist the easy option and head out into the rain and just see what you might get. What’s the worst that can happen? You scout locations and get a bit wet?
Cheers
Trevor
This post is featured in my Weekly Photo series where I post a new photo every Monday. To have this delivered directly to your inbox, you can subscribe to the mailing list here.

Christmas in London | Weekly Photo #29
Being the last post before Christmas, I thought to keep this article “on-trend” and festive. I wanted to use a fresh, new photo of the Christmas Lights in London to round off the year so a few days ago, I headed into London before sunrise to see what I could capture.
Being the last post before Christmas, I decided to keep this article “on-trend” and festive. I wanted to use a fresh, new photo of the Christmas Lights in London to round off the year so a few days ago, I headed into London before sunrise to see what I could capture.

Fujifilm XT2 | XF10-24mm | 10mm | 3.5 Seconds | f/9 | ISO200
With only limited time, I wanted to head to somewhere I knew there was a high probability of getting a shot and although ordinarily, this might mean heading to the likes of Carnaby Street to capture this year’s display, at around 0730 in the morning this would mean the road would have been full of delivery trucks so I knew that area would be no good to me.
I decided to head to Covent Garden as they put up a very tall tree every year and I knew it would be quiet this time of day. Even though it was quiet, delivery trucks are about but with more space to shoot, they are a little easier to avoid. After wandering about for a while trying out different angles and with the blue hour fast approaching, I settled on this central composition, subtly framed either side to allow the large, bright Christmas Tree to stand tall and proud leaving no doubt as to what the main subject is. I love the cobbled road here at Covent Garden and having rained not long before I arrived, they were wet and shiny which helped me get these great reflections.
I had with me the Fujifilm XT2 camera and on it, the 10-24mm lens. This wide-angle lens was perfect to capture the tree and equally important the surrounding area. I want the story of this image to be about Christmas in London, not just a Christmas tree. To do this, I had to shoot wide and expose the photo to ensure the background was exposed correctly and anyone that knows Covent Garden will know this is a photo of London at Christmas.
Back home, I imported the photo into Lightroom and went about making small adjustments to the white balance, colour tones and corrected a little distortion to straighten up the verticals. I then dodged and burned a few key areas to emphasise lights and reflections before sharpening in Photoshop resulting in the final image you can see here.
That’s a wrap! I want to wish all of the readers of my blog a very, merry Christmas and happy and prosperous 2020.
Until next time,
Trevor
This post is featured in my Weekly Photo series where I post a new photo every Monday. To have this delivered directly to your inbox, you can subscribe to the mailing list here.

The Glass Canal | Weekly Photo #28
This week I present an ultra-long exposure of 8 minutes taken from the Ponte dell’Accademia bridge during an early morning sunrise in Venice.
“Venice is the exemplar of human wit and ingenuity. Despair of man and go to Venice: you will cease to despair. If human beings can build a city like this, their souls deserved to be saved.”
Like many photographers, I love to take photos of Venice. It has everything I like from charming streets and intimate canals to grand, cityscape vistas that will take your breath away. This picturesque city has an abundance of rustic splendour and oozes history throughout.

Fujifilm X-T10 | XF18-55mm | 18mm | 480 Seconds | f/8 | ISO200
During a previous trip to Venice in 2017, I decided to venture out before sunrise to capture the city as it sleeps. As an urban landscape photographer, whatever city you happen to be in, there is no better time to capture it than at sunrise. This is the time where you can have the place to yourself and capture the landscape in a way not normally experienced by most other people.
If there was one shot I just had to capture during my stay it was this composition below looking down the Grand Canal towards the Basilica di Santa Maria della Salute in the distance. The light wasn't as epic as I hoped but if I was going to capture a long exposure, this had to be it.
Upon the Ponte dell’Accademia Bridge, I set my camera onto the tripod, composed, focused and then mounted my filter. You can see the settings I used directly under the image above. I also have an easy 10-step process to taking long exposure photos which is available to download by subscribing to my newsletter. Having already taken a test shot without the filter, with the light levels as they were, the resulting exposure was an impressive 8 minutes. So, with the remote cable release connected, I went about taking the shot.
What I really like about this image is I had one chance to capture it while there was some light in the sky. The eight-minute exposure makes the water almost mirror-like with a touch of etherealism and the resulting image is a clean crisp shot ensuring the sweeping curve of the water leads the eye to the main focus being the architecture and Basilica.
Back in Lightroom, I had to deal with one of the downsides of such a long exposure and that was the many hot pixels across the image. These are areas of electrical discharge created by the sensor getting hot whiles taking the long exposure. Noticeable in the shadows, I had to endure the tedious process of cloning out the hundreds of small red dots from the darker parts of the image.
If you’re interested, I wrote a two-part travel blog about my trip to Venice which is filled with photos and information about the many places I visited.
Until next time.
Trevor
This post is featured in my Weekly Photo series where I post a new photo every Monday. To have this delivered directly to your inbox, you can subscribe to the mailing list here.

On Location Photographing London With The Fuji XF16mm F2.8
One thing I like to do when I buy new photography gear is to really put it through its paces and to understand everything about it. Having purchased the recently released Fuji XF16mmF2 WR lens, I did just that and took the lens on a rainy walk along the Thames in London at night. Jump in to read how I and the lens got on.
One thing I like to do when I buy new photography gear is to really put it through its paces. To learn how it performs, to understand its characteristics, quirks and drawbacks so when it comes to packing my camera bag, I know what kit is going to help me get the most out of the shoot.
Earlier this year, I brought the pocket-rocket Fujifilm X-T30 and to get to know it well, I used it as my main camera during a recent trip to Ghent, Belgium.
You can read all about this trip in my post here: On-Location | Photographing Ghent
A little more recently I finally got around to purchasing the Fujifilm XF16mm F2.8 WR prime lens. I already had the XF35mm F2 which I really enjoyed using and wanted the same again but wider, so I splashed out the relatively reasonable £350 and bought one.
With the lens now in the bag, it was time to head out and get to know it properly, so a couple of weeks ago I decided to venture out into London after dark to see how it performed while on a walk from Westminster to Tower Bridge.
Just to make a quick note. This is by no means a technical or scientific review of the lens. You will find plenty of reviews that provide technical specifications and deep analysis of how well the lens performs against its rivals but in this post, I will show you the photos I took and talk about how I thought the lens behaved in the pretty tough conditions of a rainy night in London. In addition, this lens is relatively inexpensive compared to the likes of the XF16mm F1.4, the XF8-16mm F2.8 and XF16-55mm F2.8 so this particular review is based on me having realistic expectations of a lens at the particular price point.
To push the limits of the lens and myself as a photographer, I decided to head out to take a mix of street and cityscape photos with just the camera and lens and no tripod whatsoever. I was depending solely on the city to provide enough light to expose the photos enough for most to be taken handheld. I did, however, use the odd wall or ledge to rest the camera enough to enable me to drop the ISO or open the shutter longer on occasion. You can spot these easily by checking the settings I used under each of the photos below.
Photographing London with the XF16mmF2.8 WR
First stop was to capture the London Eye illuminated by these cool colours. As you can see, with no tripod to use, I ended up resting my backpack on the wall, then the camera on top of that which helped me get the angle I wanted. The wider 16mm focal length (equivalent to 83.2 degrees field of view) enabled me to capture the entire scene without having to point the camera too far upwards thus avoiding the distortion this inevitably brings.


Fujifilm X-T30 | XF16mm F2.8 | 16mm | 0.8 Seconds | f/2.8 | ISO160
The image below was about as tough as it got when it came to handheld shots using just the city lights. This area is pretty dark and I needed to up the ISO to 1600 to get close to a sharp image. Just as I had finished adjusting the ISO, this chap crossed the road in front of me and I just managed to capture him as he stepped into the light.

Fujifilm X-T30 | XF16mm F2.8 | 16mm | 1/17th Second | f/2.8 | ISO1600
For this photo walk, I was shooting in aperture priority set to f/2.8 to ensure I captured as much light as possible. One of the minor drawbacks this lens has is that the aperture doesn’t go as low as other lenses in the line up such as the XF35mm F2 WR. I could have done with that extra stop!
I generally set the camera to auto ISO800 but as you can see by the settings below, I had to adjust this for the odd photo. With the camera deciding the optimal shutter speed that left me to play with the exposure compensation dial on the fly which allowed me to manipulate the shutter speed by under or overexposing.
While up on the Golden Jubilee Bridge, I had to use all of the 16mm I had available to fit both the London Eye and sky swings into the image and still have enough room to correct some of the distortion later in post. It’s not a great composition, I know, but it demonstrates the field of view you can get with this lens pretty well.

Fujifilm X-T30 | XF16mm F2.8 | 16mm | 1/18th Second | f/2.8 | ISO800
If I could ask for one thing to improve this lens, it would be to somehow add image stabilisation without adding to the cost, size or weight. Yeah, I don’t ask for much, right? Here’s a couple of photos captured handheld as I walked along from South Bank to Embankment which were both taken at 1/10th of a second. That’s a pretty slow shutter speed and with no image stabilisation available from both camera or lens, I needed a very steady hand indeed.

Fujifilm X-T30 | XF16mm F2.8 | 16mm | 1/10th Second | f/2.8 | ISO800

Fujifilm X-T30 | XF16mm F2.8 | 16mm | 1/10th Second | f/2.8 | ISO800
The WR in the name stands for Weather Resistant. Not to be confused with Water Proof. This lens can withstand the odd rain shower but don’t go dunking it underwater as you may end up with a rather expensive paperweight.
Ideally, I would have had my XT2 camera with me on this photo walk as coupled with this weather-resistant 16mm prime, I would have had a fully weather-sealed set up but on this particular day, I forgot to check the weather and by the time I realised how wet it might get, I was already in London with the X-T30.
It took a few minutes for the right looking people to enter this scene in front of Shakespeare’s Globe Theatre to get the type of photo I was aiming for and although I had to be a bit careful about getting the X-T30 wet, at least I didn’t have to worry too much about the lens. This couple, shielded by their umbrella perfectly told the story about the wet conditions endured on this particular rainy night in London.

Fujifilm X-T30 | XF16mm F2.8 | 16mm | 1/40th Second | f/2.8 | ISO800
While the famous London Bridge is pretty plain and uninspiring during the day, it recently received a new light installation as a part of the Illuminated River Project and now shines bright and colourful at night making it a great subject for night photography. Closing down the aperture to f/10, (it ranges from f/2.8 to f/22) I was able to create these starbursts from the street lamps but the resulting 9-second exposure meant I needed to support the camera. Luckily, there was a nice flat wall right where I stood. What luck!

Fujifilm X-T30 | XF16mm F2.8 | 16mm | 9 Seconds | f/10 | ISO160
I finished up right next to Tower Bridge in the popular More London Estate. This area is pretty well lit and provides a great subject for night photography and allow me to continue testing this lens I was enjoying using so much.
In addition to letting more light through the lens, the wider aperture of F/2.8 allowed me to get a bit creative with the depth of field which you can see in a couple of the images below. The 9 blade aperture results in a nice, smooth bokeh (the blurry, out of focus part of the image).

Fujifilm X-T30 | XF16mm F2.8 | 16mm | 1/15th Second | f/2.8 | ISO800
This lens weighs only 155 grams and with the X-T30 weighing 383 grams including card and battery, I had a fantastic, lightweight set up of 538 grams (that’s about 1.2lbs). With such a light combination, carrying around this camera and lens all evening was absolutely no bother at all.

Fujifilm X-T30 | XF16mm F2.8 | 16mm | 1/25th Second | f/2.8 | ISO800

Fujifilm X-T30 | XF16mm F2.8 | 16mm | 1/20th Second | f/2.8 | ISO800
I know it’s hard to tell from looking at these photos on this web page but I was really pleased with how sharp the shots came out when using this lens wide open. In these low-light, rainy conditions and with the aperture at f/2.8, these shots taken around More London look really good. Like most lenses in this price range, when used wide open like this, you will rarely get corner to corner sharpness and this lens is no different. The images do soften slightly as you get closer to the corners but the softness is very subtle and only really visible when viewed at 100%. All in all, these photos are plenty sharp enough for me and totally useable.

Fujifilm X-T30 | XF16mm F2.8 | 16mm | 1/25th Second | f/2.8 | ISO800

Fujifilm X-T30 | XF16mm F2.8 | 16mm | 1/8th Second | f/2.8 | ISO800

Fujifilm X-T30 | XF16mm F2.8 | 16mm | 1/17th Second | f/2.8 | ISO800

Fujifilm X-T30 | XF16mm F2.8 | 16mm | 1/13th Second | f/2.8 | ISO800
As I mentioned at the beginning of this post, this is far from a formal review of this lens. A quick google will get you to one of those in no time. Instead, these are my real-world experiences of using this cracking little lens on a wet, windy night in London and if all you take away from this post is that this lightweight, inexpensive lens feels solid, performs well and is all around a pleasure to use then that’s good enough for me.
Until next time.
Trevor

Peaceful City | Weekly Photo #27
Taken while on an early morning walk in the city, I was struck by how peaceful this scene looked and loved the silhouettes of the buildings over on the Isle of Dogs. In this post, I talk through my thoughts on the composition and editing process.
This is the view that presented itself to me, one morning in late December as I crossed London’s Tower Bridge. I was on a sunrise walk in the city during that funny time between Christmas and New Year where most people are at home and the city has a quiet, more subdued feel about it so I decided to try to capture some of that feeling tranquillity in my photos.

Fujifilm X-T10 | XF18-55mm | 39mm | 58 Seconds | f/13 | ISO200
What captured my attention when looking across East London was how calm and still, the city looked. There were some subtle pastel colours in the sky as the sun started to make an appearance and that coupled with a slight mist in the air was all I needed to set the camera down and try to capture the scene in front of me. While setting up, I decided I would try the image as a long-exposure to help soften the scene a little more by removing the ripples in the water and make the clouds a bit wispier. I ended up going with a 58-second exposure but with the light increasing fast, I had to close down the aperture to f/13, reducing the light enough to achieve such a long exposure.
I deliberately composed the shot so that the River Thames swept around the right-hand side of the image and flanked St. Katherine Docks that lined the river in the foreground but with the darker heavier buildings all on the left-hand side, I had to make sure I included the clouds on the top right of the frame to help add some much-needed balance. Although only subtle, I think the clouds do just enough to save the entire shot as, without them, it just wouldn’t work at all. In addition, I decided to emphasise the high-rise buildings in the background over on the Isle of Dogs so instead of going wide which may be the more obvious choice, I used a focal length of 39mm to help bring the buildings a little forward in the frame.
When I initially edited the image, I brought way too much colour back in and the image was bright orange and way too garish. After sitting on the image for some time, I decided to pull the colour right back to these subtle pastel tones all helping to communicate the peaceful feeling I experienced on that particular morning. If you edit your photos and sometimes wonder if you have over-edited an image, just stop and let the image sit there for a while. Be it days, weeks or for some, even months, if you are still happy after living with it all that time, then you know it’s a keeper!
Chat to you soon.
Trevor
This post is featured in my Weekly Photo series where I post a new photo every Monday. To have this delivered directly to your inbox, you can subscribe to the mailing list here.

South Bank | Weekly Photo #26
This week’s photo is a classic looking scene taken along London’s South Bank. In the article, I talk about how I considered the focal length carefully to ensure the resulting image had the best balance between the foreground, middle and background elements providing me with the best composition possible.
I love the “old-worldly London” feeling I get from this particular view along the South Bank. In particular, the peaceful, sweeping path lit by ornate street lamps and the dome of St Paul’s Cathedral nestled nicely in the background. The dome really does give the image that classic London look.

Fujifilm XT2 | XF55-200mm | 55mm | 2.6 Seconds | f/11 | ISO200
“To lose patience is to lose the battle.” - Mahatma Gandhi
Those that follow my work will know that although I have been including the occasional person in some of my street work lately, I still prefer a cityscape image free of people to help simplify and declutter the London skyline as much as possible and people tend to be “easier” to remove using techniques such as long exposure photography or merging multiple exposures later in Photoshop. That being said, it can at times be rather tricky to remove people, especially when you happen to be shooting one of the busiest spots along the river and unless you arrive in the early hours of the morning, you will seldom be on your own here which is why capturing this photo needed quite a bit of patience. I was stood in this particular spot waiting for a big enough gap in the foot traffic for about 30 minutes before I got the clean composition I was hoping for.
On this particular evening way back in 2018, I was out shooting with my recently purchased Fujifilm XF55-200mm lens which I was using to take a panoramic image from Waterloo Bridge. Using a tripod isn’t really allowed along this stretch of the river so being a little cheeky, I set my Fuji XT2 onto the tripod which was parked next to a tree in a bid to keep it well out of the way of passing foot traffic. Thankfully I wasn’t approached while stood there.
How I chose the correct focal length when taking this photo
In my opinion, this image works better if taken with a medium focal length of around 40-60mm so it was a perfect time to have the new lens with me. Taken wider (zoomed out) you can include more of the scene which isn’t always a good thing as it can result in a more cluttered image with no clear focal point. Additionally, the wider you go, the more the background gets thrown much further back and rendered less significant and in a scene like this, the mid and background elements are critical to the composition.
On the flip side, too much focal length (zoomed right in) will prevent the inclusion of key elements such as St Paul’s dome or the trees on the right that act as a compositional frame helping to keep the attention on the main focal points such as the aforementioned dome. As you can see from the settings I used that are listed underneath the image, on this occasion, I stuck with 55mm which, in my opinion, worked best for this shot.
It pays to consider your focal length carefully. Play around with different settings while out in the field and check your framing carefully as this may be the difference between a snapshot you discard and a keeper.
Coming up I have a couple of “On Location” posts where I use just a single lens from the Fuji prime line up for the entire shoot to help me work on my composition and put the lenses through their paces. I will be sharing these posts over the next few weeks so keep an eye out for those.
Talk to you soon.
Trevor
This post is featured in my Weekly Photo series where I post a new photo every Monday. To have this delivered directly to your inbox, you can subscribe to the mailing list here.

Skeletal Remains | Weekly Photo #25
During a walk along Brighton Beach with my family on a warm, summer’s evening, I decided to stop and take advantage of some glorious light by taking a photo of the West Pier remains.
I find the skeletal remains of the West Pier in Brighton fascinating to photograph? I enjoy taking these central, minimalist photos of what’s left of this once grand Victorian structure which played such a significant role in the history of Brighton’s beach-front down in England’s South East. It’s not the most original composition of this structure but there’s a reason why the pier has been photographed a million times from this spot.

Fujifilm XT2 | XF18-55mm | 18mm | 1/5th Second | f/9 | ISO200
In a previous Weekly Photo post, I shared a black and white, long-exposure image of this very pier which you can find here. In the post, I talked about capturing the same composition on a pretty uninspiring cloudy day and using a black and white film simulation to help me visualise the image as I took it.
I took this week’s photo during a warm summer’s evening as my family and I walked down on the beachfront eating fish and chips for dinner. I had the camera with me to capture a few sunset shots of the family. As we walked back to the car I spotted these post-sunset pastel colours that started to appear in the sky I decided to take advantage of the light on offer.
As my family continued towards the car, I stopped and set my tripod up directly in front of the West Pier as close to the water as I could but just far enough away to avoid getting wet feet. I mounted my Fuji XT2 and trust 18-55mm lens on the tripod and went about composing the image being careful to get the structure dead-centre. Without having filters with me, a long exposure image wasn’t an option but with the sea being a little choppy, I was drawn to capturing a some of the movement and energy I could feel as I stood there taking it all in. I kept my aperture at around f/9 which, at ISO200, gave me a 1/5th second exposure resulting in an image with just the right amount of movement and texture in the water whilst retaining those subtle pinks in the sky.
Back in Lightroom, I tried to emphasise the white, frothy water to highlight the movement and add some interest so I subtly brightened the frothy parts of the water using local adjustments. Other than that, I adjusted the HSL sliders to get the tones I wanted and added a bit of contrast to the pier to make the architecture stand out a bit more.
I still have a long exposure photo of the pier in mind which I’ve been trying to get for a while now which requires a low tide and the clouds moving in the right direction. I’m still chasing that one so I’m sure I will be back again soon enough.
Thanks for stopping by.
Trevor
This post is featured in my Weekly Photo series where I post a new photo every Monday. To have this delivered directly to your inbox, you can subscribe to the mailing list here.

Western Towers | Weekly Photo #24
A few weeks ago, I shared a photo that I took of the City of London taken from the very top of St. Paul’s Cathedral’s dome. After taking another trip to this London icon, I focused my attention on a forward-facing composition of the Western Towers which I have wanted to capture for quite some time.
A few weeks ago, I shared a photo that I took of the City of London taken from the very top of St. Paul’s Cathedral’s Dome which you can read about here. After taking another trip to this London icon, this time around, I focused my attention on a forward-facing composition of the Western Towers which I have wanted to capture for quite some time.

Fujifilm X-T30 | XF10-24mm | 10mm | 1/8 Second | f/8 | ISO160
Photographing St. Paul’s Cathedral
Being a warm evening in August, I once again took advantage of the Thursday late opening times and got to the cathedral for 7pm. As the doors opened, I had to dart to the spiral stairs and climb up to the Stone Gallery so I could get this central position first and bunker in ready for sunset.
There isn’t a huge amount of space to shoot between the pillars in the wall that surrounds the Stone Gallery and knowing I wanted to shoot as wide as possible, I just managed to squeeze my small Manfrotto PIXI tripod through the gap with my conveniently compact Fuji X-T30 camera. If ever there was a time I was thankful for moving to a smaller camera system, it was then.
I carefully composed the image to ensure the towers were symmetrical and using my remote cable release, began shooting. I wanted to find the right balance between the ambient and city lights to add just a little more interest throughout the image.
Like many cityscape images I take of London, I don’t think I am finished with this one yet. As winter kicks in, I plan to revisit the cathedral a few more times to capture this iconic location as the light changes throughout the year.
Until next time
Trevor
This post is featured in my Weekly Photo series where I post a new photo every Monday. To have this delivered directly to your inbox, you can subscribe to the mailing list here.

Mental Health and Why Photography Matters
Mental wellbeing is getting a lot more attention these days which can only mean good things when it comes to awareness and management of the struggles many people privately endure every single day. In this post, I talk about how having a creative outlet such as photography can contribute to moving one’s mental health in a positive direction.
Many articles on this blog are about portraying the creativity, gear and techniques that I use in my own photography journey. I write about the places I go and photos I take, sharing useful information to other members of this close-nit photographic community in an attempt to give something back for all the help I continue to receive but one thing I don’t talk about as much as I really should is the hidden and personal benefits of having some kind of creative outlet that photography or any other artistic endeavour can provide.
Before I start, I want to clarify that I am by no means an expert. I do understand that mental health is not a light switch where everything is either fine or not. There is black and white and every shade of grey in between when it comes to mental health and everyone is different and facing their own unique challenges. I do, however, recognise how important the subject is and in my personal experience, mental health can be an ever-changeable level of wellbeing. There are the good times where I feel positive and ready to tackle what life has to throw at me and then there are the times of prolonged stress and anxiety which I try to recognise and work to keep on top of the best way I can and for me personally, photography plays a huge part in keeping everything under control.
I found a great source of information which helps to describe both good and bad mental health on the mentalhealth.org.uk website here.
Mental Health Awareness Day - October 10th 2019
This year, in recognition of Mental Health Awareness Day, my employer gave the entire workforce the day off to relax, enjoy the day and do something for themselves. This was by no means a small gesture as the workforce is made up of a few thousand staff. If that’s not getting behind this cause, I don’t know what is.
So, with the day to myself, I decided to venture out with my camera to get a bit of me-time, recharge and spend a few hours on my own taking some photos. At this point, I would normally head north into London and go get some cityscape shots but instead, I decided to get out of the Big Smoke and head down to the coast and capture some shots in Brighton.
The main reason I chose Brighton is that if I was going to embrace this opportunity and get some rest and relaxation, what better place to be is on the beachfront, with the waves crashing against the beach at sunrise with nobody else around apart from a few early risers getting their own fix of the peace and quiet on offer. So, I drove down, parked up, put my earphones in and headed out to document the start of a new day.
Why is Photography so Important for Good Mental Wellbeing?
As well as talking about how I spent the morning and showcasing the photos I took, I also wanted to list a few of the benefits that having a creative outlet such as photography provides.

Fujifilm X-T30 | XF35mm F2 | 35mm | 1/1,700 Second | f/2 | ISO160

Fujifilm X-T30 | XF35mm F2 | 35mm | 1/4,400 Second | f/2 | ISO160
Achieving Mindfulness
I believe that achieving mindfulness in pursuit of your creative endeavours can only occur when the act of creation is equal or more important than the product itself.
As a photographer, I am not alone in the photographic community when I say that once you stop worrying about capturing that killer shot each time you venture out with the camera, the pressure really does come off. This leads to less frustration and impatience when out photographing, allowing you to relax and more often than not, create your best work.
Mindfulness is so important in my landscape photography. Taking a breath, being present in the moment and ignoring distractions can help heighten my awareness as a photographer. It also helps me to take some much-needed time out from a hectic work and home life allowing me a bit of time to be alone and process my thoughts. I guess you could say photography is my therapy.

Fujifilm X-T30 | XF35mm F2 | 35mm | 1/1,600 Second | f/2 | ISO160

Fujifilm X-T30 | XF35mm F2 | 35mm | 1/2,000 Second | f/2 | ISO160
Getting Up and Feeling Motivated
I guess this section could also be called “Having a purpose” as that’s essentially the point I want to make. Just the other day, I was talking to my Dad about motivation and drive to get out and he spoke about having to get up super early before a tiring day at work to take his dog for a walk. He said that although it’s a struggle to wake up super early and get out of bed every single day, once he is out with his dog, enjoying the fresh, early morning air he really enjoys that quiet, reflective time. Needing to walk the dog is his purpose and without this, this time he has on his own to relax and process life just wouldn’t exist.
This is also so true for my photography. Having the alarm go off at silly o’clock and getting yourself out can be tough and without that purpose provided by photography, I wouldn't be getting up so early and I would miss out on being out and about at a time of the day that very few people experience.
Physical Fitness
When I head out for a few hours on a photo walk, I usually end up covering quite a distance. and exercise is widely known to be a great way to keep both your body and mind in tip-top condition. Exercise is great at breaking negative cycles such as poor sleep patterns and physical stress on the body causing discomfort and pain which I have first-hand experience with. For some time, I was struggling with tendonitis on my left knee and although seeing a Physio helped, it was never cured. At the beginning of 2019, I decided to up my exercise efforts and focus on my fitness and after only a few weeks the pain in my knee had completely gone. I am now able to walk for hours with my camera without any pain or discomfort whatsoever.
I found a great article on how exercise is so beneficial to your mental wellbeing over at https://www.helpguide.org/. A few of the important benefits the site lists are:
Reduces anxiety
Helps with depression
Helps fight ADHD, PTSD and Trauma
Helps increase overall energy levels
Increases confidence and self-esteem

Fujifilm X-T30 | XF35mm F2 | 35mm | 1/1,400 Second | f/2 | ISO160

Fujifilm X-T30 | XF35mm F2 | 35mm | 1/1,600 Second | f/2 | ISO160
The Power of Creativity
Nothing really beats the feeling you get when you have created something you are proud of and photography is no different as the ultimate goal is still to produce a nice photo, be it artistic or documentary. Although I no longer feel the added pressure to capture a banging shot every time I head out, when I do create something portfolio worthy, it provides such a positive feeling and makes all of the early mornings or cold winter evenings standing around trying to keep warm worthwhile. Occasionally capturing a portfolio worthy image gives me the motivation to keep going, continue to develop my craft and chase that next shot.

Fujifilm X-T30 | XF35mm F2 | 35mm | 1/125 Second | f/14 | ISO400
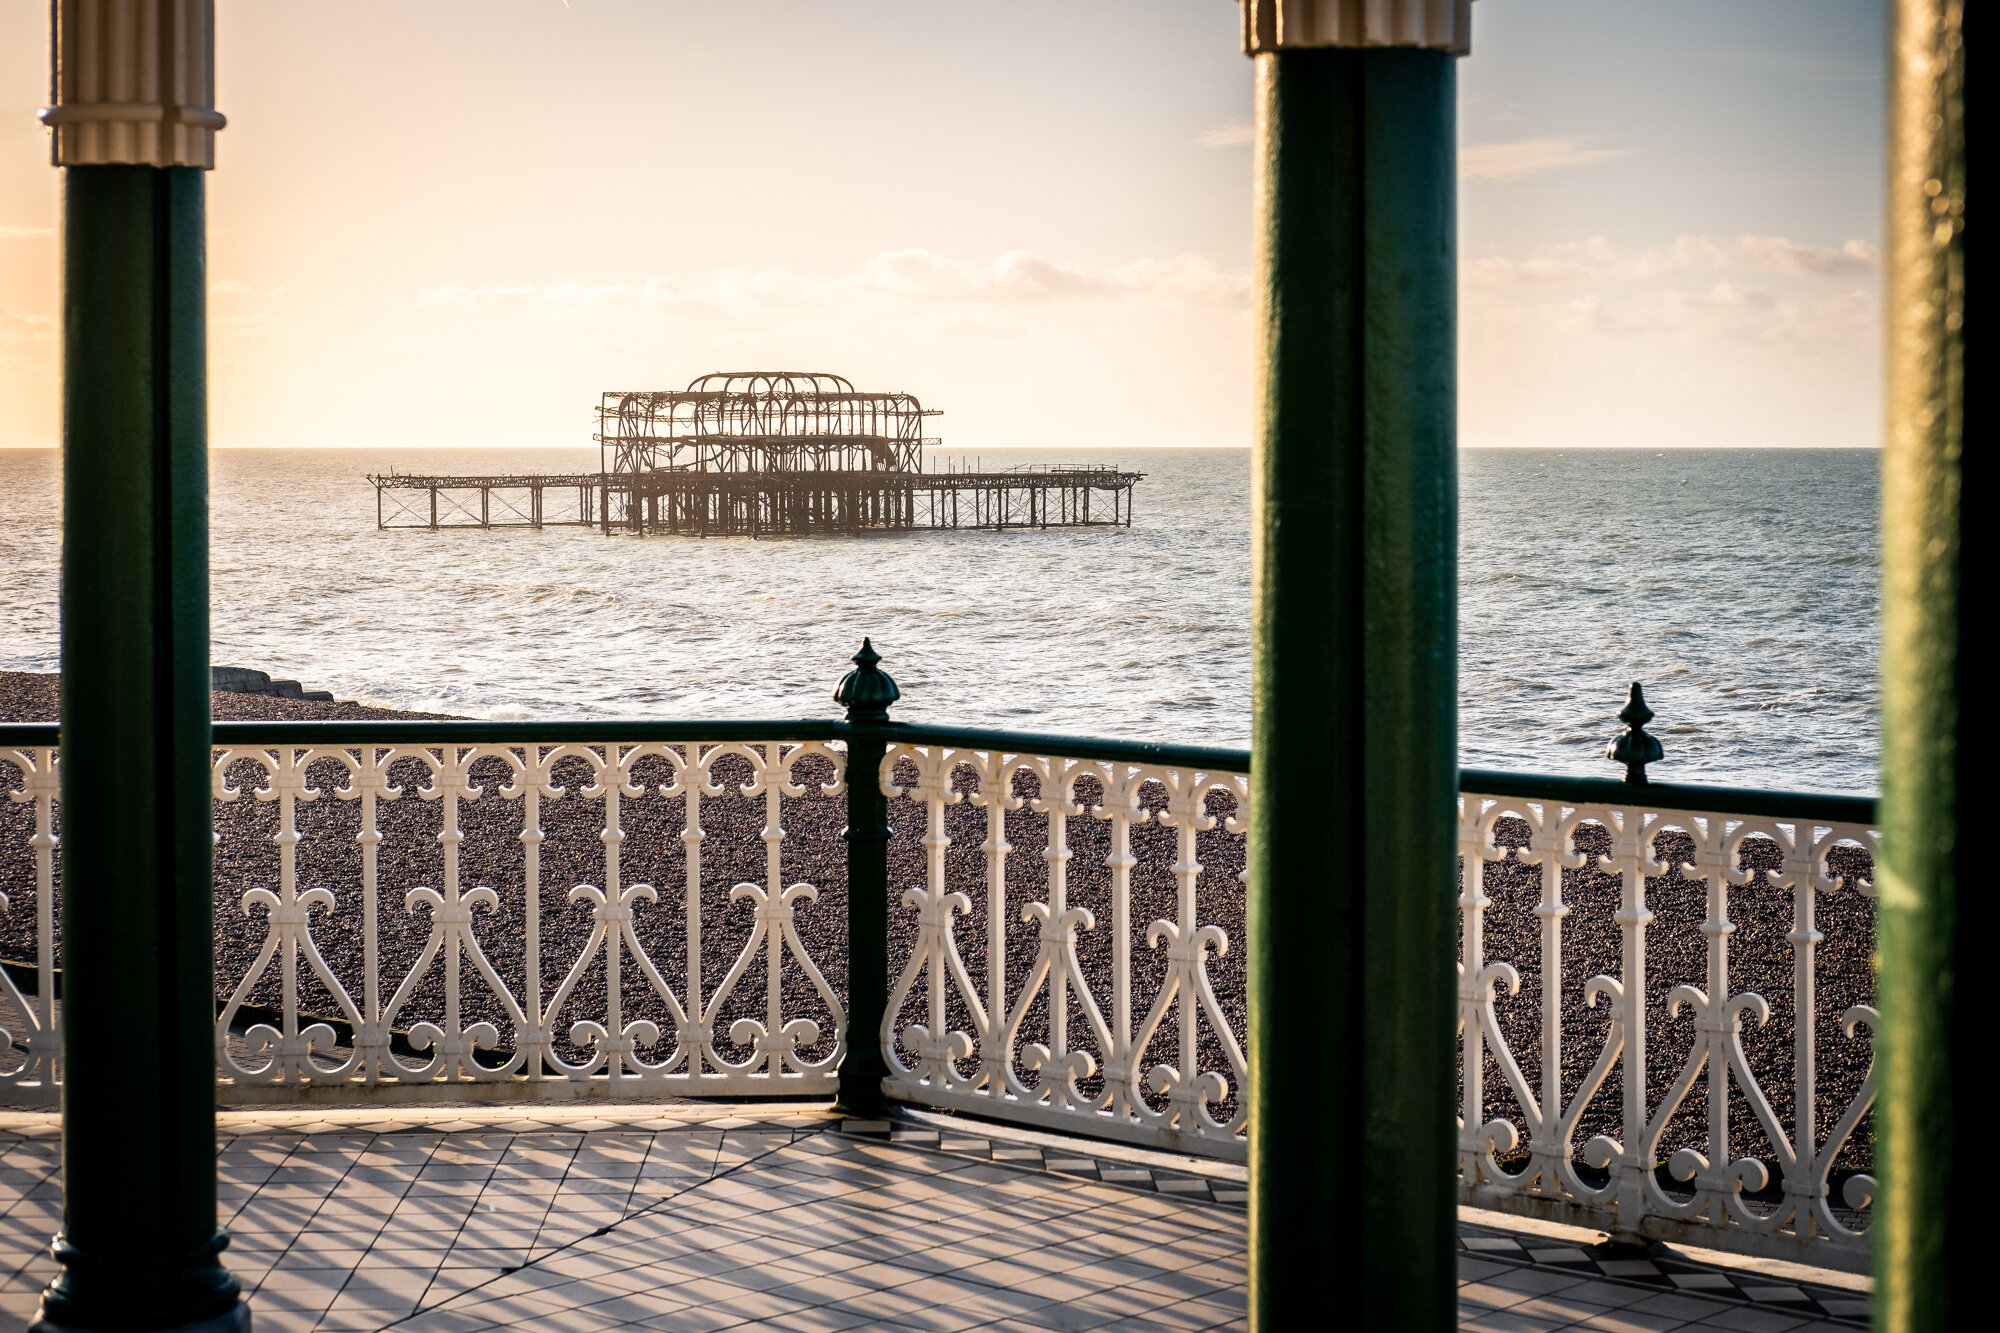
Fujifilm X-T30 | XF35mm F2 | 35mm | 1/950 Second | f/5 | ISO160

Fujifilm X-T30 | XF35mm F2 | 35mm | 1/170 Second | f/11 | ISO160

Fujifilm X-T30 | XF35mm F2 | 35mm | 1/2,000 Second | f/2 | ISO160

Fujifilm X-T30 | XF35mm F2 | 35mm | 1/1,100 Second | f/2 | ISO160
My goal for this post is not to tell you how to feel or make any assumptions. I wrote this post as I recognise how important mental wellbeing is to every single person and I truly believe that by pursuing any kind of creative endeavour really helps the mind take a break from the many distractions of modern life and allow you time to think or reflect and put things back in perspective once again.
Until next time.
Trevor