
BLOG ARCHIVE

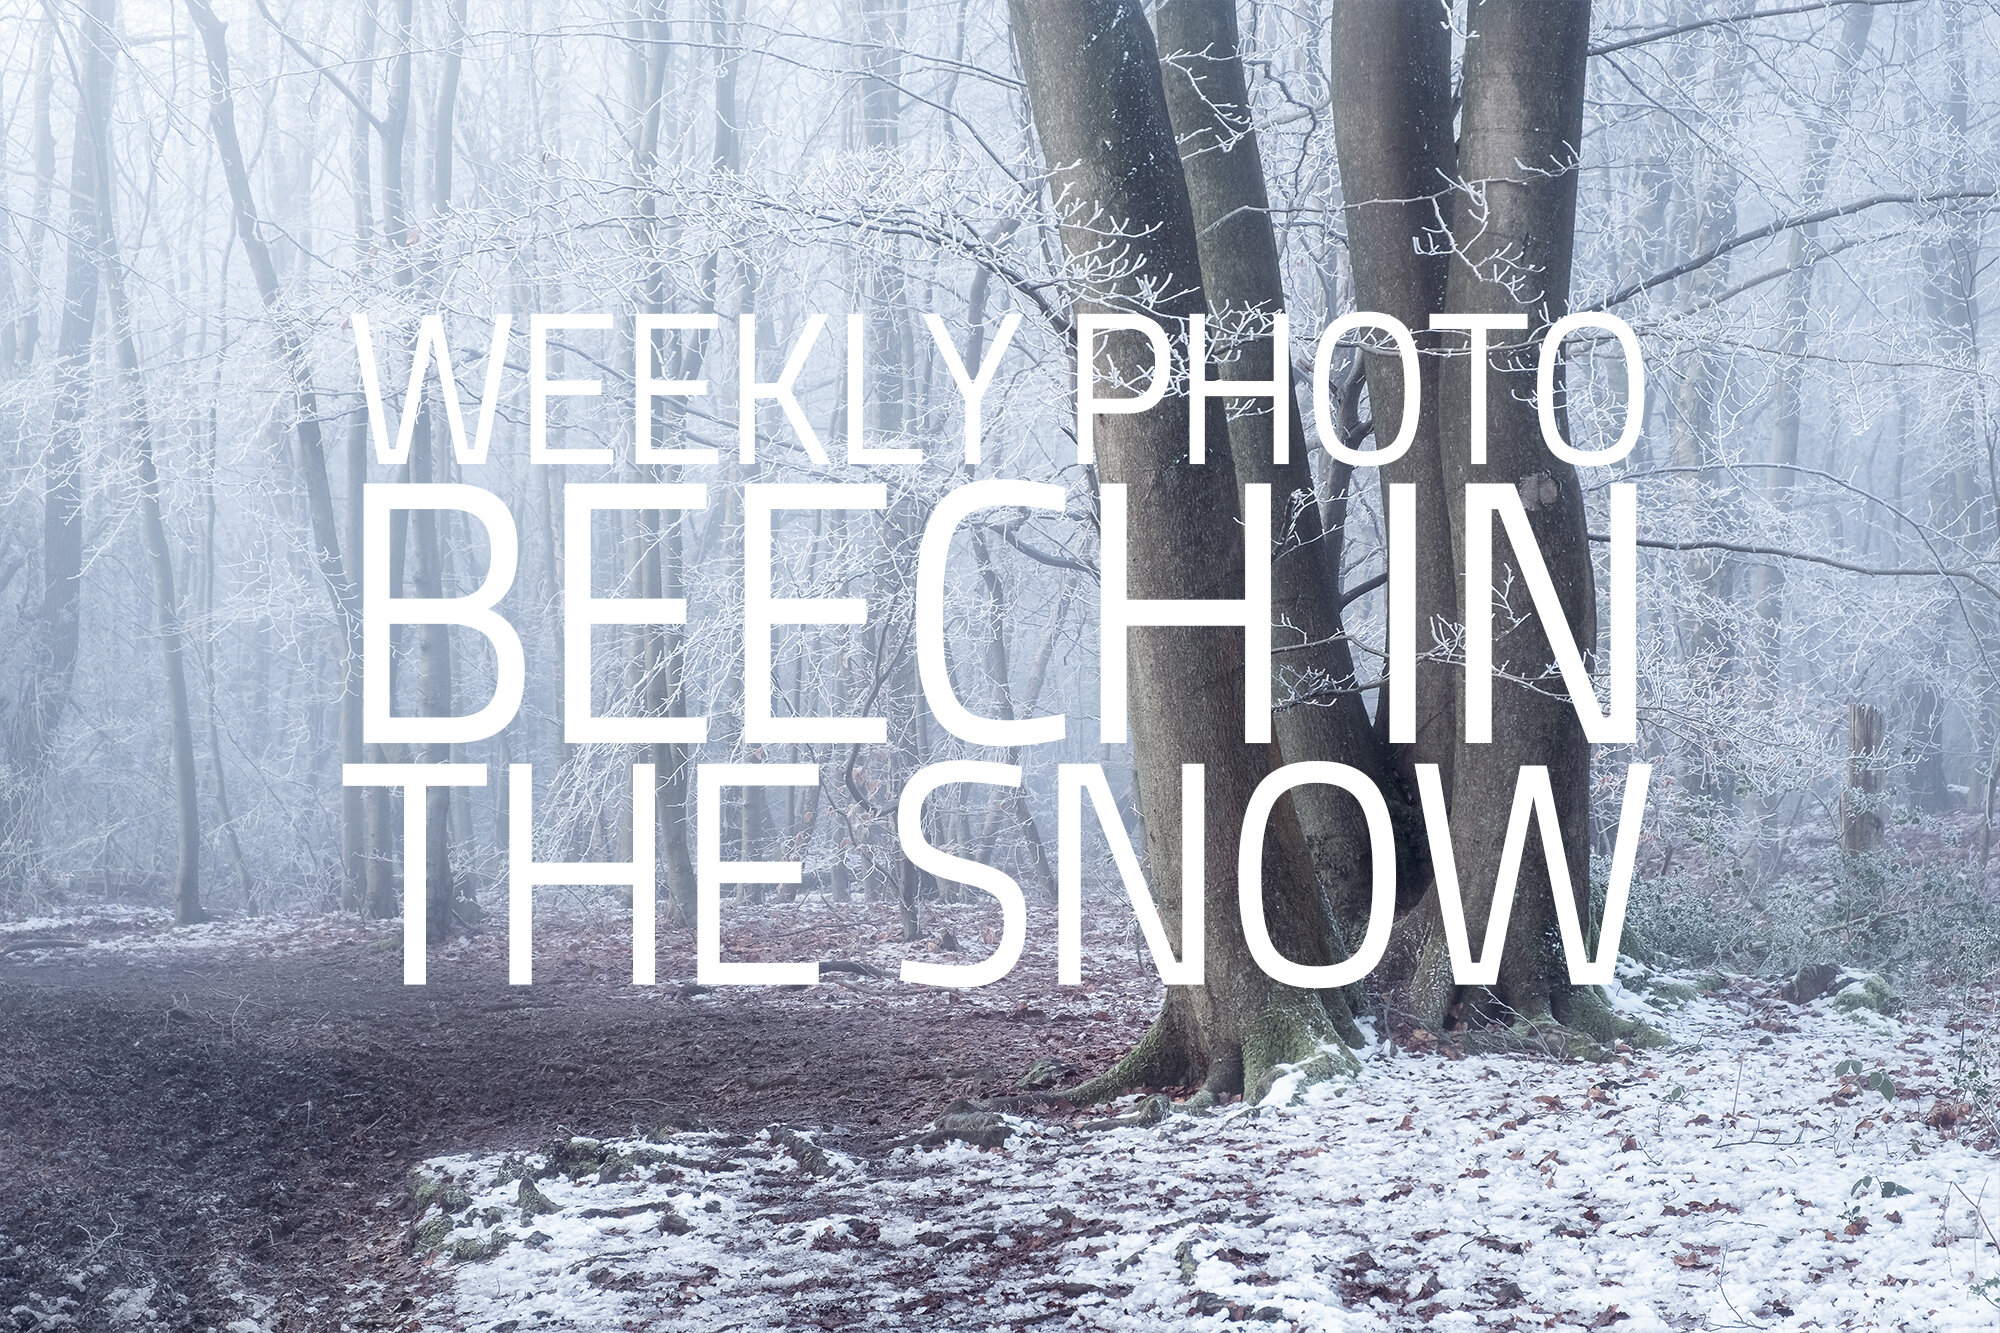
Low Tide | Weekly Photo #104
I’m fascinated by the remains of the West Pier which is why once again I took a trip down to Brighton in East Sussex to take this long exposure photo at sunset.
Once or twice a year, I take a visit down to England’s south coast and try to capture a new photo of the derelict remains of Brighton’s West Pier. There’s something about what’s left of this once grand Victorian structure that captivates me, drawing me back to photograph its skeletal frame, stripped of the ornate skin it once wore proudly.
How did the pier end up in this sorry state? After falling into disrepair, eventually closing to the public in the 1970s and suffering further damage during the storm of ‘87, it was eventually sold to the West Pier Trust who managed to secure funding for its restoration. In 2002, before the restoration could begin, the pier suffered further storm damage followed by two devastating fires in 2003, leading to the funding being withdrawn in 2004. Since this time, the structure is slowly being reclaimed by the sea.

Fujifilm XT2 | XF10-24mm | 10mm | 105 Seconds | f/9 | ISO200
When you're finished here, why not pop by and check out some of the other photos I took of the West Pier.
Last September, I decided to head down to the coast once again to photograph the West Pier at sunset. I prefer to photograph the structure at low tide as I can get a little closer and I like the way the fallen metal fragments look, scattered around the base of the pier. So, when planning the shoot, I was sure to check the tide times as well as the weather and when both were aligned, off I went to photograph the pier.
Every now and then the tide is so low that you can right out to the pier which just happened to be the case on this particular evening. When I arrived to take the shot, the beach was full of people enjoying the low tide and close access to the pier. As I wandered around looking for the best spot to take the picture, it became clear to me that if I was going to get a clean photo, free of distractions, I needed to get as close as I could to the pier and that meant only one thing…. wet feet!
After venturing further out towards the pier, avoiding the deeper pools of water, I found my spot which provided a central composition of the structure now towering above me. Up went my tripod, mounted with my Fujifilm XT2 and given how close I needed to be to the pier, I was going to need the widest focal length I had, so on went the wide-angle 10-24mm lens. It was always my intention to take a long exposure photo so when set up and composed, I mounted my 10-stop ND filter which would help me smooth out the shallow water and any clouds in the sky, removing any distractions, making the subject appear more prominent in the scene.
Ready to take the shot, I just had one more thing left to do and that was to wait for the scene to be clear enough of people to get the clean shot. With a 105 second exposure, as long as people kept moving through the frame, they would be rendered invisible but the minute they stopped, the image was ruined, so after four or five failed attempts, I managed to grab an image just as the best light was beginning to fade away.
This is probably my favourite photo of the West Pier I’ve taken to date. I love the wispy details of the sand under the water, complemented by similar shapes created by the clouds in the sky. The sunset colours are subtle and not too overpowering, and the smooth, distraction-free water really helps the pier stand out in the composition.
The West Pier has actually been on quite a journey, from its golden age in the early 20th century, storms, fires to finally what little remains there today, yet it still stands. It’s hard not to be inspired by its refusal to crumble into the sea as I stand there, feet submerged, taking photos of it.
Until next week.
Trevor
This post is featured in my Weekly Photo series where I post a new photo every Monday. To have this delivered directly to your inbox, you can subscribe to the mailing list here.

Showtime | Weekly Photo #103
One of my spring woodland bucket list shots, captured in a Sussex woodland.
This is the time of year when the ancient forests of Blighty come alive, waking from their wintry sleep as they put on a fantastic show of vibrant colour, inspiring positivity and optimism that brighter days are ahead. Photography or not, I’ve always enjoyed the woodland at this time of year and I’ve had a blast scouting, exploring and finally being able to photograph it.

Fujifilm XT2 | XF55-200mm | 67mm | 1/13th Second | f/9 | ISO200
From the moment I started thinking about photographing the woodland this spring, I had this popular bluebell scene in mind and although similar-looking photos have taken over my Instagram feed lately, I wanted to try to take my own version, captured and edited in my own style. Why you might ask, do I want to take a photo that’s been taken a million times before? Well, I don’t subscribe to the notion that we landscape photographers should avoid popular subjects or compositions as with so many variables such as light, weather, time of day, and even the effect a pandemic can have on certain locations, no two photographs are ever identical. I think that unless a photographer is working to brief, they are free to explore creativity in their own, unique way, and for many, including me, getting those hero shots are part of that process.
After a bit of research and a lot of legwork, I finally found this beautiful spot in West Sussex where I could take the photo I had planned. It’s a large forest, well known for putting on a show during spring with carpets of bluebells throughout the woodland but when presented with such a wide area to search and with a very specific look I wanted to achieve, it inevitably took some time to find the exact spot. I ended up making two separate 3-hour round trips and spending a good 6-7 hours exploring the woodland before I found the best spot.
I spent some time working the scene. By that, I mean I walked around the forest, studying it, finding the best area of bluebells, the best arrangement of trees, while trying to minimise the amount of bright, distracting light that was piercing through the canopy. After a few minutes, this is the composition I decided on.
It was this tree in the foreground with those green leaves on the trunk that initially caught my eye but as I started to compose, I started to notice other things I like, such as those vibrant greens up in the canopy and the way the floor isn’t just one solid carpet of purple, but rather these swathes of colour with purples, whites and greens spread right across the forest floor. It really was a beautiful scene to observe.
I ended up focus stacking the first few layers of trees to make sure they were nice and sharp and used a circular polarizer filter on the end of my lens to take some of the glare off the leaves and with my settings dialled in, I took the shot.
Some misty conditions would have been the icing on the cake for a woodland scene like this, but I guess you can’t have everything and there’s always next time, but overall, I’m really pleased with the photo I took.
Trevor
This post is featured in my Weekly Photo series where I post a new photo every Monday. To have this delivered directly to your inbox, you can subscribe to the mailing list here.

Moving On | Weekly Photo #102
A behind the lens story about this long exposure landscape photo of the O2 Arena taken at sunset in London.
This is a bit of a first on my weekly photo series. After posting over 100 photos, this is the first time I’ve posted one that isn’t in the 3:2 aspect ratio. 3:2 is the native ratio on my Fujifilm camera and although I do crop my images, I’ve held off posting wider photos on this blog as anything wider than 3:2 doesn’t come across well on mobile devices. That’s left me a bit frustrated as I have lots of photos in either 2:1 or even 3:1 panoramic format which I would love to share with you too, so, that’s what I’ve decided I’m going to do from now on.
After looking through my website analytics, there’s a 50:50 split between those that read my blog on a mobile device and those that read it on a desktop. yes, I know mobile is the future but still, I’m really pleased about that as for the panoramic photos like this, the wider screen on a desktop or laptop is by far the best way to view my pictures regardless of the size. I might have to get a bit more creative to show the wider format photos on the likes of Instagram, but there are plenty of techniques I can use to do that.

Fujifilm XT2 | XF10-24mm | 15mm | 120 Seconds | f/9 | ISO200
The title of this photo has a kind of double meaning as not only did I decided to move on, away from just posting the same aspect ratio photos but it’s also about one of the frustrating sides of landscape photography in London and how we photographers can be seen as a nuisance or even a threat to other people.
I’ve wanted to take a long exposure photo like this of the O2 Arena (formerly known as the Millennium Dome) for some time now and a few weeks ago, back in late March this year I found myself making a rare trip to the office in London, so I decided to take my photography gear and try to get this shot after I had finished my work. I’d done some research into where to go to get this picture of the Greenwich peninsular from the north side of the River Thames but to get the very best angle, I still needed to explore on foot, so after leaving the train station near Canary Wharf, I walked east along the river, keeping an eye on the view on the other side as it unfolded.
At around 6PM, I found my spot. It was on a public walkway, the Thames Path in fact, in front of some residential houses and provided a perfectly symmetrical view of the arena. I set up my tripod and mounted my camera, pointing it out across the river in anticipation and hope for some nice light as the sun continued to set. Here's a snapshot I took of the view with my iPhone as I was setting up.

After 20-25 minutes, I was approached by a security guard who politely asked me to pack up and move on as I wasn’t allowed to take photographs from that spot as I was on private land. I made a case that I was out of the way, doing no harm and there were many other people who didn’t live there using the space, but he said one of the residences was concerned I had been there too long and was up to no good so had asked for me to be moved on. He was polite enough and to his credit, he understood that I wasn’t a threat and my camera was pointing away from the buildings, but he had little choice but to do as requested by the resident. I’m used to being asked to put my tripod away in London as much of the Thames Path is private land with public access, but I’ve never been asked to actually pack up and leave.
I could have made a scene and argued my case but what would that have achieved? The guard wasn’t deliberately trying to make my life difficult and the fact remained that I was on private land and with time running out before the sun was going to set, arguing with him would have been a waste of time and I would have likely missed my opportunity to find another spot to get a photo. I reluctantly packed my camera gear away and made my way along the river to the spot I took this week’s photo from.
So, with the ideal composition off the table, I found the next best location around 5 minutes along the river. Up went the tripod once more and I mounted my Fujifilm XT2 and wide-angle 10-24mm lens. I wanted to include the entire peninsular with the river heading off either side to give the photo a balanced composition but to get that wide, I had to include plenty of water in the foreground which I knew I would need to crop away later.
With the sun now beginning to set and with these nice, pastel colours starting to appear in the sky, I mounted my Kase magnetic ND filters on the end of my lens and pressed the shutter. As with all of my long exposure photos, I follow a straightforward process from manually focusing to calculating my exposure and rather than explaining that in too much detail in this post, you can find all of the information in my eBook here.
To get the water as smooth as possible, I ended up stacking my 10-stop and 3-stop ND filters onto the end of my lens which resulted in this 2-minute exposure. Although there weren’t many clouds, thankfully, those that were there were moving away from me and the 2-minute exposure was enough to stretch them out, creating some nice interest in the sky.
Along with some tonal adjustments and spot removal in Lightroom, I also cropped the image to a 2:1 panoramic aspect ratio which removed some of the empty space which was adding very little to the lower third of the frame.
I’m really pleased that regardless of not being able to take the photo from my preferred location, I still walked away with something that evening.
Trevor
This post is featured in my Weekly Photo series where I post a new photo every Monday. To have this delivered directly to your inbox, you can subscribe to the mailing list here.

Awakening | Weekly Photo #101
With spring in full swing, I ventured out to my local woodlands to take this woodland photo of the bluebells and fresh, vibrant leaves on the trees.
Over the last few weeks, I’ve been eagerly scouting and photographing nearby woodlands as they begin to wake from their wintry sleep, sprouting with new life and vibrant colours. I only started to photograph the woodland in March last year but just days into this new pursuit, we were locked down, stuck at home for almost the entire spring season. So, with restrictions from the most recent lockdown loosened in March this year, I wasn’t going to miss out on photographing the woodland in spring for a second year. I spent as much time as I could researching potential areas and once allowed, headed out to explore them so I could be ready to photograph them once the awakening had started.

Fujifilm XT2 | XF18-55mm | 41mm | 0.5 Seconds | f/8 | ISO200
While researching potential locations, I came across this small woodland just 15 minutes’ drive from home. I initially discovered it on the Surrey Wildlife Trust website. The Wildlife Trust do important work here in the UK to protect the local wildlife through active engagement and education and websites like theirs are a great source of knowledge to find areas with particular types of wildlife when scouting photography locations.
When I first scouted the woodland back in early March, the trees were still bare but all over the ground, I noticed the green leaves of bluebells starting to sprout. Bluebells have a particularly thick, grass-like leaf and with the woodland floor smothered in them like a vibrant green carpet, I knew I had a great location close to home where I could keep coming back to during spring. When I took this photo, the Bluebells were still around a week from being at their peak but as I wandered amongst the trees, I spotted this picturesque scene with bluebells in the foreground, with a small, dried-up brook in the mid-ground that subtly leads the eye towards the background and those new, vibrant leaves backlit by the morning sun.
Thankfully, I could get to the spot where I took this picture without disturbing a single Bluebell as I know how fragile these flowers can be. The UK woodlands is home to around 50% of the global population of Bluebells and like many woodland flowers, if you tread on them, they may not grow back again next year which is why they are a protected species under the Wildlife and Countryside Act. They really are a national treasure.
I carefully placed my tripod on the ground, avoiding any flowers and mounted my Fujifilm XT2 and 18-55mm lens on top. To give the colours a slight boost and to take a small amount of the glare off the leaves, I mounted my circular polariser filter onto the end of the lens and with the settings dialled in, I manually focused and took the shot.
Overall, I’m happy with the final image, although I think it would be stronger and a little less busy without the trees on the far left and bottom right but this is woodland photography and although it’s part of the challenge to create a visually pleasing photo, you often have to embrace the chaos nature presents to you. I’ve quickly learned that if you strive for a perfect composition while photographing the woodland, you will quickly be disappointed.
Until next week.
Trevor
This post is featured in my Weekly Photo series where I post a new photo every Monday. To have this delivered directly to your inbox, you can subscribe to the mailing list here.

My Top 10 Night Photography Spots in London
I showcase what I consider my top spots to take photos at night in London. I will take you on a fantastic trip along the River Thames at night from Westminster to St Katherine Docks, providing you with some useful information about each location such as how to find the spot and the best time to photograph it.
I have been taking cityscape photos of London for many years now and in that time, the view of the city at night has been transformed by replacing the outdated orange street lights with new, modern light installations, turning these once monotonous views of London into vibrant urban vistas. Having photographed so many of these iconic scenes myself, I’ve decided to share a few of what I consider my favourite night photography spots in London.
Photographing London at Night
In this article, I will be taking you on a journey along the River Thames from west to east as we visit 10 of my top spots to capture photographs of London at night which includes some useful information such as the closest stations and if the locations are tripod friendly or not.
When you have finished reading this article, why not check out some of my other “Photographing London” posts.
My Top 10 Photography Spots in London
My top 5 free rooftop locations to photograph London
My 10 top tips for photographing London
My Top 5 Long Exposure Locations in London
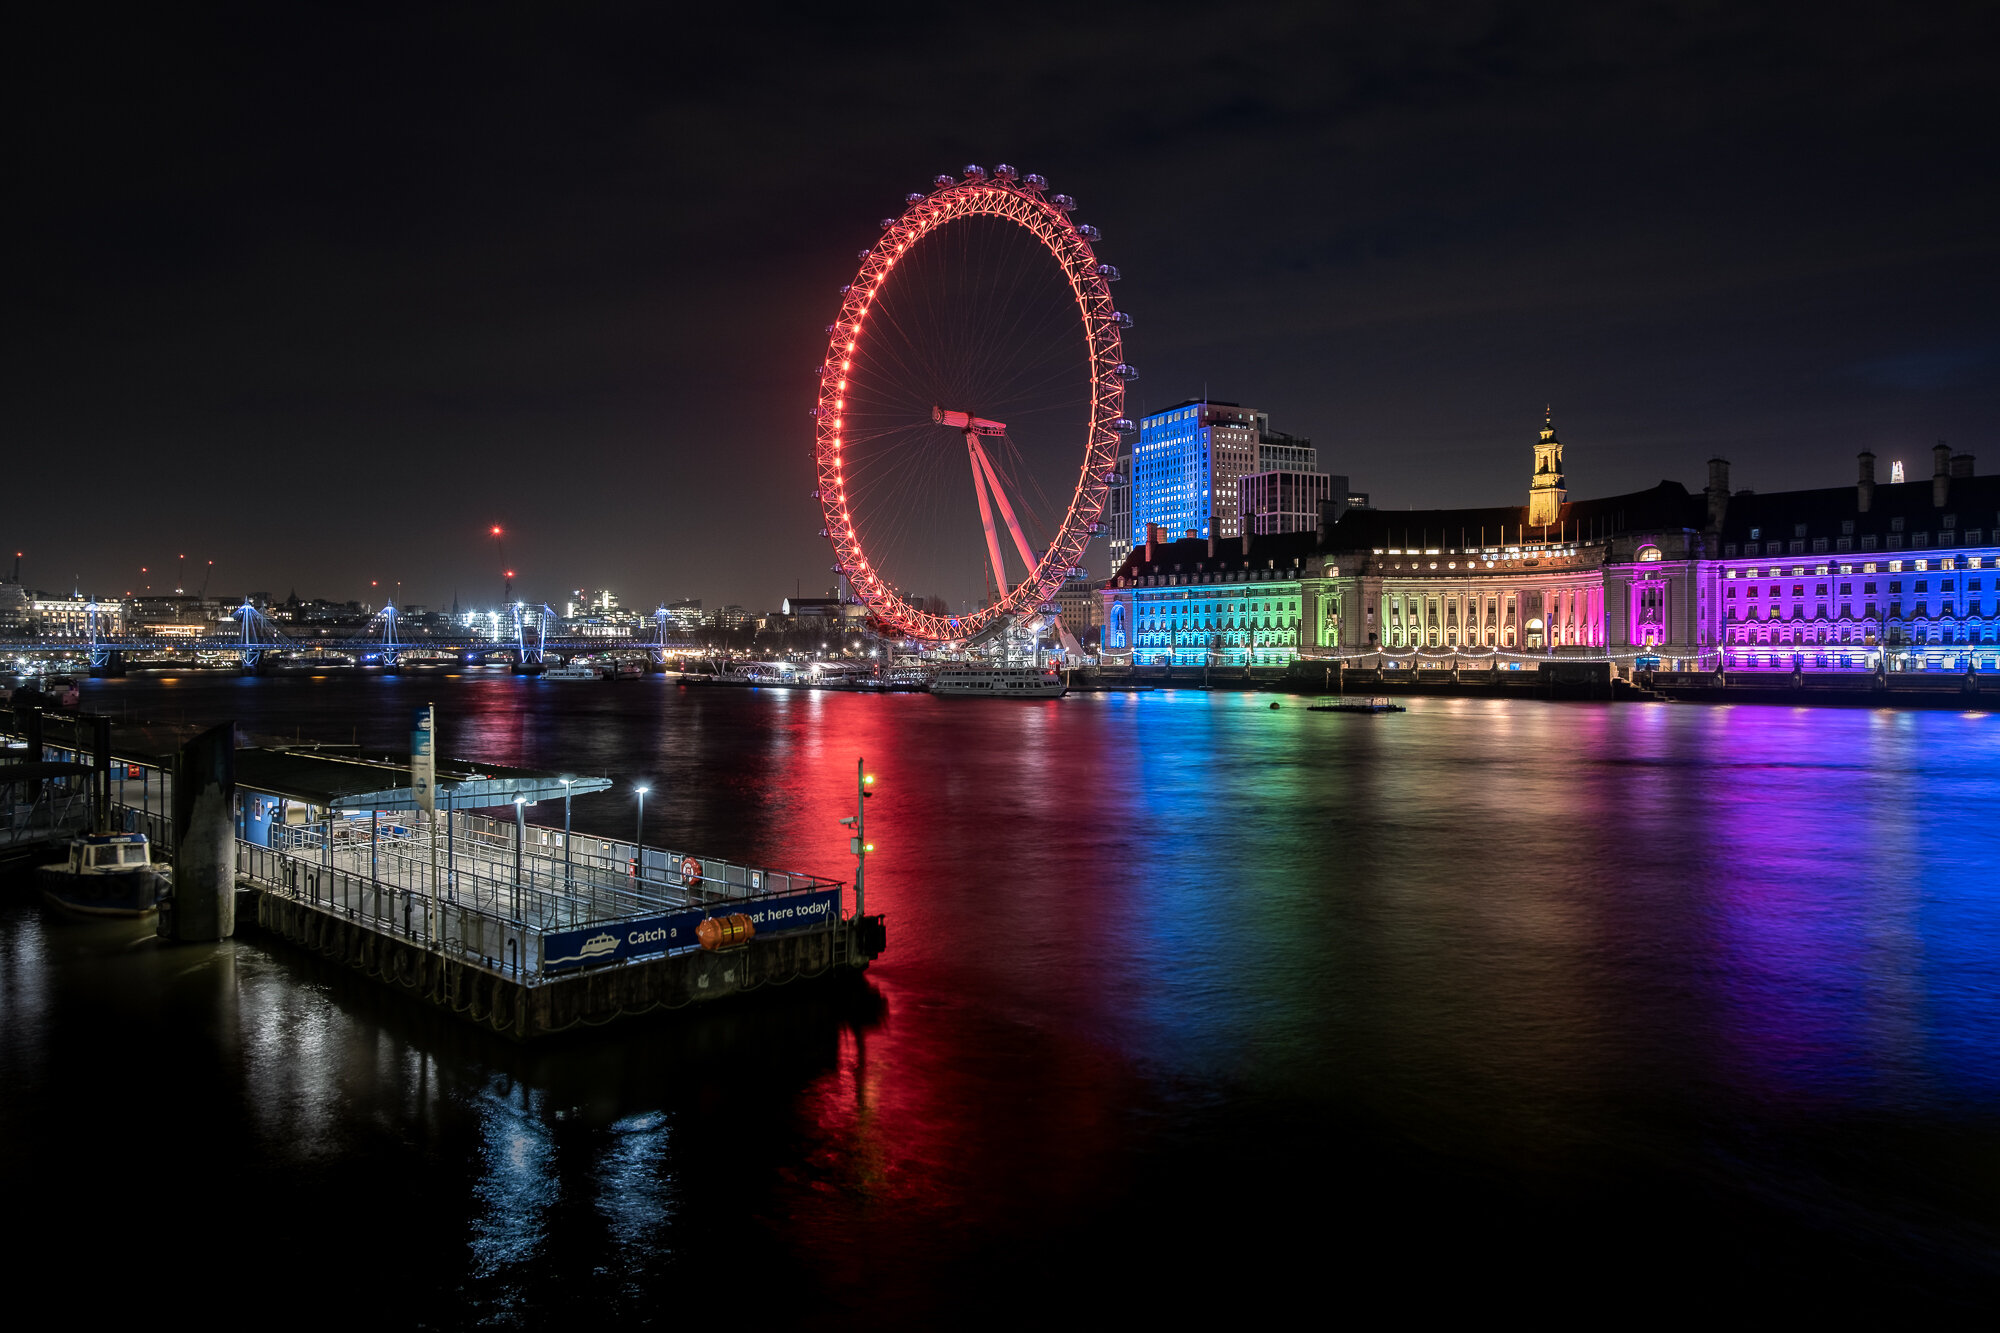
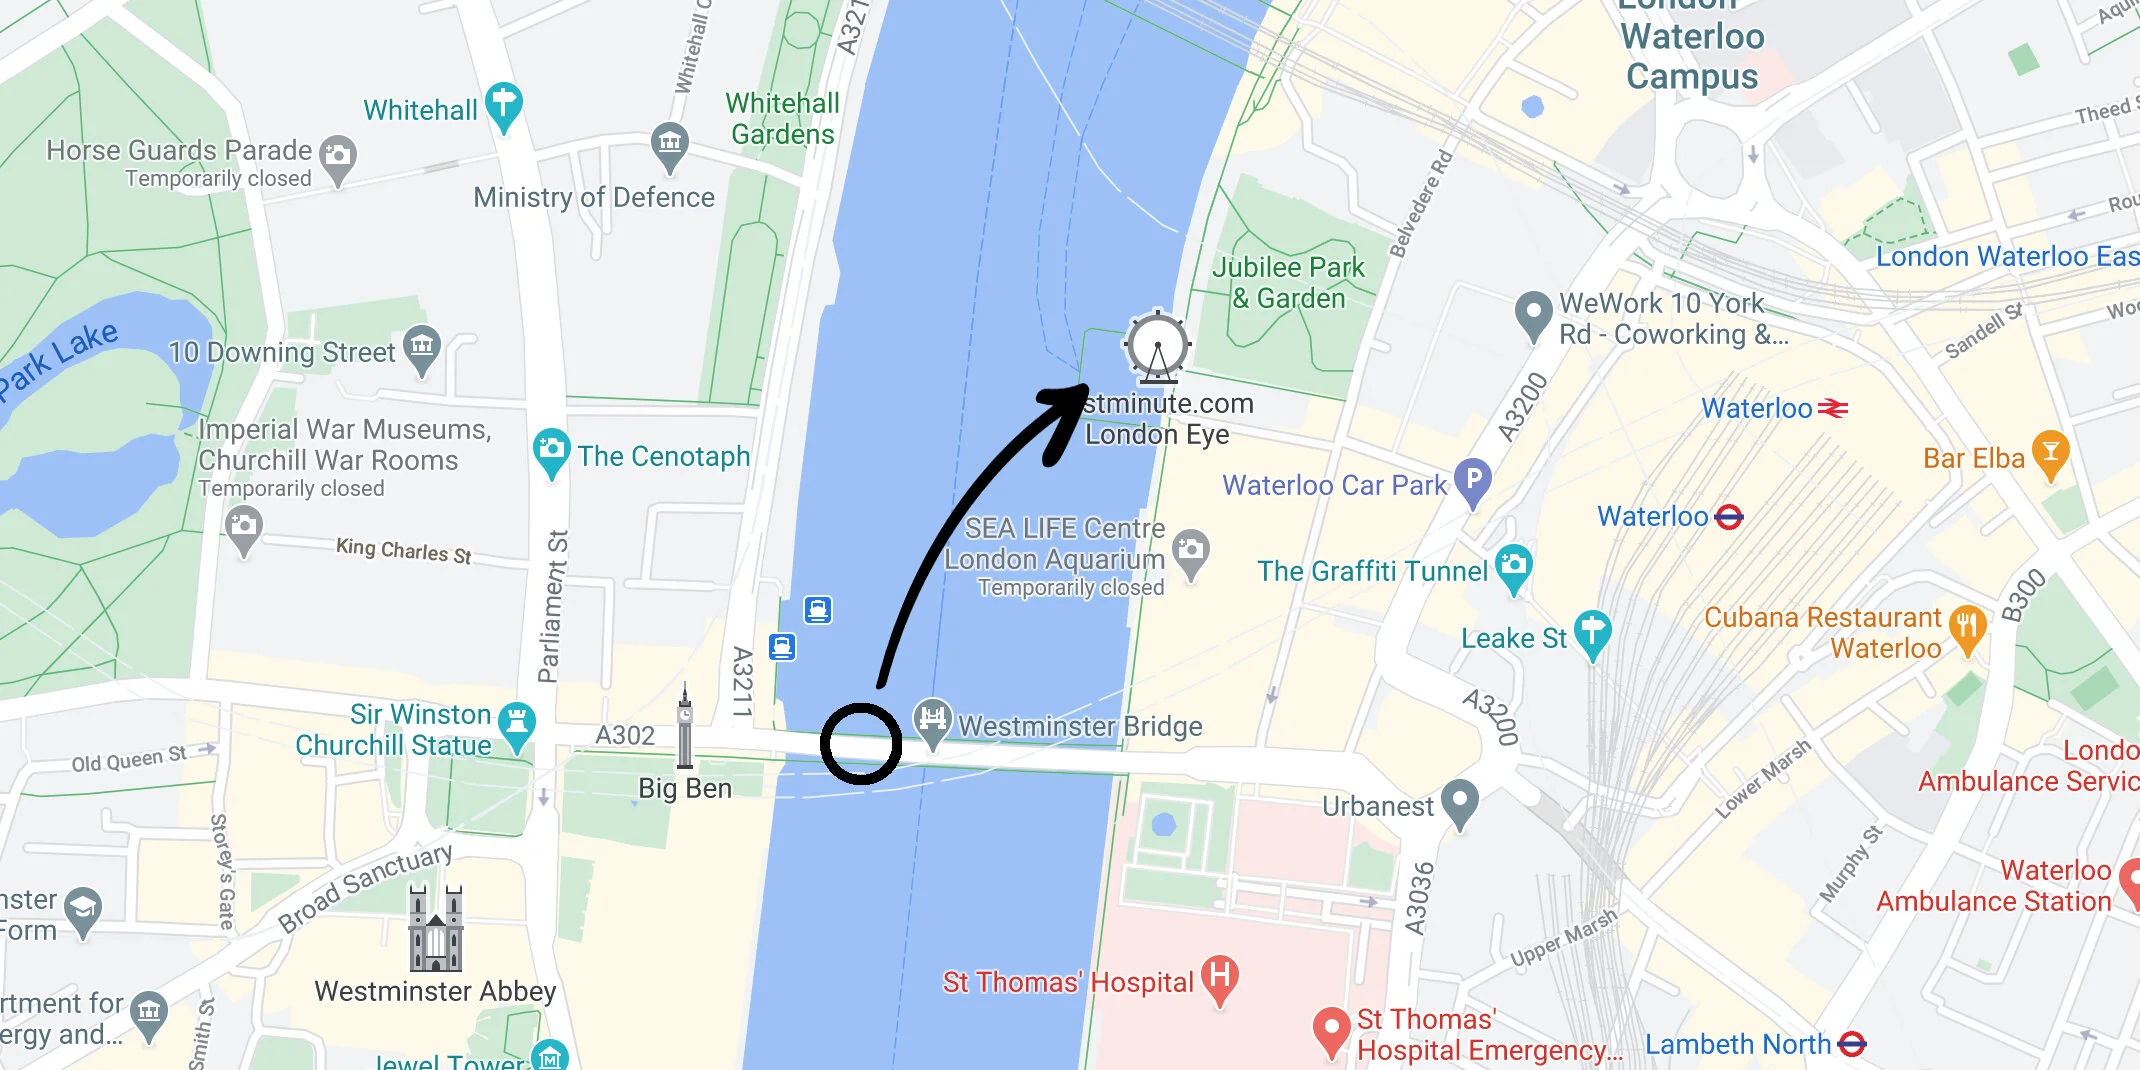
#1 The London Eye from Westminster Bridge
Starting our journey along the River Thames, the first night photography spot on my list is the view of the London Eye taken from Westminster Bridge. With the side-on view of County Hall and the London Eye, it’s a great spot to capture the bright colours that light up the South Bank. Getting a balanced composition can be a bit tricky so for this photo I walked to the far side of the Bridge which allowed me to include the riverboat pier in the bottom left, adding some visual weight into the frame. Read more about this photo in my Weekly Photo series here: Colour Wheel.
When is the best time to photograph this spot?
To both avoid the masses of people that congregate on Westminster Bridge in the evening and to avoid getting up super early, I recommend photographing this view before sunrise during the winter months. With the Houses of Parliament, Big Ben and The London Eye all situated here, this area is a magnet for tourists so finding the ideal spot and having enough space to set up a tripod is difficult at night but if you visit before sunrise in the winter, you will have to wrap up warm but you can arrive at a reasonable 7am and capture this night time photo of London with relative ease.
Can I use a tripod?
Yes, you can. There are no rules that prevent the use of tripods but as the location can get very busy during the day and into the evenings, you should choose your spot carefully to avoid it being bumped into by other people. You will have far more space to set up a tripod if you visit before sunrise as I did in the photo above.
How do you find the location?
The closest underground stations are Westminster (Jubilee Line) and Lambeth North (Bakerloo Line) and from there head towards Westminster Bridge.
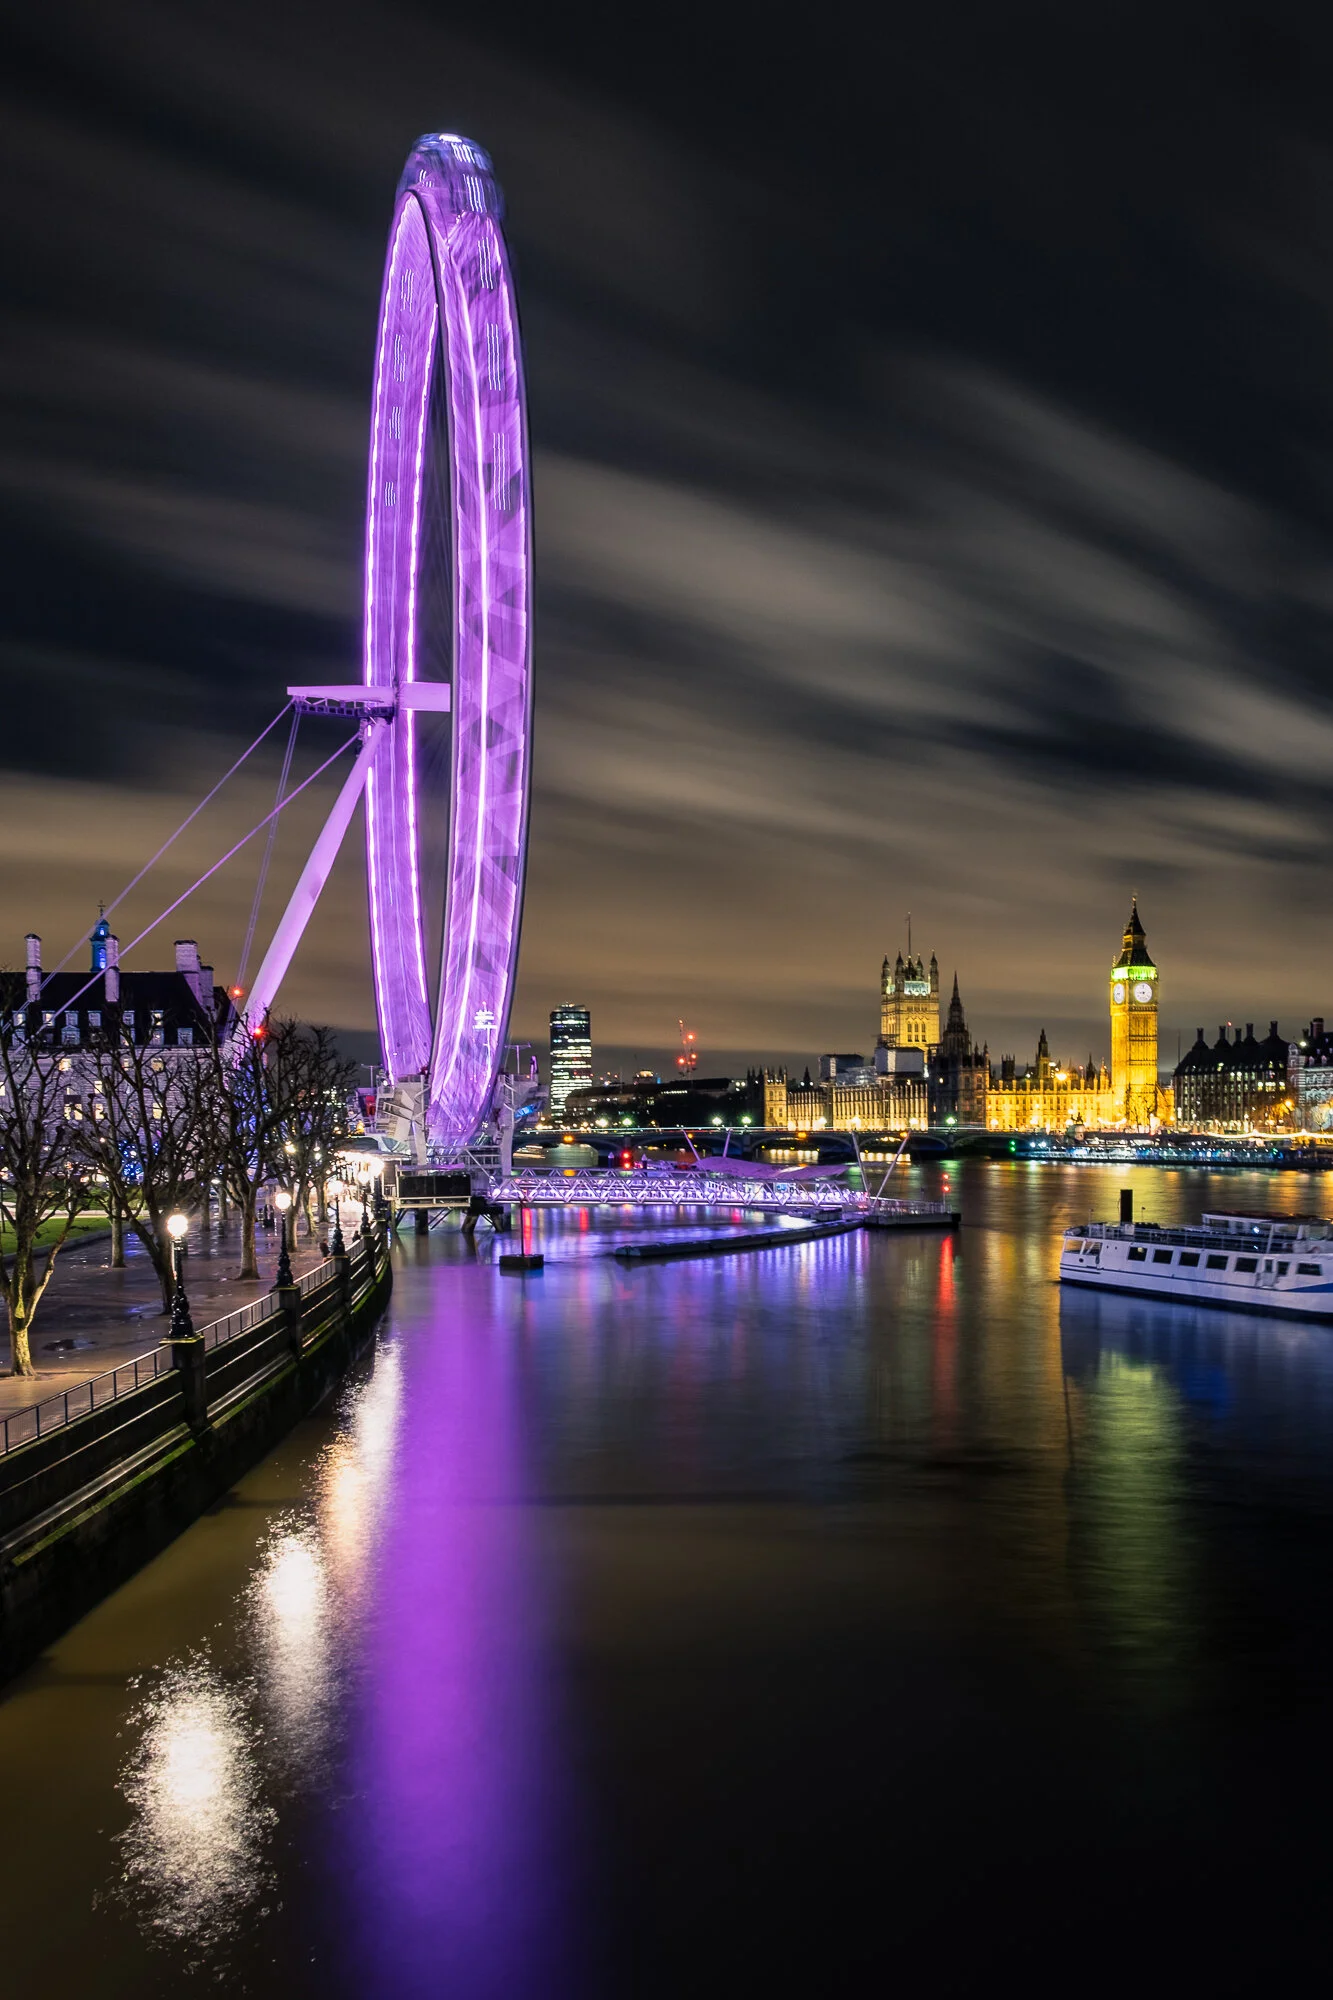
#2 Westminster from the Golden Jubilee Bridge
Next up, we have the fantastic view from the Hungerford Bridge and Golden Jubilee Bridges where you can take this night photo of the London Eye and the Houses of Parliament
When is the best time to photograph this spot?
There’s no need for an early alarm for this shot as I’ve photographed from this bridge many times and never has it got too busy to set up my tripod so getting here after dark any time of the year is fine. If you want to capture a long exposure with the London Eye spinning, make sure you look up the opening times to make sure it’s still running at the time you want to photograph.
Can I use a tripod?
Yes, you can. There is no rule to prevent the use of tripods but you will need to find a spot in between the poles that form part of the bridge’s structure and as always, try to keep it out of the way of other people to avoid it being bumped about.
How do you find the location?
The closest underground stations are Embankment (Circle and District Lines) and Waterloo (Jubilee Line) and from there head towards the south-western side of the Golden Jubilee bridge. This view can be found close to the South Bank of the river.

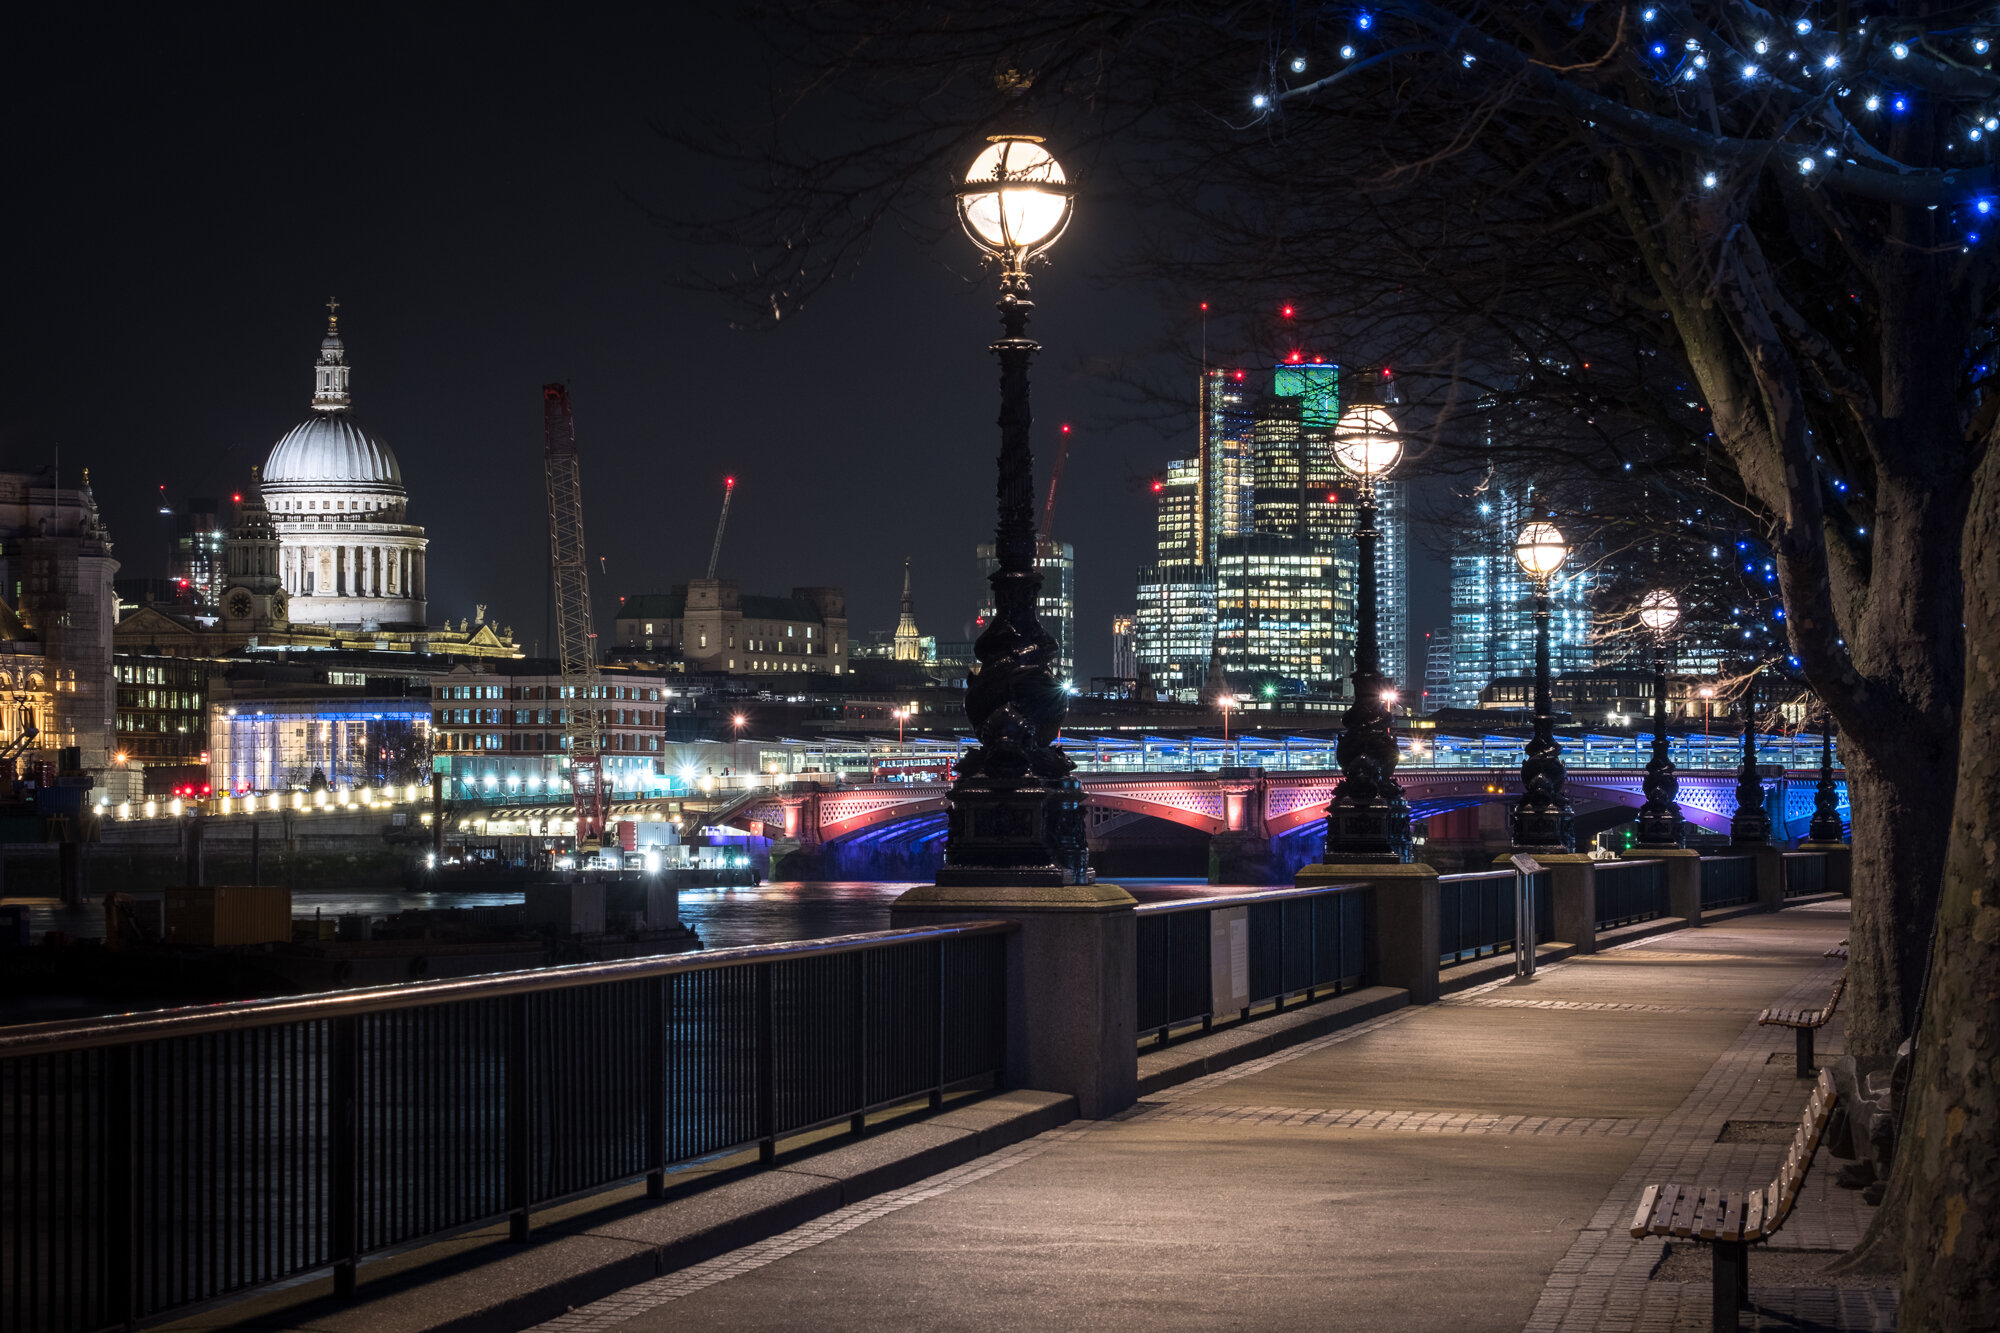
#3 The City of London from the Thames South Bank
This is a classic view of London from the South Bank of the River Thames and a fantastic spot to photograph London at night. The ornate street lamps light the path through the frame leading to a backdrop of the vibrant colours of Blackfriars Bridge, the City of London and the famous dome of St Paul’s Cathedral. I wrote more about the time I took this photo in my photoblog here: South Bank.
When is the best time to photograph this spot?
I took this photo in January and with the trees free of leaves, more of the scene opens up revealing more of the lights along the path and the city in the background which would be obscured by the trees in the warmer months. I took this photo in the evening and if you have some patience and a bit of luck, you may get a gap in the foot traffic enabling you to take a photo without any people along the path but if you’re an early riser, a pre-sunrise shoot without as many people is also a good option.
Can I use a tripod?
Strictly speaking, tripods are not allowed along this stretch of the South Bank but as it’s a short walk away from the really busy areas around the London Eye, you can normally get away with it without anyone bothering you. You do, however, need to keep out of the way here so as I did in the photo above, you can tuck yourself in, close to the trees which still leaves plenty of room for people to pass by.
How do you find the location?
This spot is on the south side of the Thames in between Waterloo Bridge and Blackfriars Bridge. The nearest Underground stop is Waterloo Station on the Jubilee Line but what I like to do is walk along the South Bank from Westminster which takes around 10 minutes. Once you can see the dome from St Paul’s Cathedral, Blackfriars Bridge and some of the buildings in the city, you are at the right place.

#4 St Paul’s Cathedral and the Millennium Bridge
Number 4 on my Top 10 Night Photography Spots in London is The Millennium Bridge. With the recently upgraded lights and sleek, modern lines there are many different compositions of London to photograph. I particularly like this symmetrical view of the bridge which leads the eye towards the recognisable dome of St Paul’s Cathedral and if you catch the clouds moving in the right direction, the long exposure needed at night will help them mirror the direction of the bridge and make your final image even stronger.

When is the best time to photograph this spot?
To get this symmetrical composition of the Millennium Bridge, the fewer people crossing the bridge the better as even with a long night time exposure, you will still end up with ghostly figures crossing the bridge if it’s too busy so I recommend late at night, after rush hour or early in the morning before people start heading off to work.
If you can’t get to the bridge at these times, don’t worry as there is a photo to be had here day or night from on or underneath the bridge. It’s a popular spot for photography for good reason.
Can I use a tripod?
You can use a tripod on the Millennium Bridge. There are a couple of central compositions that can be photographed from the south side of the bridge but if you really want a perfectly symmetrical composition, there are only a couple of specific places to photograph from so its best to arrive a little earlier than planned just in case the best spots are taken and you need to think of a plan b.
How do you find the location?
The easiest and closest stations to get to the Millennium Bridge are St Pauls (Central Line) which is just north of the bridge or Blackfriars (District and Circle Lines or National Rail) which requires just a few minute’s walk east along the river.

#5 London from Tate Modern’s viewing platform
The viewing platform is a great spot for taking night photographs of the city from the south side of the River Thames. From here you can get uninterrupted views of the city of London or the dome of St Pauls cathedral (as I did here) and with a wide-angle lens, you can embrace the dominant chimney and the lights down in the turbine room and use the historic structure as your main subject against the bright lights of the city in the background.

When is the best time to photograph this spot?
If you want to take photos of the city from this spot at night, then it’s a much more pleasant experience doing so in the warmer months as you are quite exposed to the elements when up the tower and it can be rather cold but with the sun setting later, you should aim to visit on a Friday or Saturday evening, when the museum is open until 21:30. Otherwise, you can capture a night-scape image during the winter months any day of the week, just wear an extra layer or two!
Can I use a tripod?
No, the museum has a strict rule about the use of tripods. To get a sharp image in low light, you can try to use a tabletop tripod like the Manfrotto PIXI which I carry in my camera bag and balance it on the corner of the railings or on the floor but just be careful as it’s a slightly risky manoeuvre. My advice is to make sure that whatever you do, you keep the camera strap on and around your neck just in case the camera slips.
How do you find the location?
As in location 4 above, you can use St Paul’s or Blackfriars to get to this night photography spot. Tate Modern is located along Thames Bankside on the South of the river, opposite St Pauls. Just use the main entrance to the museum and head to the back where you will find the lifts up to the viewing level.

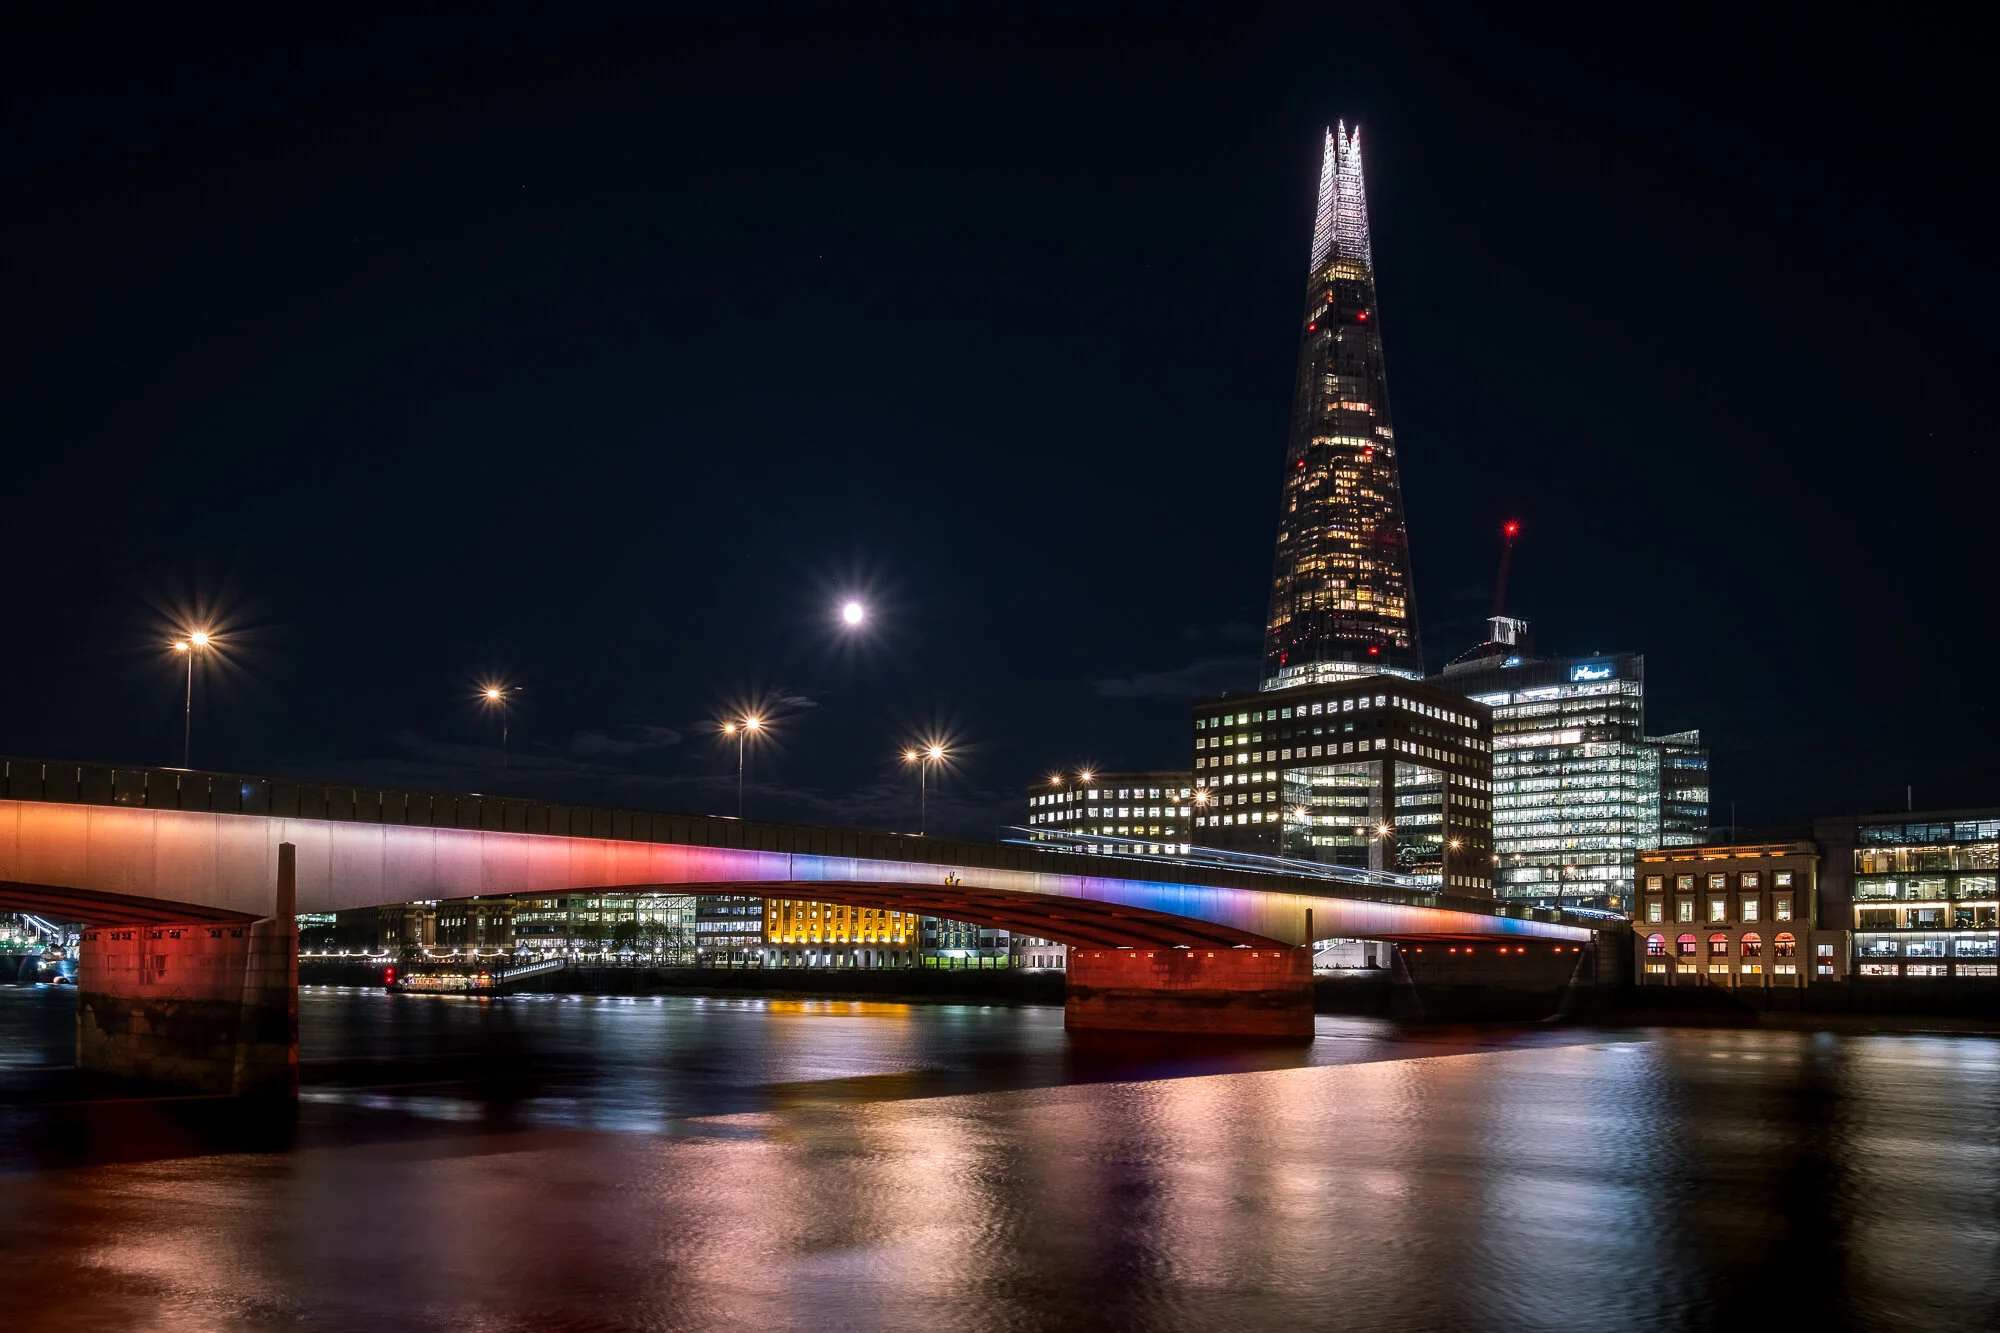
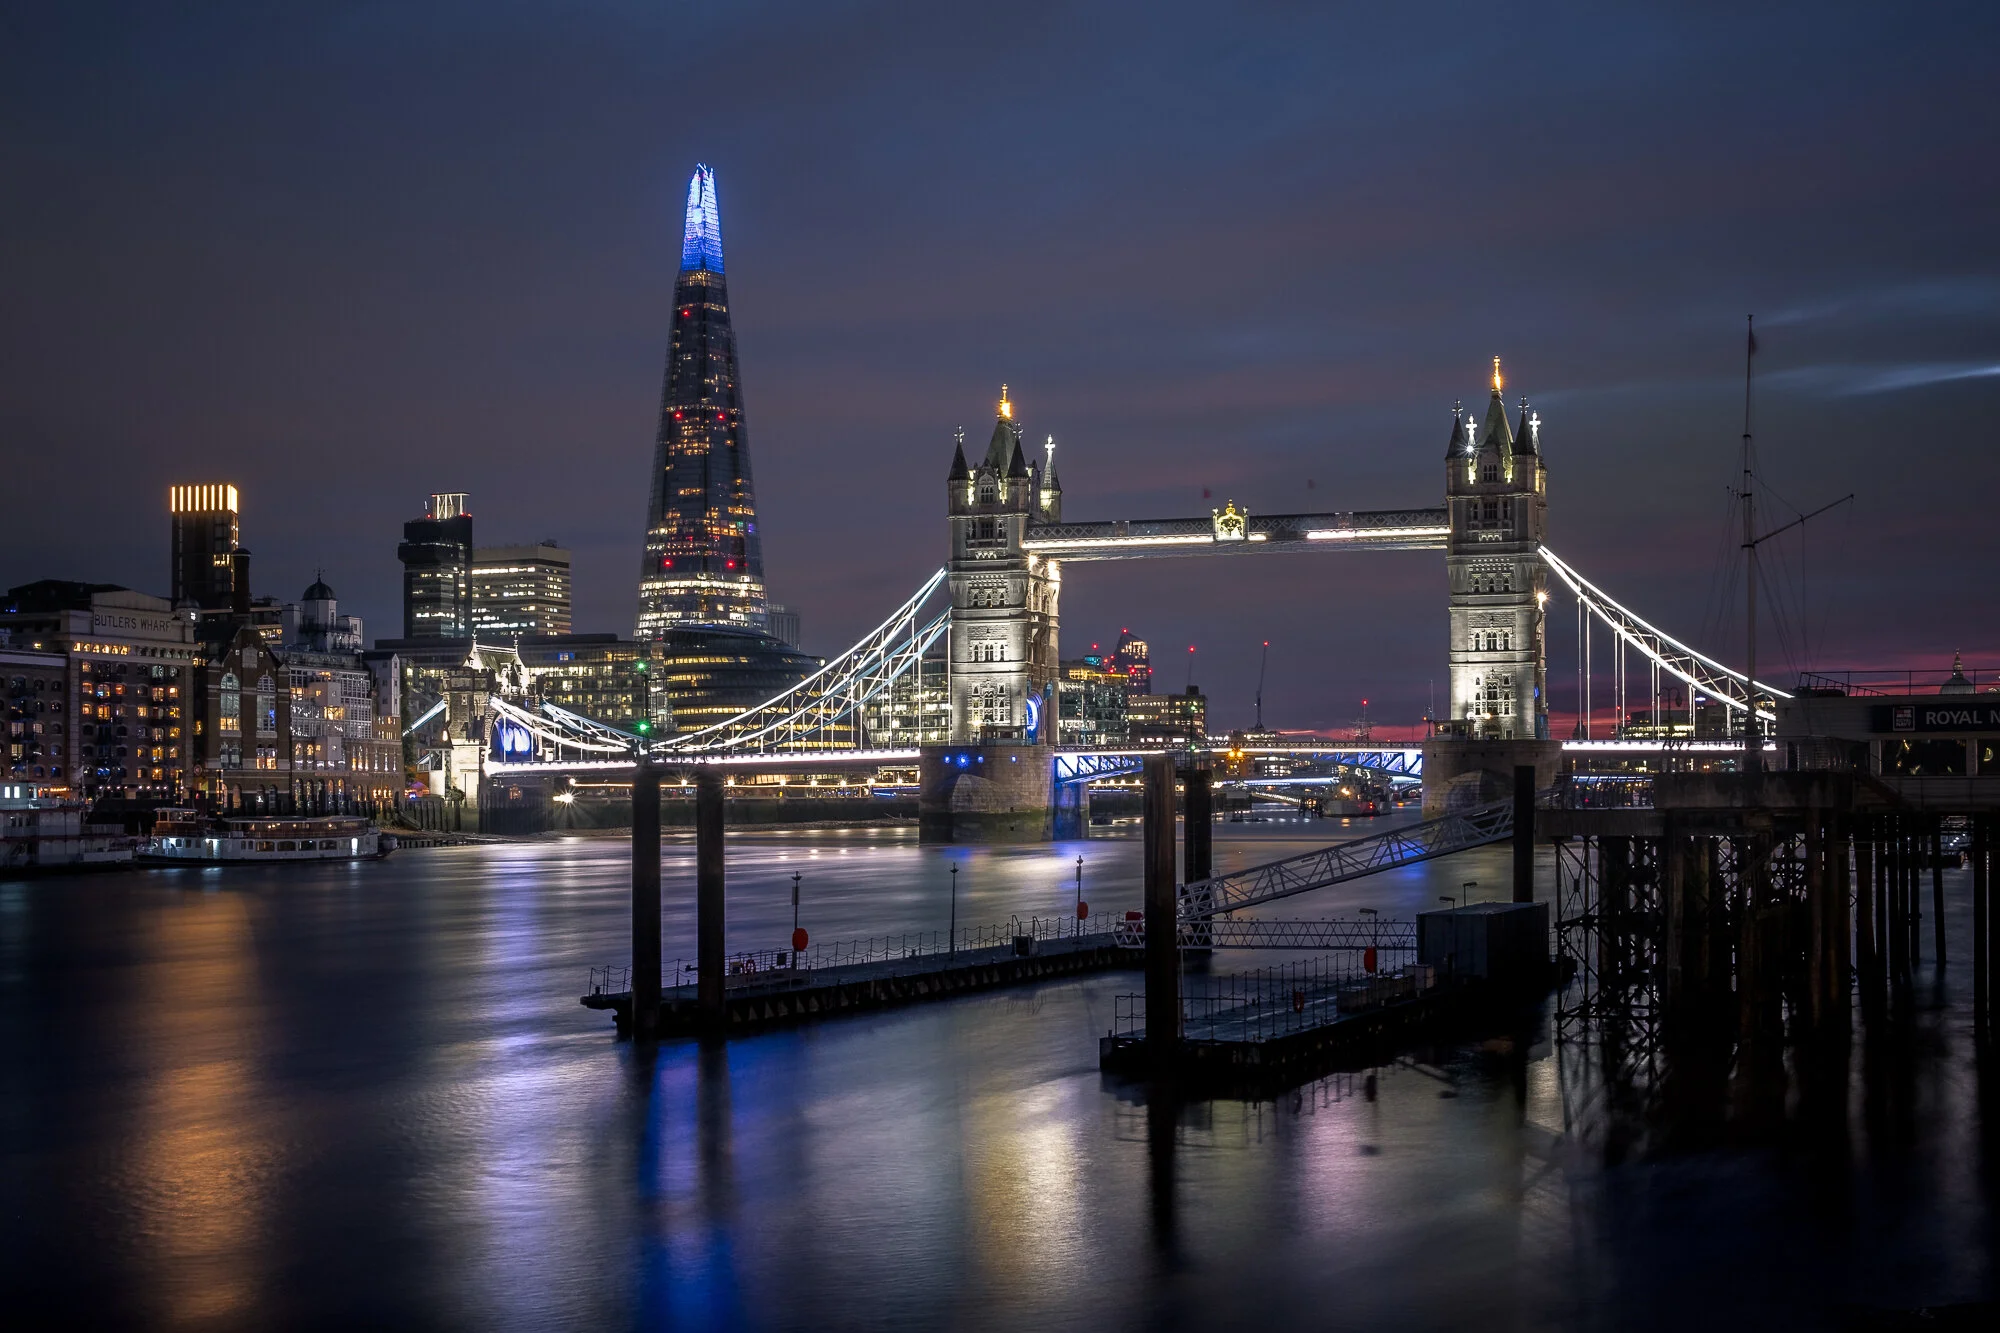
#6 London Bridge and the Shard from the North Bank
This spot next to London Bridge is quite a new addition to my list as up until recently, the lights on the bridge were a monotone orange colour and along with its uninspiring concrete arches, London Bridge at night was nothing to write home about. It’s all changed now though. The Illuminated River project has turned this dull-looking bridge into a vibrant wall of colour and not to be outdone, the lights on the Shard help it stand out at night, making it a fantastic subject for the bridge to lead the eye towards. To see how I got on taking this shot, take a look at this post: Illuminated River.
When is the best time to photograph this spot?
If vibrant colour is what you want, then December is by far the best month to photograph this view of London at night. During the month of December, The Shard puts on its own multicoloured light show which compliments the lights on London Bridge nicely. Just remember to wrap up warm and bring a wide-angle lens to fit it all in the frame.
Can I use a tripod?
Yes, you can use a tripod. The river wall is very thick at this spot so what I tend to do is close my tripod right down and put it on the wall, close to the edge to avoid including it in the shot. Just be extra careful the camera doesn’t fall off.
How do you find the location?
To get to this spot, the closest train stations are Monument/Cannon Street (Circle and District lines) or across the river at London Bridge (Northern Jubilee and National Rail lines). You then need to make your way to the north bank of the Thames and the spot is down by the waterside just a minute’s walk west along the river.

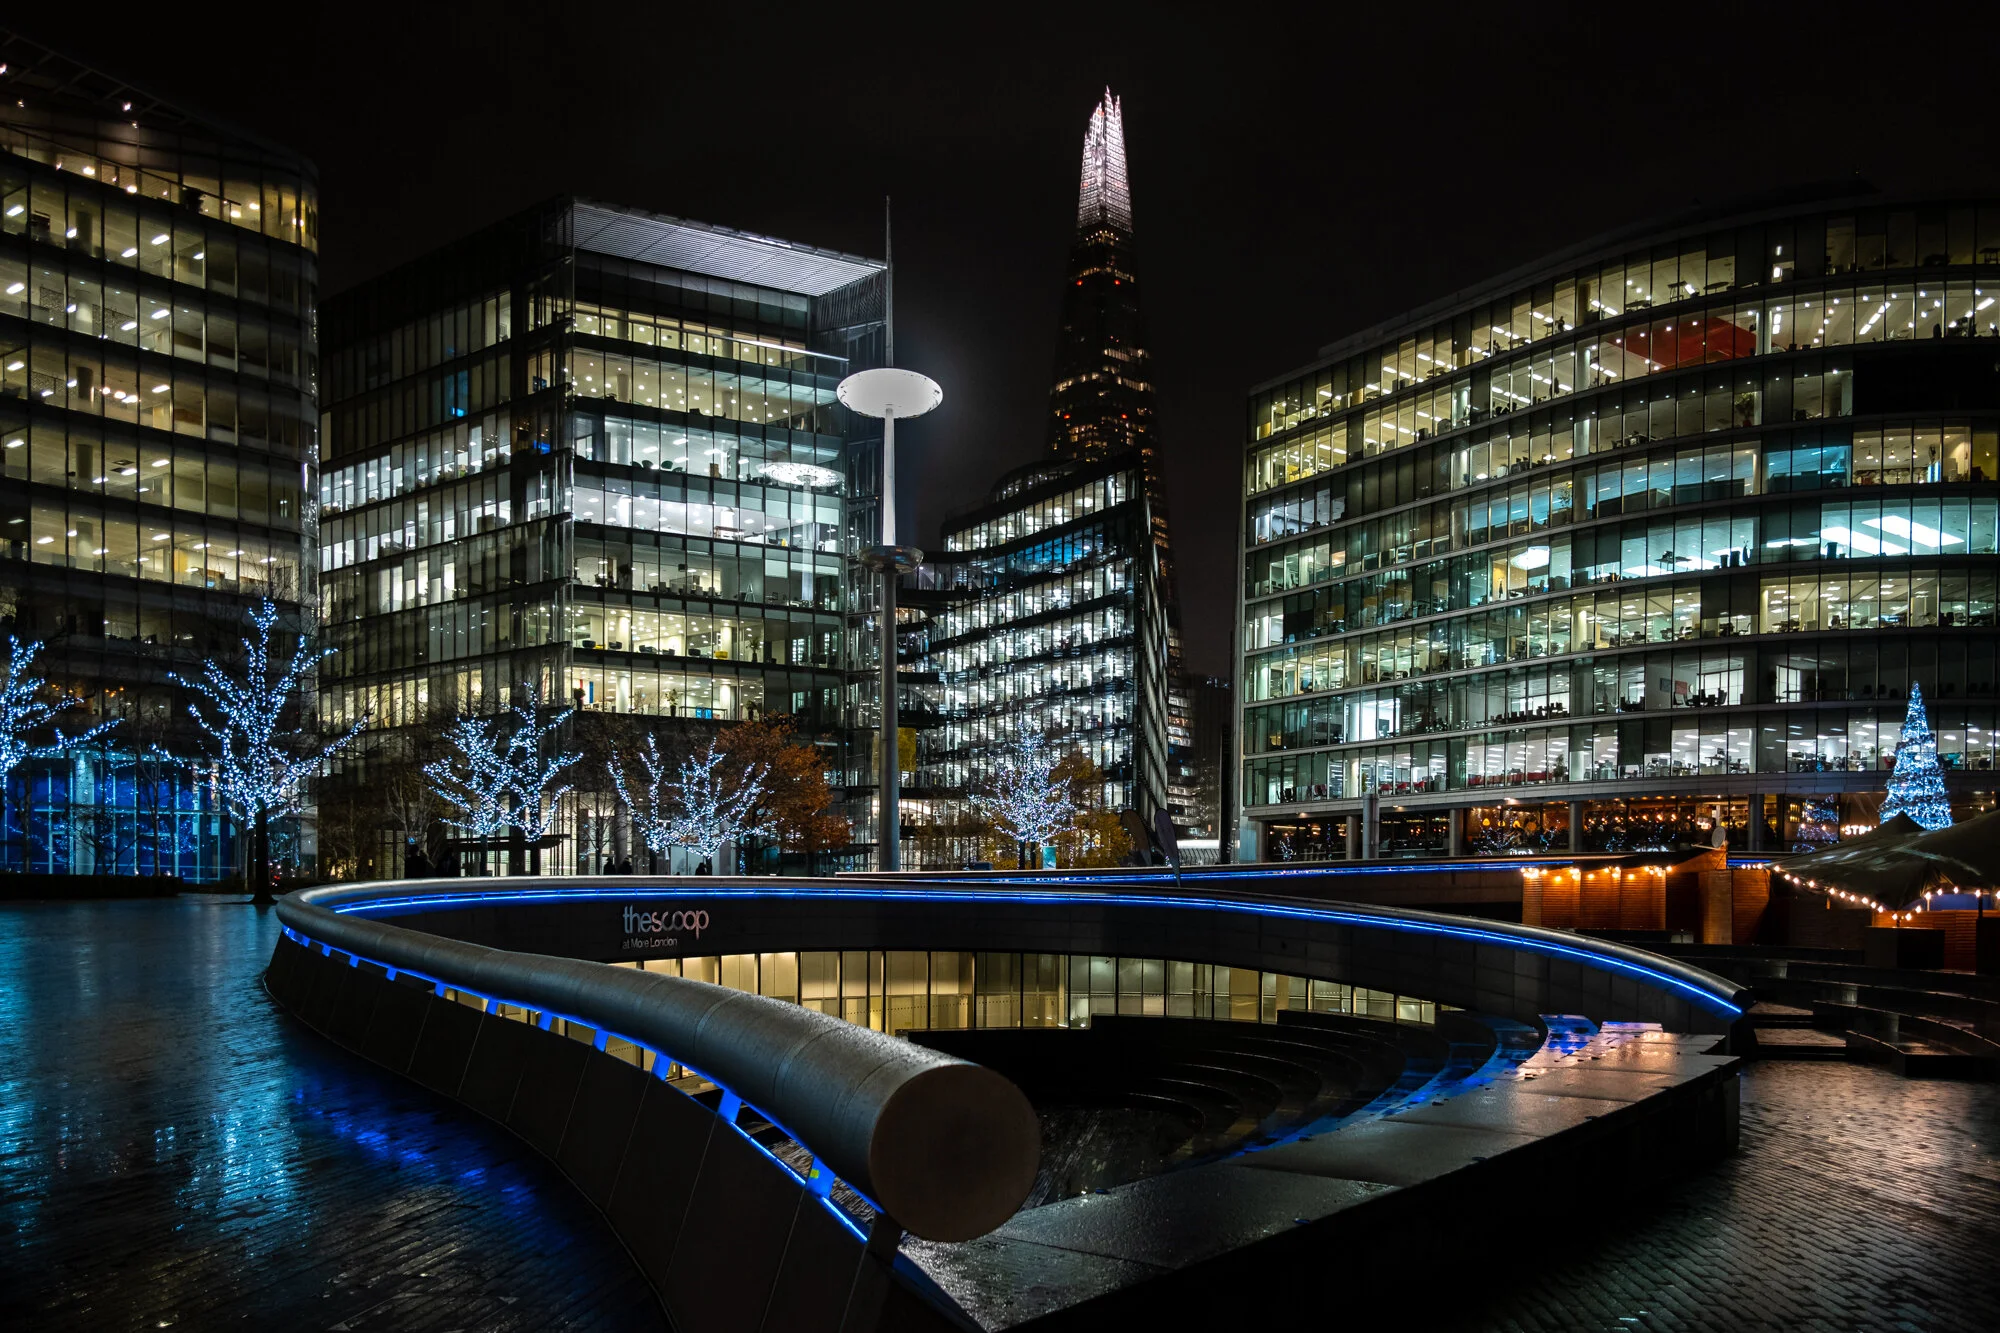
#7 The architecture at More London
Day or night, More London Estate is one of my favourite places to photograph London. This spot boasts some fantastic cityscape photo opportunities from the modern architecture of The Shard, to the classic London icons such as Tower Bridge and it’s no different at night. This is one of my top night photography spots for good reason as the cool, modern lights really pop at night and with all of this ambient light to work with, it’s a fantastic location for some night photography.
When is the best time to photograph this spot?
If you are only pointing your camera across the river or if you don’t mind lots of people in your landscape photos, then visit in the evening, any time of the year but if you want to photograph this fantastic architecture without any people causing blurry ghostly figures in the shot, then before sunrise is your best option. Although you still get people walking through, the foot traffic is far less and there are plenty of gaps to take a shot.
Can I use a tripod?
Strictly speaking, you can’t use tripods here but over the last few years, I am being bothered less and less by the wardens. I’ve learned to stay out of the way and be discrete and they seem to recognise that and leave me to it but if you visit, be prepared to be asked to put the tripod away.
How do you find the location?
London Bridge with access to the Northern, Jubilee and National Rail lines is easily the most convenient place to head to when visiting More London Estate. If coming from the north of the river, you can travel to Tower Hill on the Circle and District line and cross the river via Tower Bridge.
#8 Tower Bridge from the Thames North Bank
Number 8 in my top 10 night photography spots in London is this classic view of Tower Bridge taken from the north bank of the River Thames. Photographing this famous bascule bridge from in front of the Tower of London allows you to include these ornate street lamps and the cobbled street giving it an almost timeless look.

When is the best time to photograph this spot?
This is a gated area and opens around 7am and closes at 9pm every day so as it’s still light at these times in the middle of summer, I recommend visiting this spot between November and January for a pre-sunrise shoot or anytime between August and April for a post-sunset shoot.
Can I use a tripod?
Surprisingly so, yes. Even though this is private property, it seems the management team at the Tower of London are happy to allow tripods even though it can get very busy during the day which is quite refreshing, to say the least.
How do you find the location?
Tower Hill is the nearest tube station located on the other side of the castle. otherwise, on the south of the river, London Bridge Station is the closest. Head to the north side of the river, directly in front of the Tower of London and you will see the spot along the river.

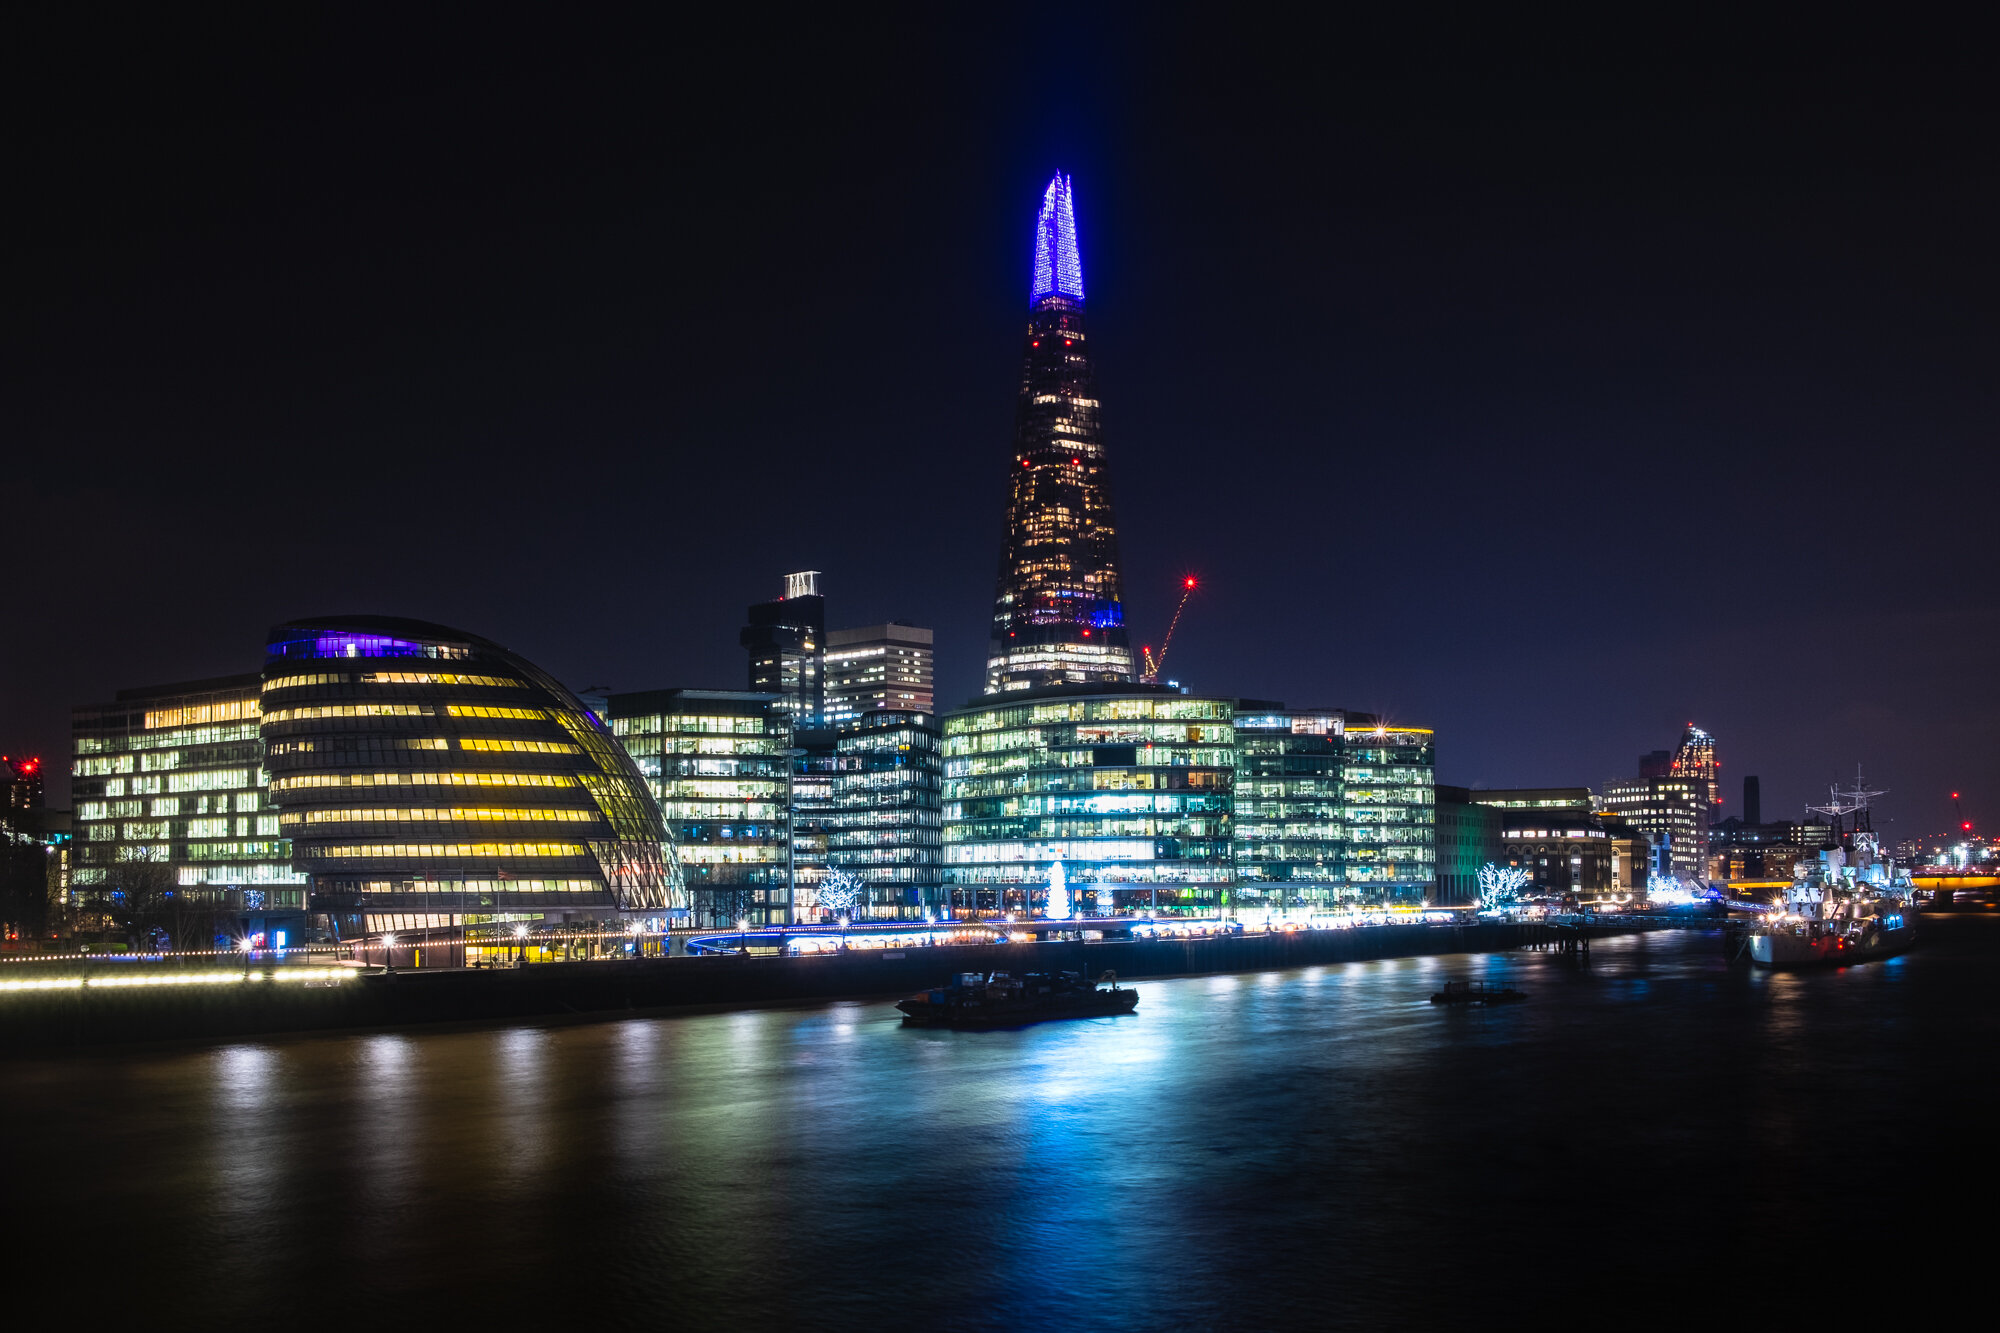
#9 The Shard and City Hall from Tower Bridge
Fast becoming one of the most iconic views in London this cityscape view encompasses More London, City Hall, The Shard, HMS Belfast and in the background, London Bridge. It’s a rather modern looking view of the city with lots of glass and modern lights which looks fantastic when all lit up at night and it’s for that very reason, this view is on my top 10 night photography spots in London.
When is the best time to photograph this spot?
If you’re a bit of peace and quiet while photographing this view, then visit before sunrise as you won’t be battling the herds of people crossing Tower Bridge but if you are lucky enough to be in London at Christmas in December, then visit after dark as although it will be busy, The Shard puts on a bit of a light show so you can photograph it with various vibrant colours on top making it worth the trouble.
Can I use a tripod?
Yes, you can. Whether you take the photo from Tower Bridge or in front of the Tower of London, tripods are allowed. Just be careful as this area gets very busy in the evening and I would advise anyone to tuck themselves out of the way as much as possible to avoid the tripod legs tripping someone up or being kicked by a passer-by.
How do you find the location?
To get here, you can use London Bridge Station on the south of the river or Tower Hill on the north of the river. Compositionally, it can be tricky to capture this view and whereas a lot of people will try to photograph the scene from directly opposite, in front of the Tower of London, I prefer to capture this view from the north end of Tower Bridge as I prefer a slightly higher vantage point looking further down the Thames and with the Shard directly the middle, the image looks a little more balanced in my opinion.

10 Tower Bridge from St Katherine Docks
The last but not least location to take night photos in London is this spot just along the river from Tower Bridge on the other side of St Katherine Docks Marina. From this vantage point, you get to enjoy this awesome view of Tower Bridge with the Shard right behind it.
When is the best time to photograph this spot?
This is a gated area and I’ve tried to access it for a sunrise shoot and found the gates locked, so, I recommend visiting in the evening to take a night photo of this view. It’s never been particularly busy when I’ve visited so I can recommend taking a late stroll to this spot in the summer and enjoying a nice, warm sunset before taking the night shot.
Can I use a tripod?
Yes, I’ve been here many times and not once have I been bothered by the site wardens. As I’ve said multiple times before, just stay out of the way and avoid making a nuisance of yourself and based on my experience, you should be fine.
How do you find the location?
The closest tube stations are either London Bridge or Tower Hill. This spot is on the north bank of the Thames. To get here, you need to drop below Tower Bridge and make your way east along the river to St Katherine Docks and once passed, walk along St Katherine’s Way until you get to Tower Bridge Wharf Building where you need to turn left and walk between the buildings towards the edge of the river.

So, there you have it, my top 10 night photography Spots in London! There are so many other great locations to capture night photos of the city, from down in the streets, along the Thames and up high looking over the rooftops.
As I mentioned at the beginning of this post, do check out some of my other posts to help you take the best photos of London
Until next time.
Trevor

Forest Dawn | Weekly Photo #100
This week, I’ve shared a photo I took while out at sunrise during a cold, winter’s morning in my local forest.
Wow! I’m ecstatic to have reached my 100th Weekly Photo story. When I started this project, I had no real idea how many stories I had in me and although it was clear in the beginning I would not be able to produce 52 portfolio-worthy photos each year, I still wanted to maintain a level of quality and not publish just any old photo just to keep to the schedule.
I started this project as I wanted a way to share my work without the quantity over quality pressure that seems to be inherent with social media. I found myself being more focused on feeding the machine, trying to crack the algorithm, and gaining more followers than the quality of photos I was posting, and I hated that! Since I started to post my photos weekly and even with a modest social media following, my engagement has increased exponentially. I talk to so many more people, receive so many more comments and it really has put the social back into social media for me. Again, quality over quantity!
Although I am incredibly grateful for the positive feedback and encouragement that drops into my inbox on a semi-regular basis, this project is very much a two-way street. Arguably, I get just as much from it as those of you that read my stories and enjoy my images. This project has helped me to improve my writing which admittedly, still has a long way to go but more importantly, it gives me the purpose and motivation to get into the great outdoors and attempt to capture 52 shareworthy images each year. With the last 12 months we’ve all had to endure, this project has helped me in so many ways, including my mental health and physical wellbeing.

Fujifilm XT2 | XF55-200mm | 64mm | 1/5th Second | f/11 | ISO200
At the time of my first post, 100 weeks ago, I was predominantly taking photos of urban landscapes in London with a bit of travel and local subjects thrown in for good measure, but over the last year, I’ve had to diversify somewhat and found myself exploring the natural world and discovering the joys of photographing my local woodlands and forests and that’s where I found myself on a cold, winter’s morning in January this year.
Although not far from home, I’d been to this part of the forest only once before as it was mostly open heathland and I tend to spend most of my time in the wooded areas, seeking out compositions amongst the trees but on this particular morning, I wanted to get out in the open and try to take a photo that incorporated the light and colours of the sunrise. This part of the forest works its way along a shallow valley so having parked up at the top of the hill around 30 minutes before sunrise, I made my way down towards the low lying land to seek out a photo or two.
Although I wanted to capture the colours of the sunrise, I still needed a subject and found myself looking around for some interest amongst the Scots pine trees. These tall, slender giants dominate this forest landscape as they tower over the surrounding trees and wildlife and if I could find the right one, with some interest and scale, I knew there would be potential for a photo.
As I descended the hill, getting closer to the valley floor, I spotted this pair of trees from the path which as you look at the image here, runs left to right directly behind the trees and from that vantage point, I would be looking directly at the rising sun. By now the sun was just coming over the horizon but the light was muted by the clouds in front of it, casting these beautifully soft purple, pastel colours across the landscape and into the sky to the west so I needed to get to the other side of the trees and point my camera in that direction to take full advantage of that gorgeous light that was hitting the landscape.
I made my way to the other side of the trees and got into position to line up a picture and at that point, I needed to make a decision. Do I take a landscape photo, keeping that sorry-looking pine, delimbed of its branches in my shot or do I go for a portrait composition including just that gorgeous tree to the right as it was looking beautiful in this purple dawn light? It didn’t take me long to decide to keep it in. The two trees were so different, representing two distinct, natural outcomes and I just couldn’t ignore the tension that poor tree brought to the image. I wish I knew the story there. Did this happen naturally in strong wind or something else? Was It just the trees time to go and make way for new forest life? I don’t know, but these questions, the contrast and light were all adding to a much more compelling story in my opinion.
Up went my tripod and on went my camera. Positioning myself quite far back from the trees, I decided to use my 55-200mm telephoto as I wanted to pull that background forward into the frame and with both trees adding balance to the composition, I set my two-second timer (to avoid camera shake) and pressed the shutter.
Back in Lightroom, I needed to work on the colours a bit to get them more how I remembered them when back in the field. The raw file was flat and desaturated, so increased the contrast a little and added some saturation back to a few of the colours, being careful not to overdo it. It was a special morning and I’m really pleased with how the final photo turned out.
Thanks for sticking with me all this time and here’s to the next 100…
…maybe.
Trevor
This post is featured in my Weekly Photo series where I post a new photo every Monday. To have this delivered directly to your inbox, you can subscribe to the mailing list here.

Lighting the Way | Weekly Photo #99
This week, I share a photo I took while walking along the cliffs at Beachy Head when out of nowhere, the sun burst through the clouds basking the landscape in this glorious light.
Spring seems to have finally sprung here in the South of England. Having been out a few times over the last couple of weeks to scout some local woodland locations, the new vibrant green leaves and spring flowers are really taking shape and last week I was greeted with some misty conditions in my local woodland and had great fun hunting down compositions and although I haven’t processed the images in Lightroom yet, I’m pretty sure I have two or three keepers from the shoot. I started to take woodland photography more seriously just last year and having never photographed the spring colours with any real purpose I’m pretty excited to see what the next few weeks have in store and all being well, I’ll be able to share a few of the images I take with you in the coming weeks.

Fujifilm XT2 | XF55-200mm | 55mm | 1/400th Second | f/10 | ISO200
I mentioned last week that I’ve been spending quite a lot of time taking photos on the South Downs and along the coast in Sussex so I thought it was about time I shared one of them here. I chose this photo I took while I was walking along the clifftops at Beachy Head.
This stretch of chalky cliffs provides some fantastic views across the English Channel and in my opinion, some of the best vistas in Sussex and on this particular day, I had a bit of time to kill before heading to my intended sunset location just a couple of miles along the coast, so I drove up to Beachy Head to take a walk along the clifftops with my camera.
When I arrived, the light was a little flat. To the eye, it still looked awesome but with the cloud cover as it was and some rather uninspiring light, there wasn’t quite enough contrast for me to make compelling images. It wasn’t a big problem though, as I was still out and about, enjoying this great landscape, which has let’s face it, been quite a privilege as of late. Even if I go out with the camera and conditions don’t lend themselves to landscape photography, I can still use it as a scouting trip and be better prepared for the next time I visit when, all being well, the conditions are better.
I decided to use my 55-200mm telephoto lens to help me to zoom in and isolate parts of this vast landscape and although it was a bit cloudy, there was still plenty of ambient light to photograph handheld so, with camera in hand and the tripod left in the car, I set off from the car park in the direction of the Belle Tout Lighthouse.
After 30 to 40 minutes of taking some so-so images, time was running out up at Beachy Head and I needed to start making my way back to the car. As I neared the car park, I happened to look over my shoulder one last time and I'm glad I did. Maybe I sensed the subtle change in light but something made me stop and turn around and see that a gap in the clouds was allowing the sun to bask the landscape in this fantastic golden light.
I quickly got the camera out of the bag and started to compose the shot. Before this point, I’d been using the lighthouse as the main subject, zooming right in on it to make it appear more prominent in the photos, but this shot was all about that sky, the light and the epic scale of the landscape so although the lighthouse was still needed to help portray that scale, I deliberately placed it on the lower third so I could get as much of that sky in as possible. Exposing for the bright sky and with the ferry heading out across the English Channel providing a nice finishing touch, I fired the shutter.
Back home in Lightroom, it took me a couple of attempts to edit the image. For my first attempt, I pushed the white balance too far to the right in a bid to warm the image and I also increased the shadows too much. The more I studied it, the more I disliked the edit. I needed to be more subtle with the sliders. I needed to exploit the potential but not force it to be something it wasn’t, so with a bit more restraint, I re-edited the image to the one you see here. It’s for that reason, I try not to rush the post-production stage. I might edit the photo, leave it for a while and return to it later. If I still like it, great! If not, I make the necessary changes. Rightly or wrongly, it’s a system that works for me.
Until next week.
Trevor
This post is featured in my Weekly Photo series where I post a new photo every Monday. To have this delivered directly to your inbox, you can subscribe to the mailing list here.

London “Full Stop” | Weekly Photo #98
A sunrise photo taken at More London featuring City Hall, Tower Bridge and one of the sculptures from the “Full Stop” art installation.
Along with working through a bit of a backlog of photo editing and submitting a batch of images to this year’s Landscape Photographer of the Year competition, I’ve been spending a lot of time down on the south coast over the last couple of weeks while I continue to wait for conditions to improve enough to entice me back into the woodland. I’ve been back once or twice to keep an eye on things and see how the spring colours are taking shape but in between, I’ve been photographing the white cliffs and rolling hills along the South Downs and look forward to sharing some of the photos I took in the coming weeks.
I’m also getting ready to get back to the city on a regular basis. I miss the familiarity of London, the people, the energy, those epic cityscapes, and although I’m not yet scraping the barrel to post London cityscape photos here on my blog, if I don’t venture into the city soon, I fear it won’t be too long until I am.

Fujifilm X-T30 | XF10-24mm | 10mm | 1/9th Second | f/11 | ISO160
Back in February 2020, I went for a sunrise shoot around More London along the Thames and although there was plenty of cloud about, the sky was pretty clear to the east so there was plenty of pre-sunrise light shining through, creating these awesome magenta tones throughout the scene.
Starting off on the upper level, I took a few photos of City Hall and Tower Bridge using The Scoop as some foreground interest (also featured in this previous photo) and shortly after, made my way down to the lower level to seek out another photo before heading west along the Thames.
Dotted around More London Estate are 5 of these reflective black sculptures made by a British artist called Fiona Banner. Installed nearly 20 years ago, these glistening spheres of various shapes are large three-dimensional representations of a full stop from 5 commonly used typefaces. It’s an interesting idea that explores the notion of language and text and it’s only when I looked into the story behind the installation and how the project has now cleverly evolved to bring attention to key environmental issues, I started to appreciate them as more than just shiny black shapes and wanted to include them as a compositional feature in one of my photos.
After spending just a few minutes in search of a composition, I found this one here featuring City Hall and Tower Bridge with one of the “Full Stop” art sculptures conveniently leaning into the frame, providing some useful visual weight on the left-hand side. Standing there, the composition was ok and I knew there was an image to be had, but something was off. There was no foreground to speak of and the subjects were a bit lost in the image. The sculpture appeared too small and inconspicuous while Tower Bridge had too much visual clutter in the background created by the buildings on the far side of the river.
The solution was quite simple, I needed to crouch right down and get the camera as close to the ground as I could. By doing so, I was able to emphasise those fantastic lines in the foreground and use them to lead the viewer’s eye from the bottom of the image, up to the very centre of Tower Bridge. The low viewpoint also made the full stop sculpture more dominant in the scene and along with Tower Bridge and City Hall, they all appeared more isolated, standing out against the bright pre-sunrise sky which is the exact look I was trying to achieve.
The biggest challenge I had once the composition was locked in was the dynamic range. With the dark areas in the foreground and bright dawn light, it made balancing the exposure particularly difficult as I didn’t want to clip the highlights and over expose the sky but at the same time, exposing for the sky meant my shadows were just too dark in places and recovering them would be difficult and at best introduce lots of digital noise and mess in those areas. The solution was to bracket the exposures and blend the correctly exposed parts of the image together in post-production. I used to bracket my images as a matter of course but these days with sensors being so good, I tend to only do it if I feel it’s the only way to get the shot I’m looking to take and this was certainly one of those times.
With my settings dialled in and focus set to give me (almost) front to back sharpness, down went the shutter and although reasonably confident I had a shot in the bag, this was one of those times I would have to wait to get the RAW files back on my computer and merge the exposures before I knew for certain.
Have a great week!
Trevor
This post is featured in my Weekly Photo series where I post a new photo every Monday. To have this delivered directly to your inbox, you can subscribe to the mailing list here.

Chaotic Rhythm | Weekly Photo #97
A photo taken in a foggy woodland I recently discovered close to where I live.
This week, whilst waiting for what seems like forever for spring to get out of first gear in my favourite woodlands, I spent some time taking photos down on the Sussex Coast. I’ve paid a couple of visits to my favourite lighthouse at Beachy Head and also photographed the rolling South Downs hills at sunrise. I’m yet to process these photos, in fact, as I write this, they’re still in the camera but you can be sure I’ll be sharing one or two of them here in the future.

Fujifilm XT2 | XF55-200mm | 61mm | 1/60th Second | f/9 | ISO800
A few weeks ago, I was researching some local woodlands, on the hunt for some new locations to capture the spring colours and while browsing the Woodland Trust website, I came across a relatively small (155 acre) area of wood, only a hop, skip and a jump from where I live. Being so close and situated on the side of a hill along the North Downs in a designated area of outstanding natural beauty (AONB) I had all the reasons I needed to pay this woodland a visit with my camera.
Top Tip: When researching locations to photograph I picked up a great tip from another photographer so I thought I would share it here. Use Bing Maps when scouting locations in the UK (sorry to my international readers). Although Google Maps/Earth are fantastic tools, what Bing Maps has that Google doesn’t is the option to overlay an Ordnance Survey map on the location you are scouting. This was a game-changer for me as I could now see information such as public footpaths, permissive pathways, nature reserves and importantly, public vs private woodlands which is not always obvious when out in the field. So, if you often find yourself scouting possible photo spots or just new locations to explore, make sure to add Bing Maps to your toolkit.
Fast forward a few days after discovering this new woodland and with a foggy morning forecasted, I took the short drive over to explore this new location. Even if all the usual indicators predict fog, you never really know if it’ll happen until you get on location but every now and then it all comes together and the fog rolls in and this was thankfully one of those times.
With the colours of spring yet to appear and being surrounded by fog, the woodland had a grey, subdued tone about it, but as I walked along the path, I noticed a vibrant green area in amongst the trees, so I wandered over to investigate. The green area turned out to be a carpet of mossy grass that was surrounding the base of these fantastic trees which appeared to twist and turn in all different directions, overlapping each other as they worked their way up towards the light. I wish I could tell you what kind of trees these are but I’ve tried and failed to identify them myself (feel free to educate me in the comments) but as I got closer, they struck a chord with me and I knew there was a photo here somewhere.
I was drawn to how their seemingly random, almost chaotic lines created this natural rhythm throughout the scene and having the fog was fantastic as it simplified the composition, allowing the trees in the foreground to stand out while softening the trees further back so they could still add to the story but not in a way that unsettled the balance of the image.
It took me a few minutes to find the best place to set up the tripod and with the space to step back without obscuring the view, I decided on my 55-200mm telephoto lens. By moving away and then zooming back in on the scene, I was able to isolate this group of trees and avoid the brighter sky which would have only been a distraction. With the camera set up and the settings dialled in, I took the shot. I’m not sure this composition will be everyone’s cup of tea as at first glance, it can seem rather messy but to me, there is a flow throughout the image and with the texture on the trees and the vibrant colour on the ground, I really like it.
You may have noticed I had the ISO set to 800 which I only noticed when I was back home on the computer, but if you are thinking this was a mistake on my part, you will be absolutely right. Beng on a tripod and with no action to freeze, there was no reason for the ISO to be set that high but thankfully, cameras these days are so good, it made no noticeable difference to the final image.
I’ve since explored this woodland even further and found a few other areas with some great potential so I just need to wait for the right conditions and look forward to getting back there with my camera sometime soon.
Until next week.
Trevor
This post is featured in my Weekly Photo series where I post a new photo every Monday. To have this delivered directly to your inbox, you can subscribe to the mailing list here.

Eastbourne Pier at Sunrise | Weekly Photo #96
This week I share a photo of Eastbourne Pier I took during a beautiful sunrise in East Sussex.
The good thing about living on a relatively small island is that you never have to travel too far to get to a beach. From where I live, it’s about an hour’s drive to my nearest beech down on England’s south coast and throughout the year I’ll visit the various coastal spots numerous times, either for a day out with my family or to take photos as I did when I photographed this epic sunrise during a trip to Eastbourne’s charming Victorian pier last summer.

Fujifilm X-T30 | XF23mm F2 | 23mm | 1/1,250th Second | f/2.8 | ISO160
My intention as I travelled down to the South Coast was to take a long exposure photograph of Eastbourne’s ornate pier from up on the pebbled beach. So, when packing my bag, I knew my main camera (Fujifilm XT2) would be stuck on top of the tripod taking long-exposure images which is why I also packed my smaller Fujifilm X-T30 camera with the 23mm prime lens attached so I could wander around, capturing different compositions without having to move the other camera. I’m so glad I did.
After an hour or so of taking long exposures from higher up on the beach, I noticed the tide had receded, uncovering some of the sandy beach and with it still being wet, there was an opportunity to capture some cool reflections too. So, with no one around, I felt confident I could leave my other camera in position on the tripod and wandered down, close to the pier to take some handheld shots, using the reflections in the sand as some foreground interest.
By now, the sun had risen above the horizon behind a thin layer of cloud. This worked out pretty well as the defused light was still bright enough to allow me to capture all of that gorgeous golden colour but wasn’t too bright, meaning the dynamic range between the lights and dark was still manageable. By exposing for the highlights, keeping an eye on the histogram for any clipping, I knew I would still have plenty of detail in the shadows and be able to pull it back in post-production.
Placing the pier towards the top of the frame helped portray the scale of the structure in front of me but with the ground being so close to the camera, there was no way I could get the entire scene sharp from front to back in a single shot so embracing the smaller depth of field, I opened up the aperture to f/2, throwing the foreground out of focus allowing me to capture the colour and shapes reflecting in the sand but softening it enough to remove the distraction of those messy pebbles, scattered across the sand.
The X-T30 and 23mm f/2 is a super lightweight combination and with a wide maximum aperture of F2, I can quickly find unique angles and shoot handheld without worrying about camera shake and ending up with blurry photos so as I crouched down trying not to fall over and with the camera hovering just above the wet sand, I quickly rattled off a few photos before my legs gave way.
It was such a great morning for photography and when I felt the best of the sunrise light was gone, I wasn’t quite finished taking photos so I took advantage of the great location I was in and drove a few minutes along the coast up to the top of Beechy Head to capture a few shots of the lighthouse from the clifftop. I wrapped the entire morning’s shoot into an on-location blog post which you can read all about by clicking the thumbnail below.

Until next week.
Trevor
This post is featured in my Weekly Photo series where I post a new photo every Monday. To have this delivered directly to your inbox, you can subscribe to the mailing list here.

Misty Layers | Weekly Photo #95
An undulated Sussex landscape taken during sunrise, interwoven with mist and trees.
I’m sure I’m not wrong when I say all creatives experience phases of feeling uninspired at some point and I’m no different. In fact, I’m feeling a little like that right now. Being in between the cold, frosty scenes of winter and the colourful, vibrant scenes of spring means I’m not as motivated to photograph my local woodlands right now and that coupled with being unable to freely travel into London to capture cityscapes means the camera has remained in the bag far more than I would like over the last few weeks.
But that doesn’t mean I’m doing nothing at all. Being out in the woodland is still important to me, with or without the camera so along with my trusty canine sidekick, I’ve still made a point to get out and use the time effectively, keeping an eye out for those early signs of spring and scout the best locations to photograph when spring really starts to kick into gear.

Fujifilm XT2 | XF55-200mm | 116mm | 1/40th Second | f/10 | ISO200
Some of you may recognise this photo as I’ve been using it as a banner on my homepage for a while now and I thought it was about time I added it to my Weekly Photo series.
After scouting this area a few times, waiting for the conditions to be right, I was up and out before sunrise on this morning back in September 2020 to take a photo of the wild heather that had recently come into bloom. Having arrived before sunrise, I went about searching for the best composition to photo the heather and as I searched, I noticed the mist down the hill in the distance and decided to include it in the photo. You can see and read more about that photo of the heather and mist in a post I called Late Summer.
When I was done taking photos of the heather, the light was still nicely defused and I realised I still had time to wander closer towards the hillside to photograph this view of the undulated landscape interwoven with drifting mist moving from right to left through the scene. Noticing the light bouncing off the top of the trees was becoming increasingly brighter, I figured I only had a couple of minutes before it became too strong, creating too much contrast in the scene so I quickly found my spot, set up the tripod and placed the camera on top.
I chose my 55-200mm telephoto lens as I wanted to zoom right in and focus on a smaller area of the landscape. With a wider lens, I wasn’t going to get the effect I wanted which was to emphasise the front to back layers of mist and trees in the landscape, becoming softer through the scene, adding a sense of depth into the photo. To help the composition further, I placed the higher, more prominent trees on the upper third to create a subtle focal point for the eye to rest on.
The sky had a warm pastel tone to it and I wanted to include some of that in the photo but being a clear morning, there was very little interest up there so by leaving just a slither of the sky at the top of the frame, I could still get the effect I wanted without introducing too much empty space into the picture. With time not on my side, I manually focused on the trees on the top left-hand third and with the settings dialled in, I took the shot.
Back on the computer at home, I was careful not to add too much colour and contrast into the image as I wanted to reflect the quiet, relaxed feeling I got while out there on the side of the hill. With some considered local adjustments and a tweak of the white balance to warm the photo up a touch, I’m extremely pleased with how this photo has turned out.
I can’t quite believe my 100th weekly post is just around the corner. I feel I should do something to celebrate the milestone. Maybe a print giveaway competition or something similar. I’ll have a think about that!
Next week, I’ll be posting a sunrise photo I took of Eastbourne Pier on the Sussex coast last year and if you don’t want to miss it, why not subscribe to my newsletter by clicking on the link below. That way a new story like this will automatically drop into your inbox every Monday so you never miss a thing.
Until next week.
Trevor
This post is featured in my Weekly Photo series where I post a new photo every Monday. To have this delivered directly to your inbox, you can subscribe to the mailing list here.

A Modern Classic City | Weekly Photo #94
A blue hour London cityscape featuring both classic and modern architecture.
I’ve been a bit busy this week as I decided to start a small printing project. If you’re a regular reader of this blog, you may already know how strongly I feel about getting photos off the hard drive and on to paper and taking it one step further, how much I love a good photobook. I’ve brought a few photography books over the last year, written by some of my favourite landscape photographers and like nothing more than finding a quiet spot and reading the stories, admiring the photos, and drawing inspiration from their work. If you’re still on the fence about the benefits of printing, check out this post I wrote called Why Every Photographer Should Print Their Photos.
I decided to embark on a small personal project to design and print my own book. I could have gone down the easier route and uploaded the photos and use the software on offer from the print lab but where’s the fun in that? By using some of my photos and stories I’ve written on my blog, I’ve decided to download a copy of Adobe’s InDesign, learn how to navigate the application and design my own book from scratch. I’ll design the layout, the cover, type and prepare around 70 images ready to send to the lab to produce the final book.
It will take some time to complete, but at the end of the process, I hope to be holding the finished book in my hand as a bit of a keepsake and as a bonus, have learned a new skill by using InDesign to build the book from scratch. It’s still early days but I’ll keep you posted on how I get on.

Fujifilm XT2 | XF18-55mm | 25mm | 13 Seconds | f/13 | ISO200
I took this photo while out in London with my camera back in September 2020. It was a wet, cloudy day and I had spent much of the afternoon photographing the city in the pouring rain, using the wet surfaces and puddles to find interesting compositions of London. It’s on this day I took one of my favourite photos of 2020 called Rainy City.
As it started to get dark, I ventured over to my intended viewpoint just along the river from St Katherine Docks in East London. I found a spot on the north bank of the river which provides a fantastic view of the classic architecture of Tower Bridge with The Shard behind it, which is itself, fast becoming a modern classic. Even though The Shard is considerably taller than Tower Bridge, it’s position, set back from the bridge, adds some much-needed visual weight to the left-hand side of the scene, helping to balance the composition.
With the water taking up much of the bottom half of the photo, I wanted to fill the empty space with the bright reflections from the city lights, but with the ripples in the water, it looked far too busy for my taste. To remove the ripples, I closed the camera’s aperture down to f/13, which in turn, increased the shutter speed to 13 seconds, resulting in a longer exposure, smoothing out the water, giving the final photo a more calm, relaxing look about it.
Once I had the RAW files loaded into Lightroom, I started off with the usual contrast and colour adjustments. I then cooled the temperature down to help with the orange cast created by the city lights and using some local adjustments, dodged and burned parts of the image to help emphasise the lights and darken the pier to the right, making it less distracting. I’m quite happy with how the final photo has turned out.
Until next week.
Trevor
This post is featured in my Weekly Photo series where I post a new photo every Monday. To have this delivered directly to your inbox, you can subscribe to the mailing list here.

Forest Glow | Weekly Photo #93
A woodland photo with a defused, dappled light casting a warm glow across the Scots Pine Forest.
Hi everyone. With the positive effects of the vaccine rollout starting to show, I’m feeling an increased sense of optimism that we are slowly but surely beating this nasty virus and although by far the most important goal is to save lives, I feel I can now start planning for some Spring and Summer adventures both with friends and family and of course, with my camera! Last year, we were told to stay indoors just as Spring came into bloom and with the UK stay at home order set to be removed on March 29th, I’m now eagerly planning some local landscape and woodland photography adventures in the hope to capture the most vibrant season of the year.

Fujifilm XT2 | XF55-200mm | 82mm | 1/8th Second | f/10 | ISO200
For the majority of my photo outings, I head out alone. Don’t feel sorry for me because, honestly, I’m fine with it and in most cases prefer it this way. I love to meet up with other photographers and talk photography, sharing tips and tricks but to me, the quiet, personal pursuit of a photograph is in fact my therapy and a kind of filter to the noisy and frantic lives we all live. I actually wrote a bit about this in a blog post back in 2019 called Mental Health and Why Photography Matters where I list some of the positive effects, I think photography has on mental wellbeing.
That being said, even when alone I do like it when people approach me, curious as to what I’m photographing, showing a genuine interest in what I’m doing. It can be a great way to connect with local people and just have a nice chat about the local area. For someone like me, always on the lookout for new places to photograph, it can be a great source of local information that only a few people might know about, which is exactly what happened while I was out taking this photo in my local forest. As I was taking a panoramic image of the woodland, a man walking his dog stopped for a chat, genuinely interested in what I was photographing and I could see he had a real passion for the surrounding area. We must have been talking for 20 minutes and he was more than happy to run through a list of places and viewpoints I might be interested in photographing, some of which sounded really interesting. Eventually, he happily went on his way but I was really glad he stopped by for a chat.
I had the camera mounted on my tripod in portrait mode, ready to take a wide panoramic photo of this Scots Pine woodland. With the slightly defused, dappled light casting a warm glow across the forest, I levelled off my tripod and while panning from left to right, took around 12 overlapping photos ready to stitch together later in Adobe Lightroom.
Another great tip when creating these high-resolution panoramic photos is that you can crop them to create multiple different photos while still having plenty of resolution left in the final photo. The resulting stitched panoramic photo ended up being a hefty 80 megapixel and even the cropped version above is 33MP, which is still plenty big enough for me to make a large print for the wall.
Although it won’t come across too well on the screen, here is the original panoramic photo which is best viewed on a larger screen.

Next week, I’ll be posting a night cityscape I captured of Tower Bridge in London last year and if you don’t want to miss it, why not subscribe to my newsletter by clicking on the link below. That way a new story like this will automatically drop into your inbox every Monday so you never miss a thing.
Until next week.
Trevor
This post is featured in my Weekly Photo series where I post a new photo every Monday. To have this delivered directly to your inbox, you can subscribe to the mailing list here.

Winter Oak | Weekly Photo #92
A wintry looking English Oak smothered in a fresh white hoar frost.
Spring is just around the corner and I for one am looking forward to getting out into the great outdoors more often as the UK starts to tentatively lift the current restrictions we are under. Things are looking up! So, I thought I would wrap up the winter season with one last frosty landscape scene I managed to capture in a local woodland during a rare but incredibly beautiful hoar frost back in January.
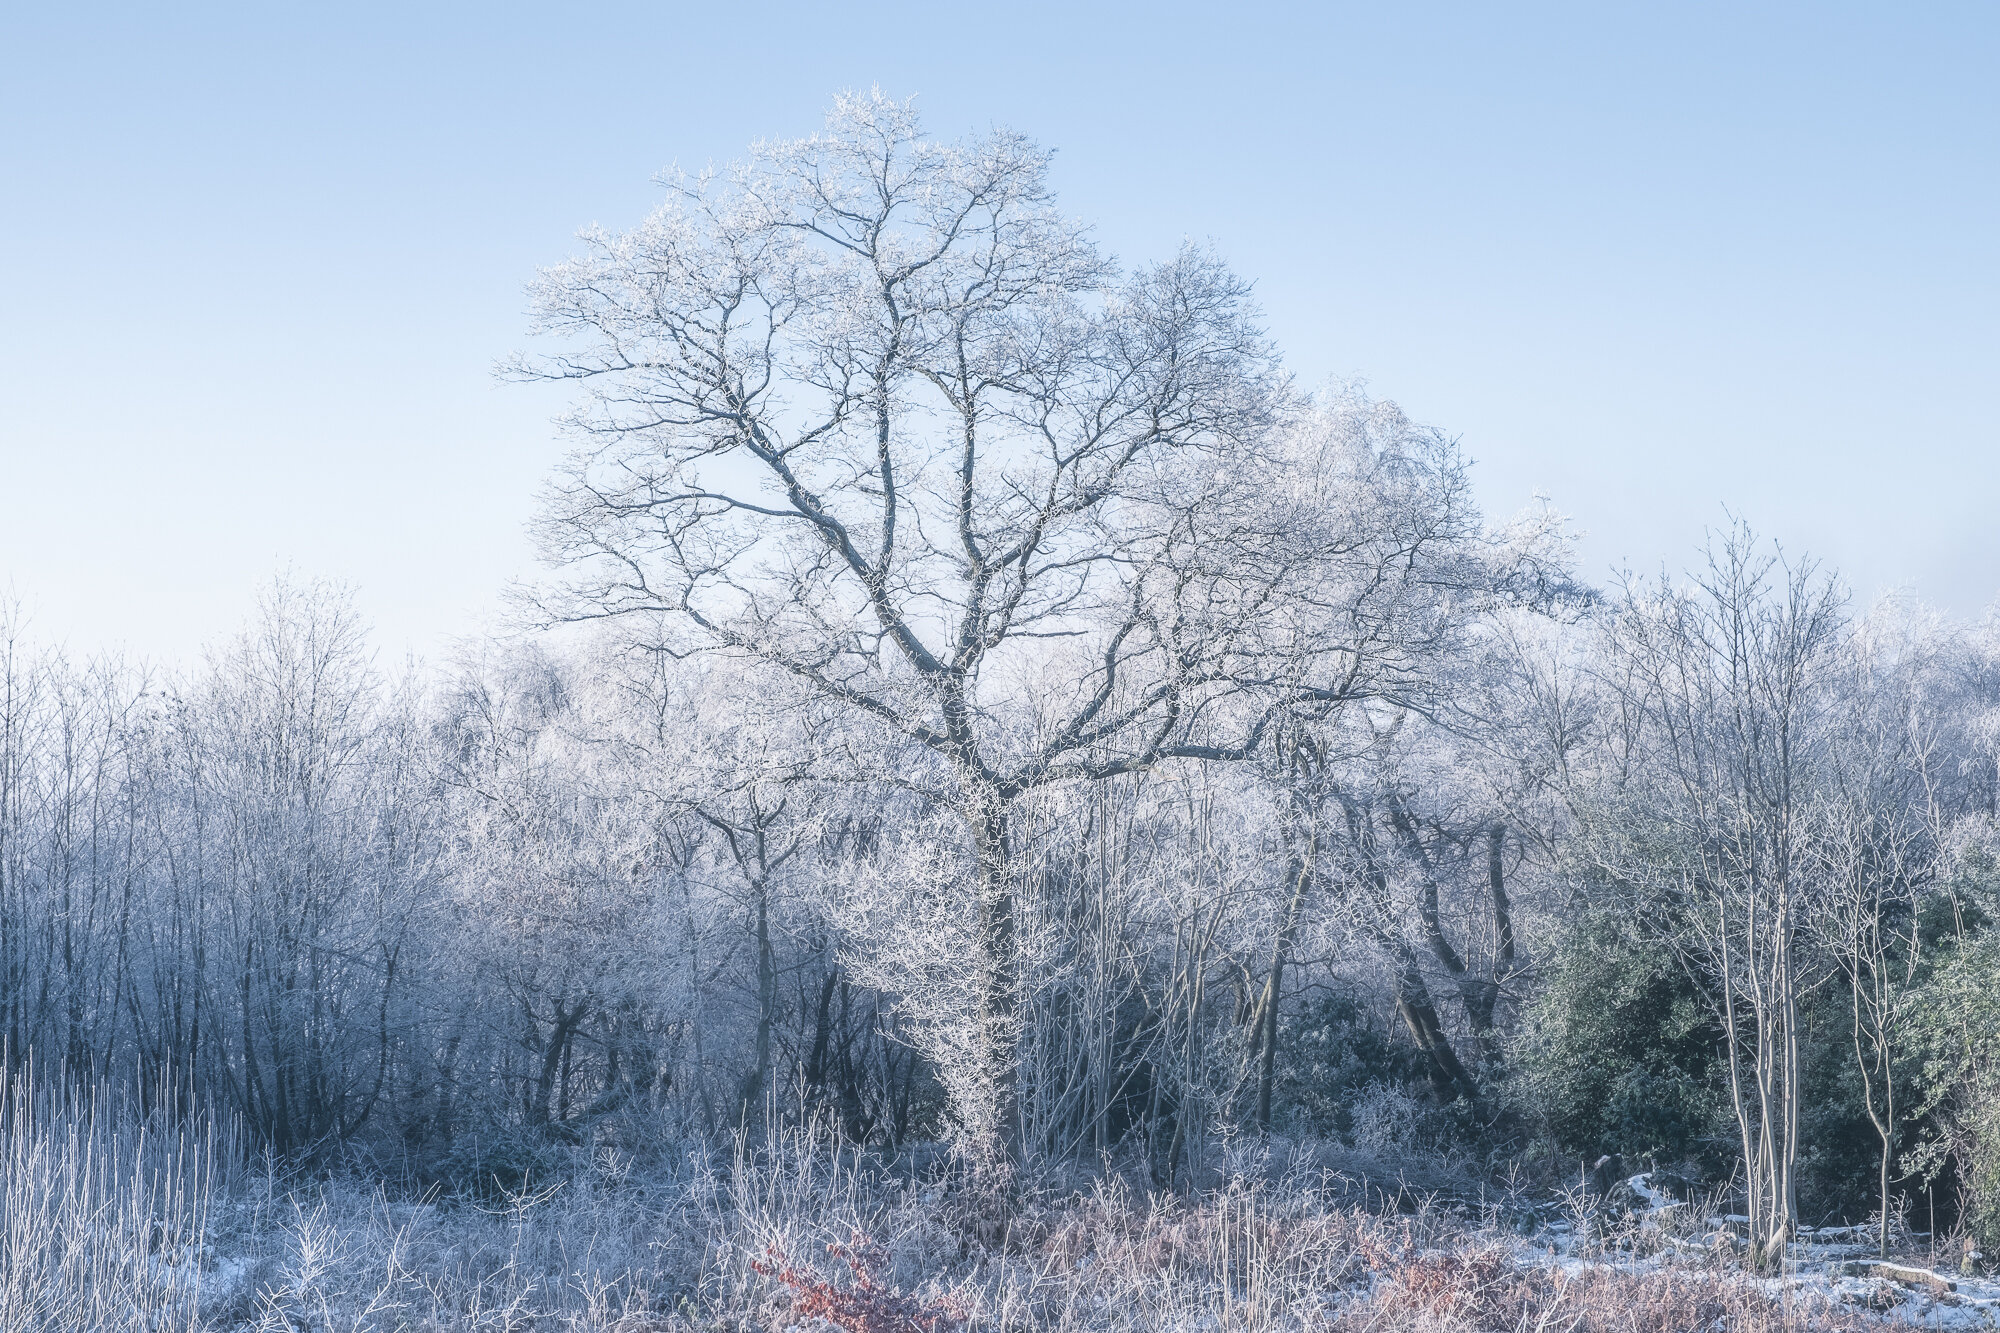
Fujifilm XT2 | XF18-55mm | 46mm | 1/160th Second | f/11 | ISO200
It had been a fantastically productive morning photographing the woodland not too far from where I live. The conditions were simply amazing as I had both mist in the air and a stunning, white hoar frost on the trees. I had started my morning a couple of hours earlier at this very spot and took a similar composition with the dominant tree silhouetted by a thick fog before heading into the woods to see what other photos I could take with a little help from these fantastic shooting conditions. You can see two other photos I took at the end of this post in my winter wrap-up.
As I returned to this spot a little later, the mist had almost cleared, making way for a bright, sunny, albeit freezing cold day and the clear blue sky with the white hoar frost on the trees and plants created this cold, fresh looking scene you see here. With this interesting English Oak standing tall, giving the composition a clear, central focal point, out came the camera ready to take this last photo of the morning.
Climbing to higher ground to avoid too much of the messy foreground, I set the tripod up with my Fujifilm XT2 camera and 18-55mm lens mounted on top. Looking through the viewfinder while composing the shot, something was off. The scene was too warm in camera and nothing like what I could see with my own eyes. As I shoot RAW and not Jpeg, I know I can correct the white balance in post, but with a simple switch to a daylight white-balance on the back of the camera, I could see these cool, fresh tones once again as I took the shot. A tip to remember going forward for sure!
I snapped away, taking a few wider compositions, then I changed the lens and zoomed all the way in to get a close-up, focusing on just the top half of this bare English Oak and those interesting branches that were fanning out from the top of the tree’s trunk. After I had all the pictures I wanted to take safety on the memory card, I packed up and headed home, grateful to be out of the cold with a nice hot brew.
To finish, I thought I would share a bit of a recap on some of the wintry themed posts I’ve written over the last few weeks, just in case you missed any.
Until next week.
Trevor
This post is featured in my Weekly Photo series where I post a new photo every Monday. To have this delivered directly to your inbox, you can subscribe to the mailing list here.

London’s Pinnacle | Weekly Photo #91
This week, I share this photo of The Shard taken from up at London’s Sky Garden back in October 2020.
Hi there. Before reading about this week’s photo, I want to tell you about the latest blog post on my website. A few days ago, I posted my 2021 “What’s in my camera bag for landscape photography” blog post. Not only can you read about all of the gear I use while out in the field taking photos, but I also share my thoughts about why buying the latest and greatest camera equipment isn’t always a shortcut to taking better photos. Click on the thumbnail below if you want to read the post.

Now, on to this week’s photo. I briefly mentioned this front-facing photo of The Shard on a previous post called Cloudburst Over London, where I was up at the Sky Garden Viewing Platform at the end of the day taking photos of a moody looking London in October last year. In the post, I talked about how the rain and wind that arrived not long after taking these photos meant the outdoor area was closed, putting a halt to any further photography for the evening. Thankfully, only minutes before the heavens opened, I had just enough time to take this wide-angle photo of The Shard across the river.

Fujifilm XT2 | XF10-24mm | 10mm | 1/6th Second | f/6.4 | ISO200
There is so much I like about this photo. First up, the foreground made up London’s streets and rooftops which, apart from adding some interest into the lower third of the photo, act to lead the eye up and into the scene. When taken at10mm, not only does it allow much more of the foreground and sky to be included in the frame but the wide-angle changes the perspective. It appears to push The Shard further back into the distance, making it look smaller in the frame, but I still think it really works here. The Shard may look smaller but I think it loses none of the scale and remains the pinnacle structure, towering over its neighbouring buildings.
It’s the sky in the scene that really sets the mood here and I absolutely love how it looks in this photo. As I made my way to the Sky Garden, the sky was flat and featureless but not too long after arriving, a blanket of rain made its way in from the west and although it eventually put a stop to the shoot, thankfully it brought some welcome drama to my photos beforehand.
Lastly, amongst the monotone grey/blue colour of the overall picture, I really like the spots of colour throughout from the orange lights dotted around the buildings, the red London Buses crossing London Bridge, the blue lights representing our COVID heroes on top of The Shard and finally the last light from the sun piercing through a gap in the clouds and bouncing off the side of The Shard. Individually subtle but collectively, they make a big difference.
While taking the photo, I needed all of the image stabilization the lens could provide as with no tripods allowed up at the Sky Garden, shooting handheld is the only option and with a shutter speed of 1/6th second, a steady hand was needed to get a sharp photo. I could have increased the ISO or even opened the aperture a little wider but as I’ve mentioned in previous posts, photographing through the glass up at the Sky Garden degrades the quality somewhat and to prevent noise from a high ISO or softness from the wider aperture making it worse, the pressure was on to get a blur-free photo with the settings that gave me the best image quality.
With the UK vaccination program in full swing, I become more hopeful by the day that I’ll be back in London with my camera soon. I can’t wait!
Cheers!
Trevor
This post is featured in my Weekly Photo series where I post a new photo every Monday. To have this delivered directly to your inbox, you can subscribe to the mailing list here.

What's in my Camera Bag for Landscape Photography (2021 Edition)
It’s that time of year again where I post this updated "What’s in my camera bag” blog post and give you all a little breakdown about the kit I use for landscape photography and importantly why I use it.
It’s that time of year again, where I post this updated "What’s in my camera bag” blog post and give you all a little breakdown about the kit I use for landscape photography and importantly why I use it. I’m not a gear head and won’t invest heavily unless I feel my photography will benefit and would much rather use and get to know my camera gear well, instead of swapping it out regularly. That way, while out in the field, I can focus on taking photos rather than working out how to change the settings on a new camera and missing the moment altogether.
I think it’s worth noting that I do believe that it is the photographer that has the vision, chooses the subject and creates the image. There are many photographers that successfully shoot with a single body and lens, a compact camera or even just their camera phone and still produce quite stunning work so, although it’s nice to get a new toy every now and then, I certainly don’t get fixated on the photography gear and always fixate on the craft of making photos.
That being said, if you are shooting with intent and have a particular style or subject you want to capture, then the right equipment can remove much of the friction and allow the photographer to focus on the creative side of the process, instead of working overly hard to get the shot, possibly taking much of the fun out of the process.
“The single most important component of a camera is the twelve inches behind it.” - Ansel Adams.
Cameras
I am a Fujifilm shooter and have been since 2016 which is when I first brought the X-T10 camera and after falling in love with the traditional feel, tactile controls and most importantly, the pictures it helped me take, I went all-in on mirrorless and sold my Nikon DSLR system.

Fujifilm XT2
Those that have followed me for some time know I am a Fujifilm shooter and this XT2 is still my primary camera. With the recent release of the XT4, there have been 2 updates to this model, but this camera still performs perfectly for me and I have no compelling reason to upgrade it just yet.
Fujifilm X-T30
Back in 2019, I upgraded my X-T10 to the X-T30 which to all intents and purposes is the same camera but with upgraded internals. I wrote a blog post about the switch which you can find here.
Camera Lenses
Zoom Lenses
Fujifilm XF 10-24mm lens F4 OIS
Fujifilm XF 18-55mm f2.8-4 R LM OIS
Fujifilm XF 55-200mm lens f/3.5-4.8 lens OIS
These three zoom lenses are my go-to for landscape photography. Between them, they cover a focal length of 10-200mm which is all I need when out, photographing the landscape.

Prime Lenses
Fujifilm XF 16mm F2.8 WR
Fujifilm XF 23mm F2 WR (New for 2021)
Fujifilm XF 35mm F2 WR
When travelling light or in need of a particular look, I will take these prime lenses with me. They are weather sealed so along with my XT2, I can head out in any conditions and still capture the shot I’m after.

Tripods

MeFoto Roadtrip
This MeFoto tripod has served me well over the years and has been the best compromise between weight and stability. It wasn’t expensive and up until only recently, since photographing woodland, I’ve been thinking about upgrading to a tripod with a little more reach.
3 Legged Thing Punks Corey (New for 2021)
Added to my gear in 2020, I purchased this tripod as I wanted a new lightweight but sturdy option when travelling around the city or further afield.
Filters

Kase Wolverine Magnetic Circular Filters 77mm Professional Kit (New for 2021)
I recently swapped to Kase filters as I love the simplicity of the magnetic system and as I heard so many good reviews, I took the plunge. So far so good. The filters are top quality and the magnetic system has made swapping the filters so much faster and less cumbersome.
My camera bags

Manfrotto Mover-30 Manhattan
I brought this bag in 2019 as I was after a bag that was large and comfortable enough to carry my cityscape gear but since last year, it has become my primary bag for all photo outings.
Manfrotto Pro Light
Relegated to my second landscape photography camera bag, the Pro Light is a little smaller and getting all my gear in is a little tighter so I’ve not used it so much over the last year.
Manfrotto Street
I use this bag when I need to travel light or I need to carry other bits as well as some camera equipment. This easily fits a camera and a couple of lenses leaving enough room in the top compartment for clothes and laptop etc.
So, how do I pack all of this landscape photography gear in my bag?
Although I have a healthy collection of camera gear, I certainly wouldn’t bring it all with me to each shoot. Below are 3 ways I might pack my bag, depending on where I’m heading to and the type of photographs I intend to take.

The collection above is my go-to landscape gear and everything I usually need when photographing landscape vistas or misty woodland scenes. I have my trusty XT2 camera, my tripod and zoom lenses that allow me to shoot between 10 and 200mm. The L-bracket is a must for any landscape photographer and helps me switch between portrait and landscape orientation without adjusting the tripod. Lastly, my Kase filters. I have a 3, 6 and 10 stop ND as well as a CPL stored in this handy carry case.

When I head out and want to travel a little lighter with my prime lenses, I might take this collection of camera gear. The lenses are small, light and super sharp and the 3 Legged Thing tripod is my go-to when heading into the city. If I know I won’t need a tripod, I might just slip the Manfrotto Pixi tabletop tripod into my bag and leave the 3 Legged Thing at home to shave off even more weight.

Travelling even lighter on days out with the family or just a casual photo walk, I tend to take my smaller X-T30, one or more prime lenses and the Peak Design Slide Lite camera strap. For a bit of stabilisation, I might pack the Manfrotto Pixi which can support quite a weight for its compact size.
So, there you have it, all of the gear I take with me in my camera bag to take landscape photos.
My plans for this year are fluid but as I mentioned previously, I may invest in a new tripod to give me a bit more reach while out in the woodland and depending on what Fujifilm release, I will keep my eye out for anything they announce, but however hard it might be, I’ll try to resist the temptation of new and shiny toys and only invest in new equipment if I know it will help my photography.
By all means, leave a comment if you want to ask me anything about my gear as I will always give an honest account of my own experience using it.
Until next time.
Trevor

Cascading Brook | Weekly Photo #90
Here’s a photo I took of a small cascading brook in my local forest.
Here in the South of England, the brief wintry spell of weather seems to be behind us (for now), and we are back in double figures. With the slightly warmer weather we had this week, it reminds me that spring is just around the corner, which completely passed us all by here in England last year due to the time coinciding with the first national lockdown. With any luck, the gradual easing will begin soon enough and we can all be out in time to enjoy the colours of spring and warmer, longer days.

Fujifilm XT2 | XF18-55mm | 28mm | 0.8 Seconds | f/14 | ISO200
A few weeks ago, just before the “big freeze” I took a wander along a brook, which runs at the base if a shallow valley in my local forest. I started the morning on higher ground and I was surrounded by dense fog with no chance of any photos, so I walked down the hill, into the woodland in the hope that the fog would thin out enough to take some photos.
I found myself down at the brook which had a good flow due to the rainfall we’d had recently. On previous visits, during the warmer months, this tiny stream had almost completely dried up, so it was nice to see so much water creating these small waterfalls as it cascaded down the hill, over fallen trees and branches that lie across the water. I searched for a composition to capture the scene featuring the brook surrounded by the misty, atmospheric woodland and settled on this spot, looking back up-stream.
Purposely setting the camera up high on the tripod, in portrait orientation, pointing slightly downward and along the brook, I positioned the small cascade on the lower third, with the atmospheric tree-lined horizon on the top third. With the circular polarizer attached to reduce the glare and tone down the strong reflections in the water, I experimented a bit with the shutter speed to get the look I wanted and settled on 0.8 seconds as it gave enough detail in the water as it fell over the log in the foreground but without making it too smooth and featureless.
Lastly, I decided to focus stack this photo as I wanted it sharp from front to back. If I had taken just the one photo, focusing on just the cascade in the foreground, with it being so close to the camera, the background would have been soft and out of focus, even at f/14. What I ended up doing was taking 4 different exposures, each one focused on a different point in the photo, working from front to back. I later stacked and merged them in Photoshop, which gave me a sharp photo all the way back to where I would expect clarity to drop away as the mist in the air becomes more prominent.
I finished off the edit by cooling down the white-balance a little and some selective dodging and burning to help bring out a bit more depth in the photo. I’m really pleased with the final image. It represents well, the scene I witnessed while out on that foggy morning in the forest.
Until next week.
Trevor
This post is featured in my Weekly Photo series where I post a new photo every Monday. To have this delivered directly to your inbox, you can subscribe to the mailing list here.

Beech in the Snow | Weekly Photo #89
A cluster of beech trees surrounded by a bright, frosty woodland.
Brrrr…!! It’s been a cold one this past week in the UK. Here in the south of England, we tend to get snowfall once or twice a year and when it does fall, it’s usually just a light dusting and gone within a few hours of daylight but every few years we get a heavier snowfall and that’s what happened this week and I had great fun photographing in foggy, frosty and snowy conditions. Restricted in where I can go due to the ongoing lockdown situation, I managed to get out with the camera a few times to photograph my local woodlands and forests and now have quite a pile of raw photos which I’m really looking forward to rummaging through and editing. Fingers crossed I have one or two keepers in there!

Fujifilm XT2 | XF18-55mm | 50mm | 1/17th Second | f/9 | ISO400
Keeping with the frosty theme, this is a photo I took a few weeks ago during what turns out to be quite a rare hoar frost. It wasn’t until I heard other photographers refer to it in this way that I wondered what it was, so I did a bit of googling. A hoar frost requires freezing conditions and moisture in the air, such as foggy conditions and ice builds up on the freezing surfaces making it appear like white hair which is why the word hoar, the old English term for “old age” is used.
While wandering the forest, I came across this cluster of beech trees along the path and was drawn to how prominent they looked against the brighter, more fragile looking frosty scene around them. I didn’t have many options in terms of where to place the trees as they were leaning into the frame so placing them on the right and using the dark, muddy floor on the left to balance the contrast somewhat gave me the composition you see here. Using my 18-55mm lens, I composed and took the shot.
This photo is featured in a blog post I released last week all about photographing winter landscapes and if you are looking to get the most of your own wintry landscape photos, take a look as you might find the tips I share useful.

Until next week.
Trevor
This post is featured in my Weekly Photo series where I post a new photo every Monday. To have this delivered directly to your inbox, you can subscribe to the mailing list here.

Misty River | Weekly Photo #88
I photo I took of this epic view of the London Eye while visiting the capital with the family at Christmas.
I don’t know what it is about certain views or scenes I return to photograph time and time again. Take this particular view of the London Eye taken from the Golden Jubilee Bridge, I have photographed it countless times over the years as the sheer scale of the structure against the rather modest-sized buildings around it never fails to captivate me. I’ve taken photos I’m really pleased with but still, whenever I cross this bridge, I will often try and capture a new version of this epic London scene. “How many do I really need?” I guess I’m unconsciously creating a small body of work, maybe even a project to see how many different ways or in what different conditions I can capture this, one of my favourite views in London.

Fujifilm X-T30 | XF23mm F2 | 23mm | 1/125th Second | f/6.4 | ISO200
In mid-December last year, (in between lockdowns), my family and I made our way into a very quiet London for a bit of sight-seeing, drink some mulled wine and see the Christmas lights. Living only 30 minutes away on the train, we do this most years, as in normal times, there is a real buzz about the place at Christmas and we love to spend a bit of time soaking up London’s festive atmosphere.
Although this wasn’t a dedicated photography outing, I still like to have a “proper” camera with me to take the odd family picture as we go, so I took my Fujifilm X-T30 and 23mm F2 prime lens. Together this makes a super lightweight, but very capable set up to walk around with.
We spend some time over on the Southbank, trying out the street food with the kids digging into some churros with chocolate source while my wife and I enjoyed a cheeky mulled wine. Once finished, we decided to head over to Covent Garden to see the famous tree and maybe try the mulled wine on sale over there…., you know, to compare ;-) which meant crossing the Thames and passing by this London cityscape view which I like so much. As we crossed the bridge, the cold, misty rain started to make its way up the river and I noticed how the rain was defusing the buildings in the distance, softening the cityscape somewhat and giving a sense of depth and atmosphere throughout the scene. I was sure there was a shot to be had here.
As I lifted my camera to the eye, the rain started to hit the bridge. I had to be quick as my camera wouldn’t fare well in the rain and as my family ran ahead to get cover, I dialled in the settings and snapped away. As I was taking a hand-held shot, I had to be mindful of the shutter speed so not to introduce any camera shake so without any close foreground to worry about, I opened up the aperture to f/6.4 to let a bit more light in which in turn allowed me to keep the shutter speed quick and the ISO nice and low.
You could be forgiven in thinking this was a black and white conversion as, apart from the hints of orange on the boats and London Eye, there is very little colour elsewhere but that was how the scene looked and this one isn’t about the epic light and high contrast. For me, it’s more about the mood and atmosphere I tried to capture in this recognisable view of London.
Without many recent trips into the “Big Smoke”, I’ve enjoyed exploring my local area, hunting down and photographing the mist or frost in the forests nearby. I plan, over the next few weeks to share a few of the photos I’ve taken over the winter so far and although there will be fewer London photos (I still have some to share) in this Weekly Photoblog over the next couple of months, I do plan to get back up-town with the camera as soon as I am able to do so. How are you liking this mix of natural and urban landscapes? I’d love to hear your thoughts in the comments.
Until next time.
Trevor
This post is featured in my Weekly Photo series where I post a new photo every Monday. To have this delivered directly to your inbox, you can subscribe to the mailing list here.

Photographing a Frozen Landscape
This post features some of my recent winter landscape photos and includes 9 useful tips to help you get the most from your winter landscapes.
Winter can be one of the best times for landscape photography. Those blankets of snow across the landscape, cold, misty brooks, and frost-covered wildlife, if the weather plays its part, it can be a landscape photographer’s dream. Over the past few weeks, here in the UK, we’ve had some bouts of frosty weather and I’ve spent some time exploring the area close to home to photograph some of these wintry scenes.
Photographing in these conditions is not for the faint-hearted, especially when the temperatures fall well below zero and to get the best light, it can mean dragging yourself out of bed and heading out in the cold, dark hours but with the right “give it a go” attitude, the results can be well worth it.
In this post, I will want to share some of the photos I’ve taken over the last few weeks as well as some useful tips to help you get the most of your own winter landscape photography.

The picture above is a multi-photo stitched panoramic image I took while up on the hills in East Sussex looking across the landscape just as the freezing mist was moving in and if you look closely you can see the frost starting to form on the elevated trees on the hill. Getting up high to capture some of the low-lying freezing mist rolling through can result in some great wide vista winter landscapes.
A Frozen Woodland
If you’re really lucky, you might come across a hoar frost which is where the moisture in the air freezes as it hits the cold surfaces and builds up layers of hair like frost and I was fortunate enough to be out during one of these frosts where I took the two photos below. The white tips of the branches make them stand out and the misty conditions help to add some nice depth and frosty atmosphere in these winter landscape scenes.
When wandering around in sub-zero temperatures, it pays to have plenty of spare batteries with you as the cold weather dramatically shortens the battery life, especially when using mirrorless systems (which I do!). Even better, if you are out for an extended amount of time, try to keep your spares on your person, warmed by your body heat to help them last as long as possible.


After a heavy snowfall, I ventured into the local woods to seek out some wintry scenes. When you are presented with a thick snow cover, it can all look a bit “samey” with very little interest, so the key here is to seek out contrast and try to use it in your composition. In these photos, I used the dark path and trees to add the needed contrast and add some visual weight into the compositions.


When photographing winter landscapes, using auto white balance can mean the camera tries to compensate for the cool tones and warm the photo up too much. When shooting in RAW, this can be corrected in post but so I can see the image correctly on the back of the camera, I will usually go into my camera settings and manually switch to a cooler white balance so I can see how it will look while in the field.

To take the wide photo of the Scots Pines above, I spent a few minutes rooted to the same spot. It’s a panoramic image made of 6 or 7 photos stitched together so it took some time to set the tripod up, level it and punch in the manual settings to keep all of the images consistent as I swept the camera from left to right. While standing there in the freezing cold, I was thankful for having wrapped up warm before heading out. It seems obvious to say but if the cold starts to take hold, it can ruin your photography trip. Patience will wear thin and changing settings on your camera can be a real challenge when you can’t feel your fingers.
Once finished in the field, and after arriving home from being out in such cold weather, I will leave my camera in the bag to let it warm up gradually to avoid any build-up of condensation on the cold surfaces of the camera, potentially damaging the internal electronics.
A Frozen Intimacy
As I talked about in this post here, the photos below were a bit of a happy accident. After heading out to photograph some frozen landscapes, I realised too late that I didn’t have my tripod with me, so, instead of giving up, I decided to change things up and take some handheld intimate landscape shots of the frosty plant life around me.
The key to getting these photos was using a longer lens and opening the aperture as wide as possible. Opening the aperture gave me a nice amount of bokeh which helped to simplify the background and ensure the subject stood out. It also allowed more light into the camera meaning the shutter speeds remained fast enough to take these photos handheld.
When taking photos in the frost or snow, the camera’s light meter may want to balance the exposure and under-expose the brightest parts but snow is bright white so I will normally bump my exposure to compensate and using my histogram, “expose to the right”. This will ensure the image is nice and bright but be careful not to push it too far as overdoing it can lead to blowing out your highlights.


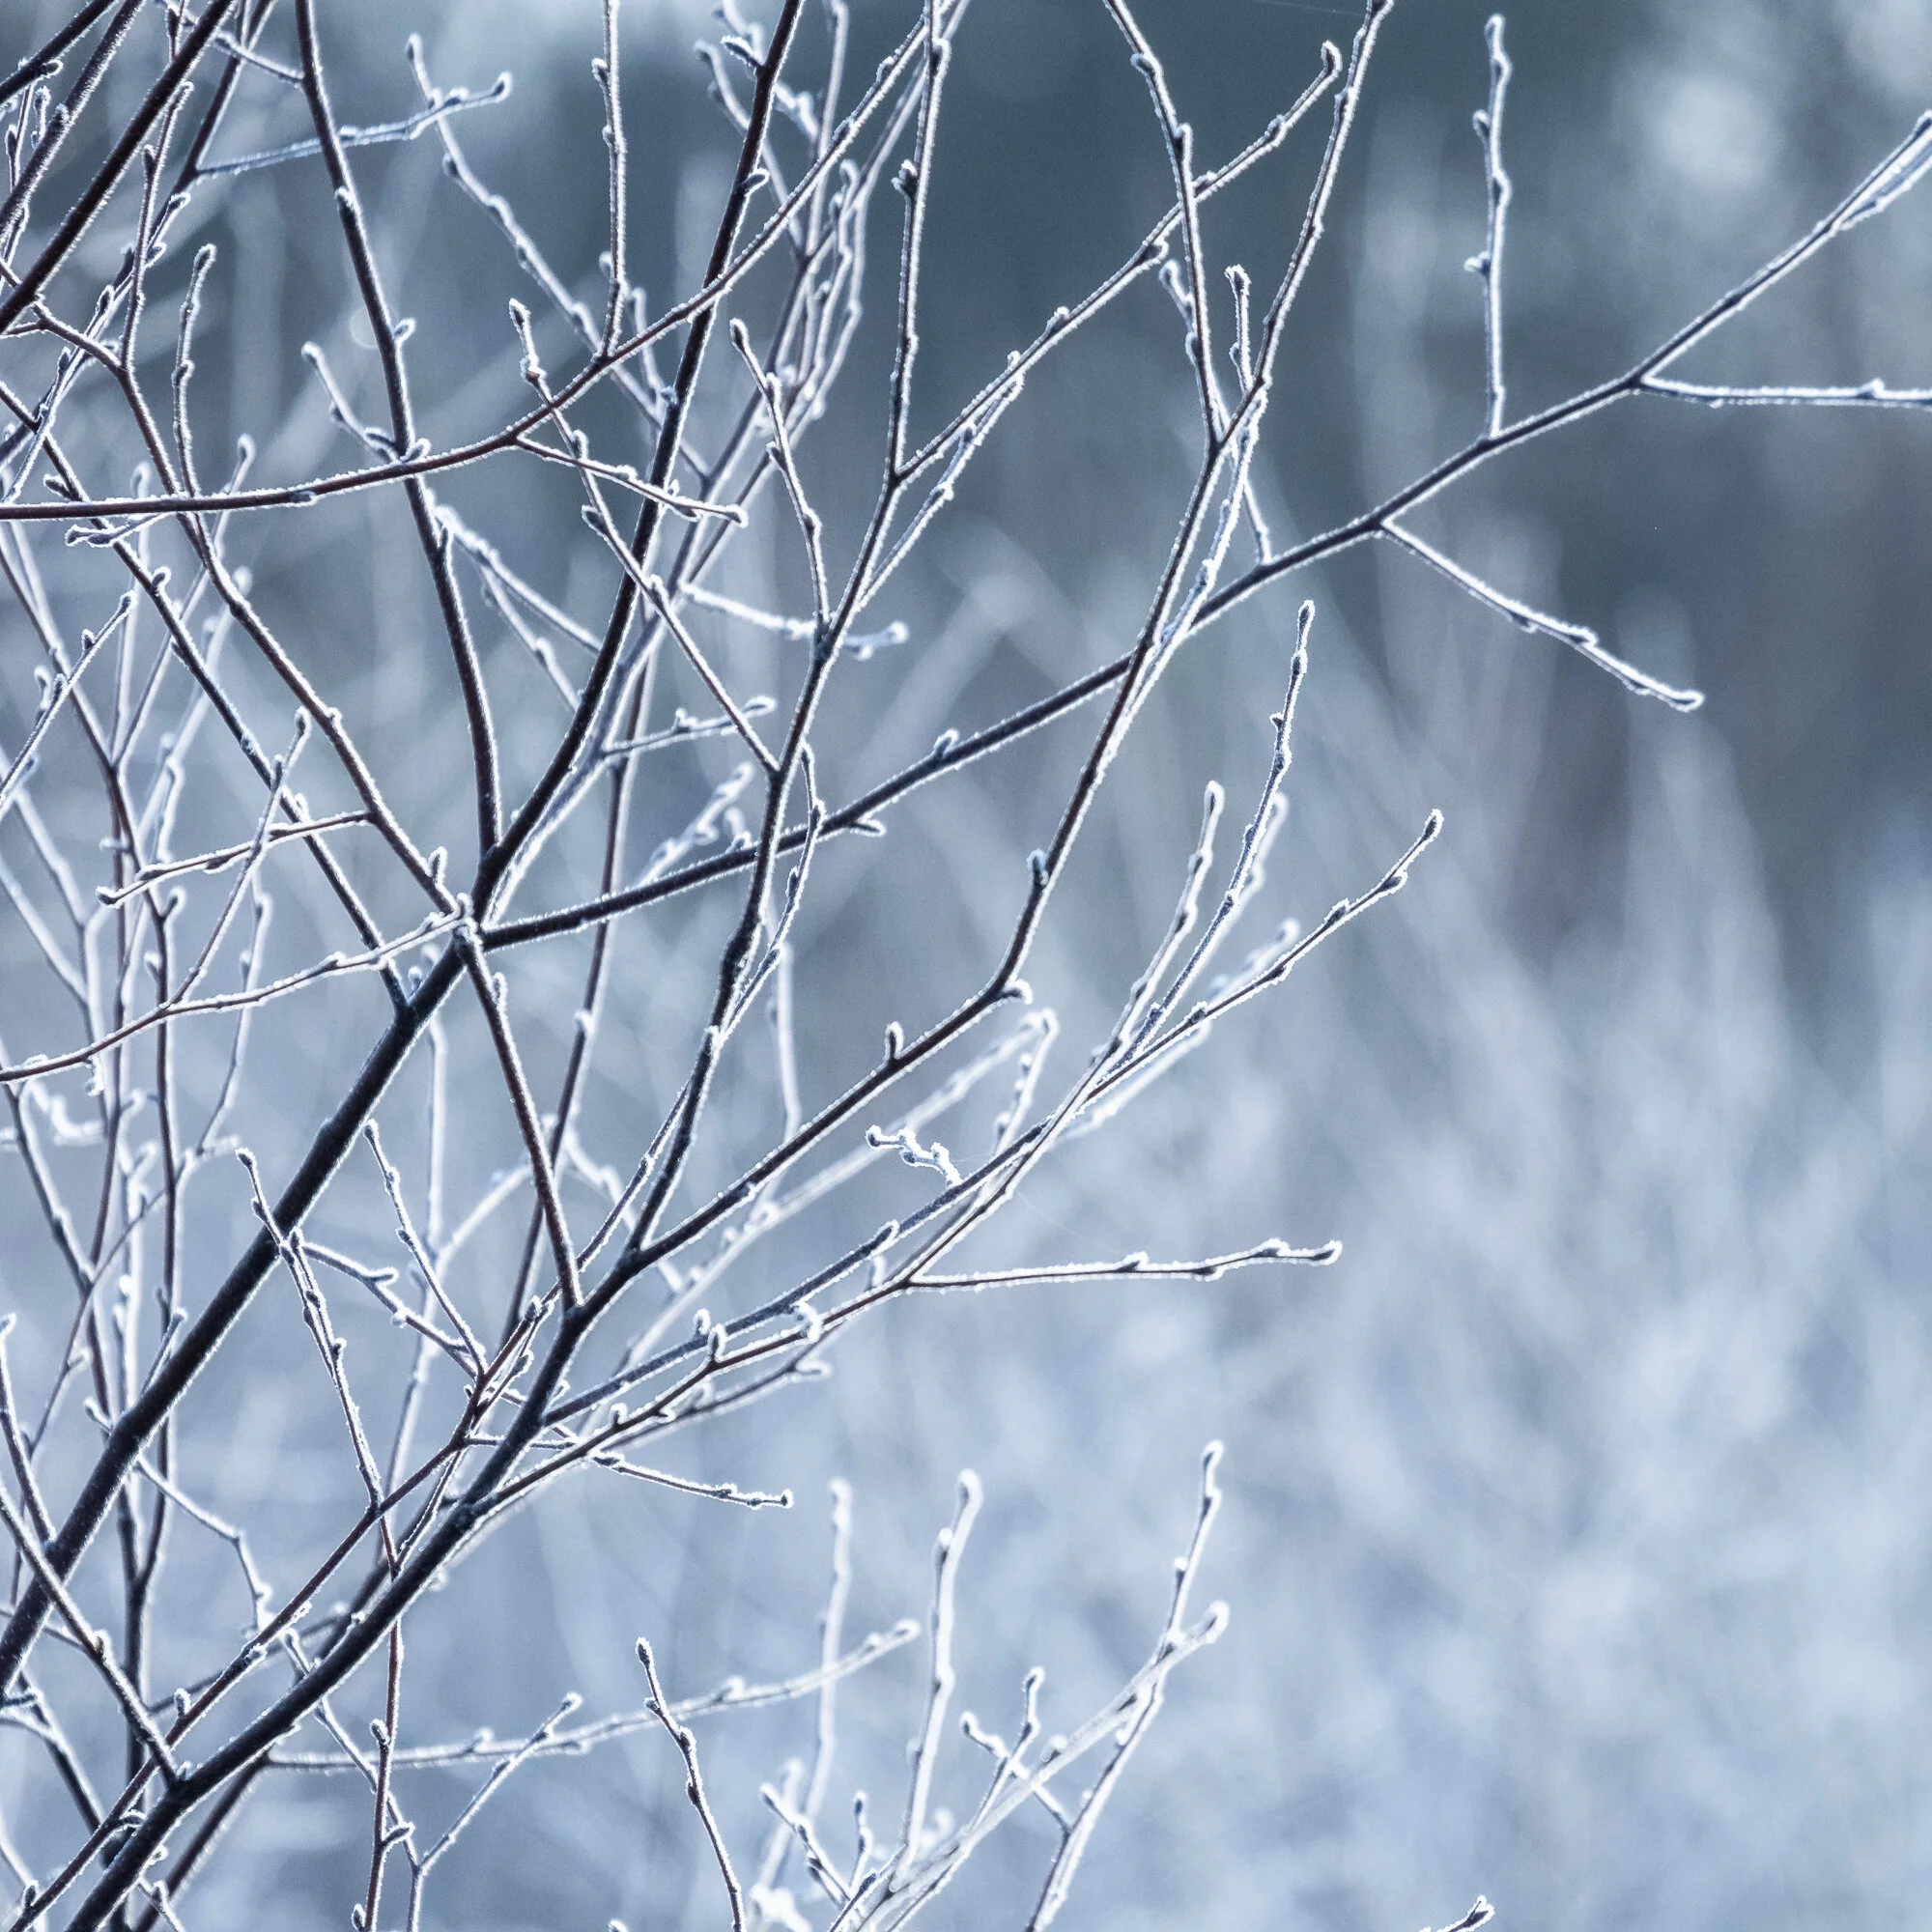


9 Tips for Photographing Winter Landscapes
Throughout this post, I’ve shared some tips for photographing winter landscapes and here’s a bit of a recap:
Make the effort and get up early to catch some of the best conditions.
Wrap up warm as standing there shivering or not being able to adjust the camera settings with frozen fingers will not make photographing wintry landscapes fun at all.
Take plenty of batteries with you. Even better, keep them warm so they last longer.
Look for contrast in the snow and use it to help your composition.
Get up high to photograph the low-lying mist.
User a cooler white balance to keep the snow a cool white.
Expose to the right to keep the photo nice and bright but don’t blow out those highlights.
Seek out the detail and capture the frozen intimate landscape
When you get home, leave the camera in the bag so it acclimatises slowly to avoid condensation forming on your equipment.
It’s worth noting that all of the photos here were taken while the UK was in a strict lockdown and although I’m incredibly thankful for having these woodland locations on my doorstep, I feel I have missed out somewhat in being able to travel further afield to capture some of the wide, impressive vistas we have on offer in the south of England, but this is a situation outside of all of our control and essentially “it is what it is”, and no photo is more important than the collective efforts needed to get us all free of these restrictions for good, so I did my part and stayed local and made the most of it and still came away with a healthy crop of winter landscape photos.
Maybe next year, I will create another one of these posts and be able to share a broader range of photos with you.
Until next time.
Trevor